The main way of playing back animations or simulations is by dragging the playback cursor on the timeline or by using the playback controls below the timeline. You can also set the time range for playing back, play back in real time, and optimize the playback in different ways.
Before you start playing back, you should set up the time range, the time display format, and the timeline's start and end frames.

On the top, the timeline determines which frames are played back.
On the bottom, the time range determines the global range of available frames, as well as which ones are displayed in the timeline.
The time range lets you do two things:
View and play back a smaller range of these frames in the timeline. For example, if you are working with an animation sequence that is very long, it's useful to be able to focus on a smaller range of frames for specific tasks.

Enter values in the Start and End frame boxes at either end of the time range.
Set frames for the Global In/Out parameters in the Play Control property editor (choose Playback  Playback Options in the playback panel).
Set the default preference for the Global In/Out parameters in the Animation Preferences property editor (choose File Preferences from the main menu).
Changing the values of the time range slider determines which frames are displayed in the timeline.
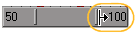
Drag the range slider's left or right handles (vertical bars) to adjust the length of the frame range (compress or extend the range) displayed in the timeline. Doing this updates the timeline's start and end frames.
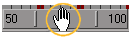
Drag in the middle of the range slider to shift the range of frames displayed in the timeline without changing the range's length. Doing this updates the timeline's start and end frames.
Before you play back an animation, you should set the appropriate start and end frames for the scene. These define the range of frames that you can play in the scene.

| A |
Start frame of the scene's playback (Frame In value). |
| B |
End frame of the scene's playback (Frame Out value). |
Set the frame numbers in the Start and End Frame boxes at either end of the timeline.
Set the Frame In and Frame Out values in the Play Control property editor (choose Playback Playback Options in the playback panel).
These values must be within the range of frames specified for the Global In/Out values (time range) in the same property editor.
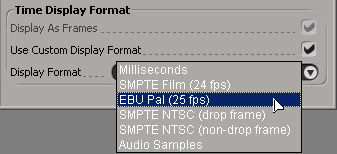
By default, the timeline is set to display frames but you can change this to display other options. When you change these settings, they also affect the timelines found in the animation editor (fcurve editor and the dopesheet) and the animation mixer.
The timeline is used to display the current playback position of the animation and to manually move between different frames.
The current frame (or time position depending on the format) is indicated by the position of the playback cursor in the timeline, the frame number beside the playback cursor, and in the current frame box in the Playback panel.

The red playback cursor indicates which frame is currently displayed in the viewports. The frame number is displayed beside the cursor as well as in the current frame box beside the playback controls.
Left-clicking anywhere in the timeline changes to the frame. You can also scrub (drag) the playback cursor back and forth (see Scrubbing the Animation for different scrubbing options) in the timeline.
Middle-clicking+dragging the playback cursor moves to the selected frames but does not update the scene. The cursor and frame number beside it (and in the current frame box) turn green. To refresh the scene, click the cursor.
By middle-clicking+dragging a frame to another frame, you can copy the current values at this frame to any number of other frames and then set keys. For more information on this, see Keying the Current Values at a Different Frame.
Right-clicking in the timeline opens the context menu used for editing keys in the timeline. For more information, see Editing Keys in the Timeline.
Click the eye icon in a viewport and choose Visibility Options.
On the Stats page, select Show Current Time.
This uses the settings defined in the Output Format Preferences property editor.
The controls in the Playback panel below the timeline allow you to view and play animations, simulations, and audio in a variety of ways. See the following table for a description of each button:

|
Playback menu displays a menu of playback options for doing such things as setting playback preferences, selecting the playback viewport, opening the Playback Options property editor, setting the real-time playback percentage, selecting a playback update mode, and opening the flipbook. |

|
Increment Backward moves the currently displayed frame backward by predefined increments (default is 1). You can also: |
|
|
Increment Forward moves the currently displayed frame forward by predefined increments (default is 1). You can also: |

|
Start/First Frame displays (resets) the first frame at the beginning of the timeline. You can also: |

|
Play Backward plays/stops the animation or simulation in the backward direction (to the left on timeline). Note that you can only play simulations backwards if you have cached them. |

|
Stop stops the animation or simulation playback. You can do any of the following to stop the playback: |

|
Play Forward plays/stops the animation or simulation in the forward direction (to the right on timeline). |

|
End/Last Frame displays the last frame at the end of the timeline. You can also: |

|
Loop repeats the animation or simulation in a continuous loop. You can also choose Playback See Looping the Playback for more information. |

|
Audio toggles sound on/off during playback. It is on by default. When the audio is off (muted), the icon appears highlighted. See Audio and Animation [Nonlinear Animation in the Animation Mixer] for more information. |

|
Current frame box displays the current frame. You can also enter a number here to go to that frame. |

|
All/RT toggles between playing back frame by frame (All) or in real time (RT). See Playing Back All Frames or Playing in Real Time for more information. |
With looping, you can play back the animation in a continuous loop. This can be handy when you want to test out a small area of the animation but don't want to play back all of it.
There are different ways in which you can loop the animation, depending on how you're working: you can set up loop markers in the timeline to delimit a range of frames or you can use the Quick Loop mode.
Drag the yellow loop markers at either end of the timeline to set the loop range, or Ctrl+click in the timeline at the frames where you want them.
Set the Loop In and Loop Out values in the Play Control property editor.
By default, the loop in and out frames match the scene's start and end frames. If the loop range matches the scene's range and you change the scene's start or end frame, the loop range automatically updates to match the scene's new frame range.
In the Interaction Preferences property editor, click the Playback and Audio tab and select Enable Quick Loop Mode.
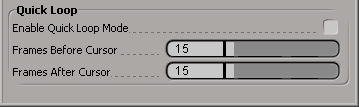
Set the number of Frames Before/After Cursor. This determines where and for how long you want the loop.
For example, you could set 1 for the Frames Before Cursor and 20 for the Frames After Cursor to loop the 20 frames of audio that occur after the position of the playback cursor in the timeline.
Move the playback cursor in the timeline to where you want to loop the animation and hold down the mouse button.
As long as you hold down the mouse button, the animation is looped back around the playback cursor according to the frames you have set for the Quick Loop mode.
When you release the mouse button, the looping stops. You can then click anywhere else in the timeline to continue to quickly loop other parts of the animation.
Scrubbing means to drag the playback cursor back and forth in timeline. This is something that you need to do frequently as you check the animation in a segment. There are different modes that you can set for scrubbing, as well as the scrubbing playback rate.
Open the Interaction preferences property editor (see above) and click the Playback and Audio tab.
Set the options in the Scrubbing area of the tab. See Scrubbing [Properties Reference] for more information on these, which include audio options.
Drag the playback cursor in the timeline to scrub the animation using these settings.
 Except where otherwise noted, this work is licensed under a Creative Commons Attribution-NonCommercial-ShareAlike 3.0 Unported License