The viewing area of the interface contains four windows, called viewports, where you can view and work on your scene. Each viewport can display different types of views. You can display up to four different views in the viewports.
Viewports can have different geometry views (Top, Front, Right, and User) and display types (Shade, Wireframe, Texture, Hidden Line, etc.). They can also display other tools such as the animation editor, browser, and the explorer.
A viewport's menu bar contains a set of controls that allow you to perform various functions such as changing views and display types, setting scene visibility, and resizing the viewport.
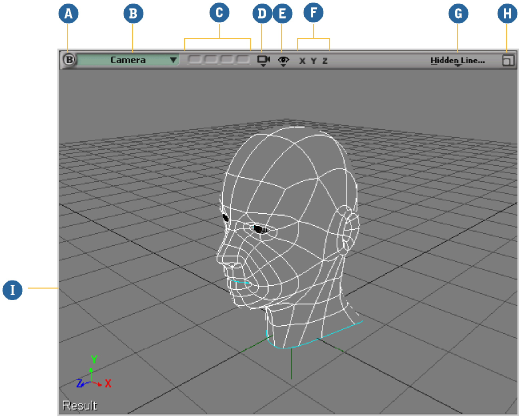
| A |
Viewport letter identifier: Click to solo the viewport or middle-click to mute it. See Muting and Soloing Viewports. |
| B |
Views menu: Choose which view to display in the viewport. |
| C |
Memo cams: Store up to 4 views for quick recall. Left click to recall, middle-click to save, Ctrl+middle-click to overwrite, and right-click to clear. There are similar memo cams in other views, including the object view, schematic, and so on. |
| D |
Camera icon menu: Navigate and frame elements in the scene. |
| E |
Eye icon menu (Show menu): Specify which object types, components, and attributes are visible in the viewports. Hold down the Shift key to keep the menu open while you choose multiple options. |
| F |
XYZ buttons: Click on X to view the right side, Y to view the top side, and Z to show the front side. Middle-click to view the left, back, and bottom sides respectively. These commands change the viewpoint but you can still orbit afterwards unlike in the Top, Front, and Right views selected from the Views menu. Click again to return to the previous viewpoint. |
| G |
Display Mode menu: Specifies how scene elements are displayed: wireframe, shaded, and other options. |
| H |
Resize icon: Resizes viewports to full-screen, horizontal, or vertical layouts. |
| I |
Gray border: Indicates that this is the active viewport. See The Active Viewport [Windows and Views]. |

When a viewport is muted, it is prevented from displaying its contents. Muting a viewport's neighbors helps speed up its refresh rate.
The letter identifier in the upper-left corner of the title bar allows you to mute and solo viewports. Muting a viewport's neighbors helps speed up its refresh rate.
Middle-click the letter to mute the viewport. A muted viewport does not update until you un-mute it. The letter of a muted viewport is displayed in orange. Middle-click the letter again to un-mute the viewport.

Click the letter to solo the viewport. Soloing a viewport mutes all the others. The letter of a soloed viewport is displayed in green. Middle-click the letter again to un-solo the viewport.

To control how viewports update when playing back animation, see Playing Back in Only One Viewport.
 Except where otherwise noted, this work is licensed under a Creative Commons Attribution-NonCommercial-ShareAlike 3.0 Unported License


