You can create surfaces from other surfaces and objects in your scene in several different ways:
Fitting a new surface to an existing one to resample the original or convert between cubic and linear.
Blending two surfaces to create a third surface that fills the gap between them.
In addition to the techniques described here, you can also:
Build surfaces from curves, as described in Generating Objects from Curves [Data Exchange].
Get primitive surfaces, as described in Getting Primitives [Data Exchange].
Import models and scenes with surfaces from other software, as described in Importing and Exporting [Data Exchange].
This section includes some basic information that is common to all or most of the operators described in the sections that follow.
Most of the operators that generate surfaces use a standard set of controls to determine the subdivisions (knot curves) of the result.
If Subdivision Type is Per Span, the basic subdivisions are based on the "natural" subdivisions as determined by the shapes of the inputs. You can subdivide each segment further using the U and V span sliders.
In this case, discontinuities resulting from multiknots in the inputs are preserved in the generated objects.
If Subdivision Type is Absolute, you can use the U and V abs sliders to set the exact number of subdivisions in the resulting object.
However, the result is automatically reparameterized and discontinuities are not preserved.
Whenever you generate a new object from other input objects, you can manage the inputs, for example, hide or delete them. See Managing Generator Inputs [Data Exchange].
You can create a new surface by fitting it to an existing surface. You can specify the degree and the subdivisions of the new surface. This lets you resample a surface or convert between cubic and linear. The parameterization of the new surface is uniform.
If you didn't pick a surface in step 1, you can pick one now. This creates a new surface and the Fit Surface property editor opens.
Set the options as desired. For more information, see Fit Surface Op Property Editor [Properties Reference].
Blending creates a new surface that fills the gap between boundaries on two other surfaces.
The created surface is always cubic in the blend direction. It can be linear or cubic in the other direction, depending on the degree of the boundaries; if both boundaries are linear, then the surface is linear in that direction, other wise it is cubic. If desired, you can use Fit to create a new surface with different degrees as described in Fitting Surfaces.
Choose Create  Surf. Mesh Blend from the Model toolbar.
If you didn't select the curves in step 1, you can pick them now. A blend is created and the Blend Surfaces property editor opens.
Use the options on the Subdivision page to specify the resolution in U and V.
Use the options on the Shape page to adjust the overall shape of the blend. For more information, see Blend Surfaces Property Editor [Properties Reference].
If it is not possible to create a surface with the selected options, a unit sphere is created at the global origin by default.
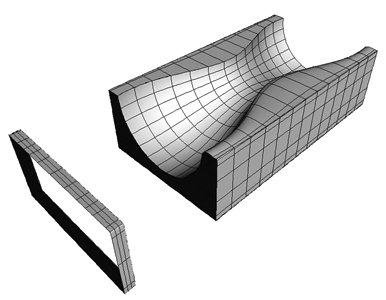
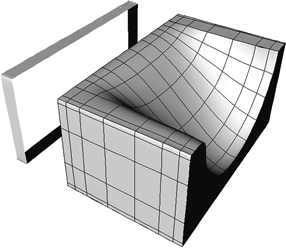
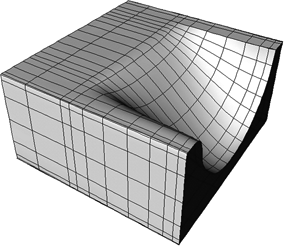
A fillet is a surface that smooths the intersection of two others, like a molding between a wall and a ceiling.
Choose Create Surf. Mesh Fillet Intersection from the Model toolbar.
If you didn't select two surfaces, you can pick them now. A fillet is created and the Fillet Intersecting Surfaces property editor opens.
Adjust the options as desired:
Specify the Radius and Radius Type of the fillet. The fillet can have a Constant radius or one that interpolates from a Start to an End value in a Linear or Cubic way.
If you set the radius value too high, it may be impossible to fit the fillet on the input surfaces; if this happens, the result is a unit sphere at the global origin.
The input surfaces, the resulting fillet, and a shaded view.
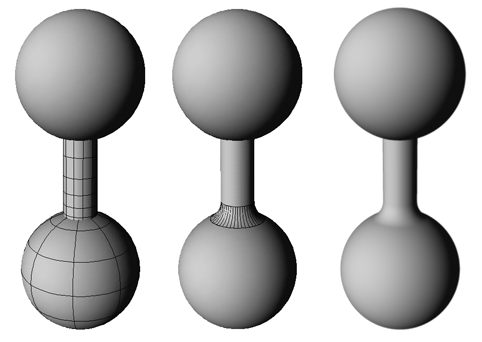
Merging two surfaces creates a third surface that spans the originals. You have the option of specifying an intermediary curve for the merged surface to pass through. For best results, first reparameterize the surfaces uniformly as described on Reparameterizing Surfaces.
The degree depends on the inputs. If both objects are linear in one direction, then the merged surface is also linear in that direction, otherwise it is cubic. If desired, you can use Fit to create a new surface with different degrees as described in Fitting Surfaces.
Select two surface boundaries then (optionally) add an intermediary curve to the selection.
Choose Create Surf. Mesh Merge from the Model toolbar.
If you did not select two surface boundaries and an intermediary curve, you can pick them now.
Right-click to terminate the picking session without choosing an intermediary curve.
A merged surface is created and the Merge Surfaces property editor opens.
Use the options on the Subdivision page to specify the number of knot curves in the result.
Use the options on the Shape page to adjust the overall shape of the blend. In particular, if you selected a curve to pass through, set Seam to Curve.
For more information, see Merge Surfaces Property Editor [Properties Reference].
 Except where otherwise noted, this work is licensed under a Creative Commons Attribution-NonCommercial-ShareAlike 3.0 Unported License