The material manager is designed for creating, managing, and editing all your materials and libraries.
The material manager is divided into several areas:

| A |
The left panel contains the explorer that has the Scene (cluster) and Image Clip tabs.
|
| B |
On the top, the command bar provides tools for applying materials, such as creating, duplicating, or deleting materials, as well as tools for managing material libraries. |
| C |
The middle right is a shelf with shaderballs for the materials in your scene. Multiple libraries appear on separate tabs. |
| D |
Click a shaderball to select the material, or drag a shaderball onto an object or cluster in the scene to apply it. See Using Shaderballs. |
| E |
The tabs on the bottom of the material manager can display one of several views:
|
The command bar provides tools for creating, applying, and managing materials, as well as material libraries.

| A |
Libraries menu contains commands for managing material libraries — see Managing Material Libraries. |
| B |
Create menu contains commands for creating new materials based on different illumination types — see Creating and Assigning Materials. |
| C |
Materials menu contains commands for creating and editing materials — see Creating and Assigning Materials. |
| D |
Sets the size of the shaderballs for the shaders displayed in the material shelf — see Material Manager Shelf. You can also set this in the Material Panel Preferences [Preference Reference]. |
| E |
Filters materials displayed by all, used, unused, and highlighted materials — see Filtering the Materials Displayed in the Material Manager. |
| F |
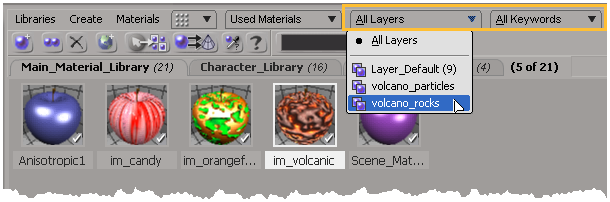
Filters materials displayed by scene layer — see Filtering the Materials Displayed in the Material Manager. |
| G |
Filters materials displayed by user keywords — see Filtering the Materials Displayed in the Material Manager. |

|
Creates a new material — see Creating and Assigning New Materials to Objects. |

|
Duplicates the selected material — see Duplicating Materials. |

|
Deletes the selected material — see Deleting Materials. |

|
Opens the material preset manager — see Creating New Materials without Assigning Them and Assigning Existing Materials to Objects. |

|
Highlights the materials of selected objects. All materials that are used by those objects are highlighted in the material manager's shelf area. |

|
Assigns the highlighted materials to selected objects — see Creating and Assigning Materials. |

|
Picks the material from an object or cluster — see Picking Materials from an Element. |
| O |
Filters materials displayed by the name that you enter in the text box — see Filtering the Materials Displayed in the Material Manager. |
The shelf displays shaderballs for the materials (shaders) in your scene.
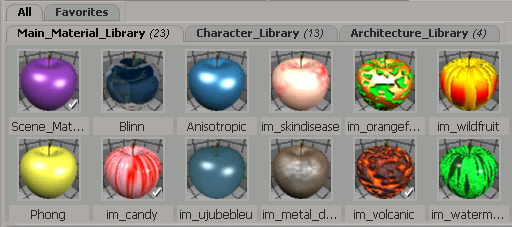
Multiple libraries appear on separate tabs. Click on the tab to display that library.
The All tab displays all available material libraries, while the Favorites displays the shortcuts to materials that you want to keep handy. You can also create your own "favorites" tabs — see Creating Custom Favorites Tabs for information.
Click a shaderball to select that material. Use Ctrl to toggle-select and Shift for ranges.
Drag a shaderball onto an object or cluster in the scene to apply it.
One checkmark means that a material is used by a single object or cluster; Two checkmarks mean that it is used by multiple objects and clusters; No checkmark means that it is not used.
For more information on using the elements in the shelf, see Creating and Assigning Materials and Managing Material Libraries.
Shaderball display options can be set in the Material Panel Preferences [Preference Reference].
You can set the size of the shaderballs used in the shelf.
You can also optimize the performance of displaying the rendered shaderball image on the shelf by selecting the Turn Off Rendering of Shaderballs option. Shaderballs are then shown as either just a color square of the material or the last rendered shaderball version.
If you are working with the render tree and it has shaderballs turned on, the material's shaderball in the render tree is updated as usual, but the shaderball in the material manager shelf doesn't update until you click on it. This lets you turn off the shaderballs for all shaders except the ones that you are working with in the render tree.
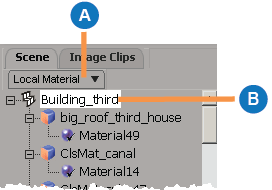
The scene (cluster) and image clip explorer is on the left side of the material manager.
Scene tab displays the objects selected in the scene, together with their clusters and materials.
Image Clips tab displays a list of all image clips in the scene.
If you don't use this pane, you can hide it by clicking the triangle on the splitter bar.
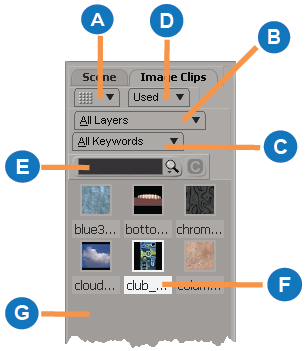
| A |
Select the thumbnail size for the clips displayed in this list: small, medium, large, or list view. To optimize the performance of the displaying thumbnails for the clips, you can select the Turn Off Image Clips Thumbnails option in the Material Panel Preferences [Preference Reference]. You can also save the thumbnail images in a subfolder along with image proxies by selecting the Save Image Clip Thumbnails in a Sub-Folder option in the Material Panel Preferences [Preference Reference]. |
| B |
Filters clips displayed by scene layer. |
| C |
Filter clips by user keywords. |
| D |
Filters clips by All, Used, and Unused clips. |
| E |
Filters clips by name. |
| F |
Right-click a clip to display a context menu. |
| G |
Drag and drop one or more image into the image clip explorer to create sources and clips. |
You can filter your image clips by using the Layer and Keywords filters on the image clips explorer. This helps you to organize and find certain clips in large scenes based on scene layers and keywords.
Keywords are simply tags that you give to objects, materials, and image clips to classify them in your own way. You can easily add and change keywords to image clips in the by right-clicking on of their thumbnails and choosing Set User Keyword from the menu that appears. For information on keywords, see User Keywords [Scene Elements].
If you use the Layers and Keywords filters in combination with the Used and Unused filters, you can significantly narrow down the selection of image clips.
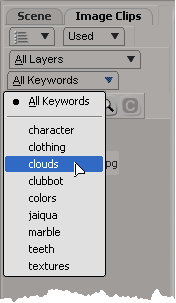
You can also use these controls to filter the clips displayed on the Image Clips tab.

Click the Highlight Materials From Selected Objects icon in the material manager's command bar, or choose Materials  Get Material From Selected Objects.
All materials that use the clip are highlighted in the material manager's shelf area.
If desired, set the material manager's display filter to Highlighted Materials to display only those materials.
You can filter your materials by using the Layer and Keywords filters on the command bar. This helps you to organize and find certain materials in large scenes based on scene layers and keywords.
Keywords are simply tags that you give to objects, materials, and image clips to classify them in your own way. You can easily add and change keywords to materials in the by right-clicking on their thumbnails and choosing Set User Keyword from the menu that appears. For information on keywords, see User Keywords [Scene Elements].
You can select multiple keywords from the Keywords list by using the Shift or Ctrl keys.
You can then use the Match Keywords options in the Material Panel Preferences [Preference Reference] to filter the materials based on the keywords you select in the Keywords list:
With Match Any Keywords (OR), any materials that match the selected keywords are displayed in the shelf. For example, if you select "blue" and "striped" in the keyword list, any materials that have either (any) of these keywords are displayed.
With Match All Keywords (AND), only the materials that match all the selected keywords are displayed in the shelf. For example, if you select "blue" and "striped" in the keyword list, only materials that have both (all) of these keywords are displayed.
If you use the Layers and Keywords filters in combination with the Used and Unused filters, you can significantly narrow down the selection of materials.
You can also use these controls in the command bar to filter the material shaders displayed in the material manager.
 Except where otherwise noted, this work is licensed under a Creative Commons Attribution-NonCommercial-ShareAlike 3.0 Unported License


