Polygonizer allows you to create a mesh around the points of a cloud and other objects in your scene. The effect is similar to metaballs and blobs. This is especially useful for water and other liquids, such as the result of a Lagoa simulation.
The mesh is based on a 3-dimensional density field. You specify a density level, and a mesh is generated corresponding to the isosurface for that level — the volume inside the mesh has a higher density than the specified level and the volume outside has a lower density.
The density field can be defined and controlled by any combination of:
Curves. You can optionally control certain parameters along the length of the curve.
Polygon meshes. You can optionally control certain parameters with weight maps.
Because the Polygonizer operator regenerates the mesh every frame, you should not use UV coordinates, clusters, anything that relies on component indices, anything that relies on persistent locators, and so on.
Polygonizer is a version of emPolygonizer written by Eric Mootz.
Select the objects to use as inputs. You can select point clouds, curves, polygon meshes, and nulls.
Choose Create  Poly. Mesh Polygonizer from the Model toolbar. This command is also available as Particles Create Surface from Point Cloud on the ICE toolbar.
Adjust settings in the Polygonizer Property Editor.
In addition, you can adjust the settings for each input individually in its Polygonizer custom property. See:
Polygonizer_Curve Property Editor. This is where you can control the Size and Influence parameters along the length of the curve.
Polygonizer_Polymesh Property Editor. This is where you can control the Size and Influence parameters with weight maps.
The main parameters that control the size and shape of the mesh are:
Isolevel in the main Polygonizer property editor. This is the density level at which to build the mesh.
Detail in the main Polygonizer property editor. If this value too small then the mesh will miss detail and will not follow the isosurface well. However, values that are too high can produce very dense meshes.
The Size and Influence settings in the inputs' Polygonizer custom properties, as well as LOD if Use is set to an option that includes it. Note that you can use a negative Isofactor value to make an input remove volume from the resulting mesh.
The particles's Size attribute when using point clouds as inputs. This is because Multiply Radius by Point Size (if available) and Multiply Falloff by Point Size (if available) are on by default in the clouds' Polygonizer custom properties. Note that if the size of particles is very small, you may need to increase it or turn off those options.
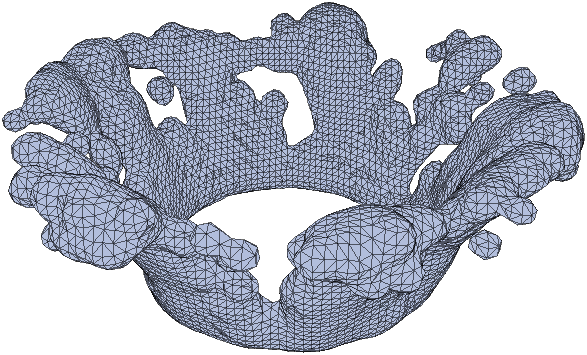
By default, polygonized points clouds can look rather blobby. You can improve the look to something closer to that of a flowing liquid using the Lagoa Fluid Shaper.
Note that this compound is a deformation that can be used on polygonized meshes from any point cloud, not just Lagoa simulations.
Choose Particles Create Lagoa Fluid Shaper from the ICE toolbar. This command is also available from the Deform Create menu.
An ICE tree is created and the Lagoa Fluid Shaper compound is applied.
If you want to move mesh geometry outside of other geometry, such as outside of the collision objects for a fluid simulation, connect the collision object or group to the Geometry port and activate Remove Intersections.
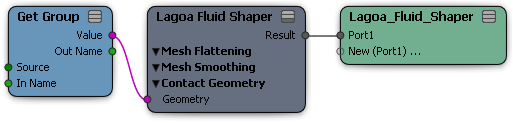
Set the other options as desired for flattening and smoothing the mesh — see Lagoa Fluid Shaper [ICE Reference].
Note that if you are using the smoothing options in Lagoa Fluid Shaper, you might want to turn off the smoothing options in the Polygonizer property editor to avoid over-smoothing.
After you have applied Lagoa Fluid Shaper, you should apply Subframe Deformation to recalculate the correct point velocities for motion blur. See Recalculating Motion Blur After Polygonized Meshes Have Been Deformed.
The Polygonizer operator can calculate motion vectors that are used for rendering motion blur. The motion vectors are based on the point velocities of nearby particles in the input point clouds.
To calculate motion vectors, activate Calculate 3D Motion Vectors on the Advanced tab of the Polygonizer property editor. You can adjust the amount of motion blur using the Scale parameter.
For best results with motion blur, especially with long shutter speeds, you should cache the point cloud being used to generate the polygonized mesh (see Caching Animated Deformations and Simulations [Data Exchange]). You should also use the options on the Cache tab of the Polygonizer property editor to write cache files for the mesh and then read them.
To easily adjust the amount of blur without re-simulating or re-evaluating the Polygonizer operator, write cache files using a Scale of 1.0. After that, set the cache options to read from files, activate Scale When Reading Cache Files, and adjust Scale.
If you deform a polygonized mesh, for example by using Lagoa Fluid Shaper, then the motion vectors calculated by the Polygonizer operator may no longer be correct. You can fix them using Subframe Deformation.
In the Polygonizer property editor, turn off Calculate 3D Motion Vectors on the Advanced tab. This avoids unnecessary recalculations.
With the polygonized mesh selected, choose Deform Create Subframe Deformation from the ICE toolbar, and then pick the point cloud that was used to generate the mesh.
An ICE tree is created and the Subframe Deformation From Cloud compound is applied.
You can use the Lagoa Cached Post Sim Effects compound to create effects like bubbles and debris in polygonized fluid simulations. For more information, see Applying Cached Post Sim Effects [Lagoa Multiphysics Simulations].
 Except where otherwise noted, this work is licensed under a Creative Commons Attribution-NonCommercial-ShareAlike 3.0 Unported License


