Instead of relying on the automatically generated normals, you can specify custom normals to use for shading. These custom normals are called user normals, or explicit normals in some other programs including 3ds Max. User normals allow you to create things like a box with rounded corners using a minimum number of polygons.
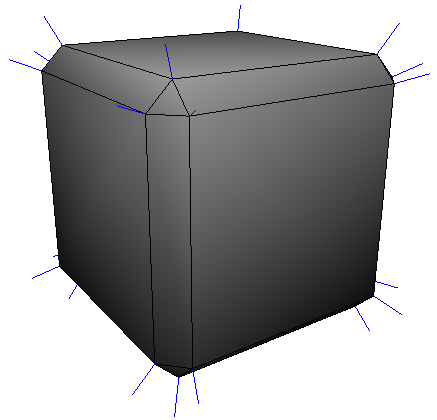
On a cube with beveled edges, the interpolation of the automatic normals creates a gradation in the shading across the large, flat sides.

To create the illusion of a box with rounded corners, you can set user normals so that their interpolation produces the correct shading.
You can edit user normals interactively with the Tweak User Normals tool as described in Tweaking Normals Interactively. Alternatively, you can set them to specific values using commands on the Modify  Component Set User Normals submenu as described in Setting User Normals with Commands. The preferences that control how the tool and commands work are described in Tweak Normals Preferences [Preference Reference].
User normals are stored relative to object space. They do not update when the object is deformed. The exception is envelope deformations. In the case of envelopes, the user normals are deformed along with the geometry and then renormalized.
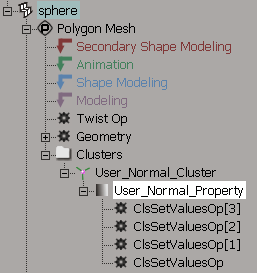
User normals are stored on the polynodes (also known as polygon nodes or texture sample points). There is one polynode for every corner of a polygon. At a vertex, there are as many polynodes as there are adjacent polygons.
A polygon mesh can have a mixture of auto and user normals. As soon as you edit a normal, the corresponding polynodes are automatically added to the User_Normal_Cluster. If a polynode has a user normal (that is, if it's in the User_Normal_Cluster), then its user normal will automatically be used for viewing and rendering instead of the auto normal. In particular, user normals take precedence over hard edges, automatic discontinuity, and other ways of controlling auto normals.
As you edit user normals, operators are added to the User_Normal_Property's construction stack. You can freeze this stack by selecting the property and clicking Freeze on the Edit panel of the MCP, or you can freeze from a particular operator down by selecting it and clicking Freeze. Note that freezing all or part of this stack also freezes any operators that are below it in the object's main construction stack, including the generator. Likewise, freezing the object's operator stack or its modeling region also freezes the User_Normal_Property's stack. For more information about freezing operator stacks, see Freezing the Operator Stack [Data Exchange].
Multiple sets of user normals on the same object are not supported. Although it is possible to duplicate the user normal cluster with its user normal property, only the first one can be edited.
The Tweak User Normals tool allows you to interactively rotate user normals at polynodes, vertices, edges, and polygons. It works in a similar manner to the Tweak Component tool (see Using the Tweak Component Tool [Data Exchange]). You can use it in two ways:
For a fast, uninterrupted interaction, simply click-and-drag.
For a more controlled interaction, select one or more components and then use the manipulator to rotate the corresponding normals.
When using the Tweak User Normals tool, the normals of polynodes that have user normals (that is, that are already in User_Normal_Cluster) are drawn with a solid line, and the normals of polynodes that still use auto normals are drawn with a dashed line.
The Tweak User Normals tool supports symmetry (Sym mode on the Transform panel). For more information about symmetry, see Manipulating Components Symmetrically.
Activate the Tweak User Normals tool by choosing Modify Component Tweak User Normals Tool from the Model toolbar.
Move the mouse pointer over the object in any geometry view. As the pointer moves, the component under the pointer is highlighted.
If you click on a polynode bisector (one of those little purple lines), only the normal at that polynode is affected. You can control the display of polynode bisectors in your Display preferences (see Display Preferences [Preference Reference]).
If you click on a vertex, the normals of all polynodes at that vertex are affected.
If you click on an edge, the normals of the four polynodes that share the edge are affected (two for each of the two polygons that share the edge). If Bleed Edge/Polygon Selection is on, then the normals of all polynodes at the two vertices that share the edge are affected.
If you click on a polygon, the normals of all of the polynodes owned by the polygon are affected. If Bleed Edge/Polygon Selection is on, then the normals of all polynodes at all vertices of the polygon are affected.
You can toggle Bleed Edge/Polygon Selection on or off in your preferences. See Tweak Normals Preferences [Preference Reference].
When there are multiple types of components within the picking radius, priority is given first to vertices, then to polynodes, then to edges, and finally to polygons.
Click and release the mouse button to select the highlighted component. A manipulator appears (unless you've toggled it off). You can use the manipulator to rotate the selected normals, or if you prefer you can first modify the selection, change the pivot, and set other options.
The Tweak User Normals tool uses the Ctrl, Shift, and Alt modifier keys with the left and middle mouse buttons to perform different functions — look at the mouse/status line at the bottom of the Softimage window for brief descriptions, or read the rest of this section for the full details. The right mouse button opens a context menu.
The Tweak User Normals tool remains active, so you can repeat steps 3 and 4 to manipulate other components.
When you have finished, deactivate the tool by pressing Esc or activating a different tool.
If you are using the manipulator, you can use the manipulation modes on the Transform panel (Global, Local, View, Object, Ref, and Plane) to control the location and orientation of the manipulator. For a description of these modes, see Component Manipulation Modes [Data Exchange].
If you are not using the manipulator, the normals are rotated in View mode.
If you are using the manipulator, you can activate or deactivate axes on the Transform panel — see Specifying Axes [Data Exchange].
Alternatively, you can activate a single axis by double-clicking it on the manipulator. Double-click on the same axis again to re-activate all axes, or on a different one to activate it instead.
The Tweak User Normals tool lets you select components in a similar way to the standard selection tools, but there are some differences.
Note that selection with the Tweak User Normals tool is not affected by the SI|3D Selection Model or Extended Component Selection settings.
Use the following keyboard and mouse combinations for selection:
To quickly deselect all components, click outside the object. By default, you need to click 20 pixels away from the object, but you can control this with Boundary Pick Size in your Tools > Tweak Normals preferences (see Tweak Normals Preferences [Preference Reference]).
Note that you can only multi-select components of the same type. You cannot select a heterogeneous collection of polynodes, points, edges, and polygons.
Use the Alt key to select loops or ranges of components. You can select loops and ranges of points, edges, and polygons. This procedure does not work with polynodes.
To select additional loop or ranges, use Shift+click to specify a new anchor and then Alt+Shift+click for a new range or Alt+Shift+middle-click for a new loop.
Note that for edge loops, the direction is implied so you can simply Alt+middle-click on an edge to select the loop and then Alt+Shift+middle-click to select additional loops. However, to select parallel edge loops, you still need to specify two components as described above.
The Tweak User Normals tool allows you to manipulate the normals at polynodes, points, edges, and polygons, but you can limit it to a particular type of component if you desire. Use the context menu to activate Tweak All, Samples (polynodes), Points, Edges, Polygons, or Points + Samples.
The Tweak User Normals tool uses a preference for determining how far away a component can be to be considered "under" the mouse pointer. You can change the size in pixels by adjusting Pick Size in your Tools > Tweak Normals preferences. See Tweak Normals Preferences [Preference Reference].
You can quickly set the pivot by middle-clicking on a component. For example, to rotate a polygon's normals about one of its edges, simply click to select the polygon and then middle-click to specify the edge as the reference. The manipulator does not react to middle-clicks, so you can pick a component even if the manipulator is covering it in a view.
Middle-clicking temporarily switches to Ref manipulation mode. As soon as you select a new component, the previous manipulation mode is restored. If you want to keep the same pivot for multiple tweaks, you should manually switch to Ref mode and then middle-click to specify the reference. In this way, the reference frame does not revert to the previous mode when you select a new component to manipulate.
If you don't like working with the manipulator, you can hide or unhide it by clicking the on-screen button at the bottom of the view or by choosing Toggle Manipulator from the context menu.

When the manipulator is off, the Tweak Component tool is always in click-and-drag mode. This means that you cannot select multiple components and tweak all their normals simultaneously. In addition, manipulation is always in View mode.
You can also assign a hotkey to Toggle Manipulator in the Tweak Normals Tool group (see Keyboard Shortcuts [Customizing Softimage]). It acts like a supra key — press and release quickly to turn the manipulator on or off, or press and hold to temporarily toggle the current state.
You can affect the normals at selected components by selecting them and applying "one-shot" commands. These commands can be used to set user normals to various values, or to control which components have user or auto normals. You can also copy a normal and paste it onto other components.
The general procedure is the same for all commands:
Select a polygon mesh object or some of its components. You can select samples (polynodes), vertices, edges, or polygons.
Selecting a vertex is equivalent to selecting all polynodes at that vertex.
Selecting an edge is equivalent to selecting the four polynodes that share the edge (two for each of the two polygons that share the edge). If Bleed Edge/Polygon Selection is on, then it is equivalent to selecting all polynodes at the two vertices that share the edge.
Selecting a polygon is equivalent to selecting the polynodes at all of its corners. If Bleed Edge/Polygon Selection is on, then it is equivalent to selecting all polynodes at all vertices of the polygon.
Selecting an object is equivalent to selecting every polynode on the object.
You can toggle Bleed Edge/Polygon Selection on or off in your preferences. See Tweak Normals Preferences [Preference Reference].
Select a command from the Modify Component Set User Normals submenu on the Model toolbar.
These commands are also available from the context menu when using the Tweak User Normals tool.
The sections below describe the effect of each of these commands.
The Modify Component Set User Normals Average command sets the normal of each polynode in the selection to the average of the current normals of the selected polynodes
at the same vertex.
This can be useful for smoothing the shading across a selected edge or selected adjacent polygons.
This command uses the Average Distance Threshold to determine which components to use when calculating the average. Setting this parameter to a value above 0.0 allows you to smooth across disconnected edges. See Tweak Normals Preferences [Preference Reference].
This command has no visible effect on a single selected polygon unless Bleed Edge/Polygon Selection is on.
The Modify Component Set User Normals Vertex command sets the normal of each polynode in the selection to the normal at its corresponding vertex. This would be the same
as the automatic normal for shading if automatic discontinuity was turned off and there are no hard edges defined.
The Modify Component Set User Normals Polygon command sets the normal of each polynode in the selection to the geometric normal of the polygon that owns it. This is useful
for creating a faceted appearance.
If Bleed Edge/Polygon Selection is on, all polynodes at the vertices of a selected polygon are set to its geometric normal. When there are multiple adjacent polygons selected, the normal is set to the average geometric normal of the selected polygons that share the vertex. This makes it easy to create flat or smooth areas with rounded corners between them.
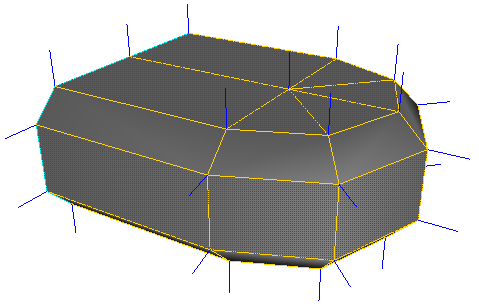
Result of setting normals to Polygon with Bleed Edge/Polygon Selection on.
The Modify Component Set User Normals Invert command inverts the normal of each polynode in the selection.
Note that the Modify Poly. Mesh Invert Polygons command has no effect on user normals.
The Modify Component Set User Normals Normalize command sets the length of the normals at the selected polynodes to 1.0 without changing their directions. Normals are always
1.0 unit in length by convention but may become shorter or longer if you use the Set Value command with the Normalize checkbox
turned off.
The Modify Component Set User Normals Set Value command allows you to set the normals of the selected polynodes numerically. Enter values in the XYZ boxes, or use the preset
buttons (X, Y, Z, -X, -Y, -Z) for unit vectors along the axes.
The Modify Component Set User Normals Copy command copies the normal of the selected polynode so that you can select other polynodes and paste it onto them. You can
copy only one normal at a time. As an alternative to choosing this command from a menu, you can press Ctrl+C while the Tweak
User Normals tool is active.
The Modify Component Set User Normals Paste command pastes the previously copied normal onto all selected polynodes. As an alternative to choosing this command from
a menu, you can press Ctrl+V while the Tweak User Normals tool is active.
The Modify Component Set User Normals Reset command sets the normal of each polynode in the selection to the automatic shading normal, including the effects of automatic
discontinuity and hard edges. Note that the result is still a user normal, although it has the same value as the auto normal.
The Modify Component Set User Normals User command adds all selected polynodes to the User_Normal_Cluster, if they are not already members. The user normals of new
members of the cluster are set to their current automatic shading normals, including the effects of automatic discontinuity
and hard edges. The user normals of existing members of the cluster are not changed.
 Except where otherwise noted, this work is licensed under a Creative Commons Attribution-NonCommercial-ShareAlike 3.0 Unported License


