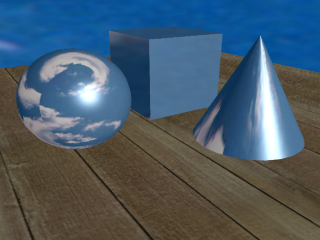
The Ambient Occlusion shader is also capable of reflective occlusion. When reflective occlusion is activated, the shader changes the sampling pattern in order to distribute samples around the direction of reflection, rather than the direction of the surface normal (or bent surface normal). This is most useful for adding detail to environment-only reflections created using environment maps.
You can create reflection occlusion for individual objects, but it is easiest to do it a the render pass level, as shown in the following example, where an environment map shader has been added to the current pass' shader stack:


The cube, sphere and grid are all reflective, but the reflection type is set to Environment Only, meaning that they reflect only the environment map (a sky texture) that has been applied to the current render pass. Since no raytraced reflections are done, the objects do not reflect the floor grid, or one another.


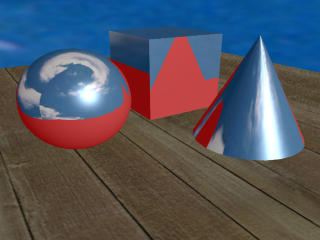
Here, the Ambient Occlusion shader is connected to the Pass Material's Environment Shader Stack port. The environment map itself is driving the Ambient Occlusion shader's bright color, so that the reflected environment appears where the objects are unoccluded. The dark color (red in this case) is filling in the occluded areas, which adds the outline of the occluding objects to the (still non-raytraced) reflections. Note that the Spread is set to 0, so the occlusion is very sharp. This adds detail, if not realism to the scene's reflections.

Note that the Reflective parameter must be turned on in the Ambient Occlusion shader's property editor. This ensures that occlusion takes place where reflections, rather than ambient occlusion, should appear.


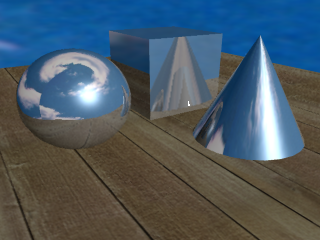
Finally, a Reflection shader is added, to drive the Ambient Occlusion shader's dark color. This allows raytraced reflections to be calculated for the occluded areas only, adding realism to the reflections.
For more information about environment maps, see Using Environment Map Shaders [Texturing]. For more information about pass-level shaders, see Applying Shaders to Partitions [Rendering].
Before you start: this procedure assumes that the scene contains reflective objects whose surface shaders (or other reflection shaders) have their Reflection Mode parameter should be set to Environment only
For more information about reflectivity, see Reflectivity. For more information about environment maps, see Using Environment Map Shaders [Texturing].
Open an explorer (press 8) and press P to set the scope to passes.
Select the pass in which you want to create the reflective occlusion effect and press 7 to open the render tree.
From the render tree's Nodes menu, get the following shaders:
Connect the Ambient Occlusion shader to the Material node's Environment Shader Stack port.
Connect the Environment node to the Ambient Occlusion shader's Bright Color port.
Edit the Environment node's properties to choose the image you wish to use as an environment map.
Edit the Ambient Occlusion node's properties and make sure to set the following:
Continue to tune the ambient occlusion parameters as needed. See Setting the Ambient Occlusion Shader Options for details.
Before you start: this procedure assumes that the object in question is reflective, meaning that it has a surface shader, or other reflection shader controlling its reflectivity. Furthermore, the surface shader's Reflection Mode parameter should be set to Environment only.
For more information about reflectivity, see Reflectivity. For more information about environment maps, see Using Environment Map Shaders [Texturing].
Select the object for which you want to create the reflective occlusion effect and press 7 to open the render tree.
From the render tree's Nodes menu, get the following shaders:
Connect the Ambient Occlusion shader to the Material node's Environment port.
Connect the Environment node to the Ambient Occlusion shader's Bright Color port.
Edit the Environment node's properties to choose the image you wish to use as an environment map.
Edit the Ambient Occlusion node's properties and make sure to set the following:
Continue to tune the ambient occlusion parameters as needed. See Setting the Ambient Occlusion Shader Options for details.
 Except where otherwise noted, this work is licensed under a Creative Commons Attribution-NonCommercial-ShareAlike 3.0 Unported License