


While a reflectivity map determines where an object is reflective, a reflection map determines what it reflects. Reflection maps are also called environment maps.
You can use a reflection map to replace raytraced reflections and speed up rendering. Alternatively, you can use reflection maps to enhance raytraced reflections, for example, by providing a background in addition to the reflected objects in the scene.
You can use an environment to completely encompass the whole scene, or you can apply it to a specific object.
You can define whether reflections are Raytracing Enabled or Environment Only from the surface shader's property editor.
Select the object whose reflective surface you want to modify.
Choose Modify  Shader and click the Transparency/Reflection tab.
For the Reflection options, set the Reflection Mode:
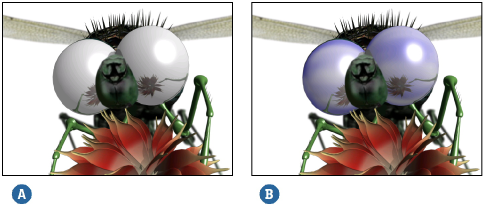
Raytracing Enabled reflections are slower to render on the object's surface because they are actually computed for everything around them. This includes the environment map which is combined with the raytraced reflections.
Environment Only reflections are much faster to render on the object's surface because they are simulated based on a specified texture which is defined in an environment shader. There are no inter-object reflections calculated when this mode is active, only the reflection map appears on the object's surface.
Environment shaders are used mainly to create an environment that completely encompasses a scene. To simulate this environment, an environment shader can be applied to a geometric object, or to a scene's render pass so that all reflective objects are affected by the global environment map.
The Render Tree Usage shader [Shader Reference] can also be used to light scenes using High Dynamic Range (HDR) images. See Using Environment Maps to Light a Scene [Image-Based Lighting].
The most common use for an environment shader is to create a background that is visible from any camera angle at any distance and reflected on the surfaces of objects in your scene. To do this you apply an environment shader to a render pass.
Select the pass for which you want to generate the background environment and open its Render Pass Property Editor [Properties Reference].
In the Environment stack window, click Add to select an environment shader from the shader library. See Environment [Shader Reference].
Click OK when you have chosen a shader — it appears in the shader stack list.
To give the shader a texture to use as an environment, select the shader from the stack window and click Inspect. This opens the shader's property editor. For more information on how to use a particular environment shader, click the ? icon in the shader's property editor.
Rather than create an environment that encompasses an entire scene, you can work on a smaller scale and create a specific environment for a single object. The object is usually reflective and is given its own environment map to speed up rendering.
Select the object to which you want to apply an environment shader. Make sure that you have applied a material to it.
From the Render toolbar, choose GetShaderEnvironmentEnvironment Map or More... to open a list of environment shaders you can use. See Environment [Shader Reference].
When you have chosen a shader — it is connected to the material node's environment input.
The shader's property editor opens where you can give it a texture to use as an environment. For more information on a shader's parameters, refer to its help topic by clicking on the ? in the property editor.
 Except where otherwise noted, this work is licensed under a Creative Commons Attribution-NonCommercial-ShareAlike 3.0 Unported License