


While you can create Lagoa simulation effects easily using any of the Model Library or Create commands on the ICE toolbar, you can also go the "do-it-yourself" route by following the steps in this section.
The following workflow shows an example of a fluid effect, but similar basic steps can be followed for creating a deformation effect.
Each of the numbers on the nodes in this image corresponds to the steps following it:
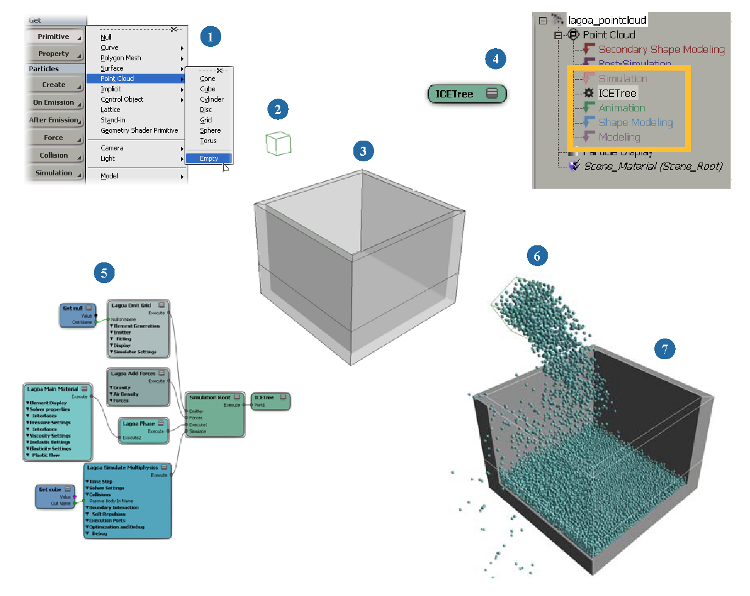
| 1 |
Create either a point cloud for particle effects, or a polygon mesh for deformation effects. |
| 2 |
Create one or more emitter objects for particle effects. Put multiple emitter objects in a group. See Setting Up Emissions in Lagoa Simulations. |
| 3 |
Create one or more collision objects. Put multiple collision objects in a group. |
| 4 |
Create a simulated ICE tree for the point cloud or polygon mesh. |
| 5 |
Add the basic Lagoa nodes to the ICE tree, plugged together as shown in Anatomy of a Basic Lagoa ICE Tree below. |
| 6 |
Play the simulation, then tweak the parameters, mostly in the Lagoa Emit and Material nodes — see Lagoa Material Properties. |
| 7 |
Set up collisions with the collision objects — see Setting Up Collisions for Lagoa Effects. |
Once you have an ICE tree set up, you can add other Lagoa nodes, or use most ICE nodes as you would normally. See Task Tab - Lagoa (Fluids and Deforms) for a description of each Lagoa node.
These nodes are the ones that you need as a base for any Lagoa simulated effect. See the table following this image for an explanation of each node.
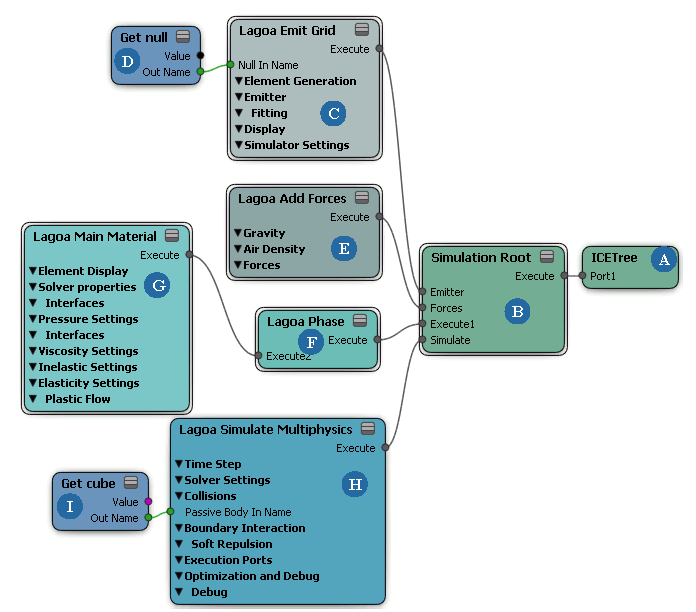
| A |
The ICETree node is the main node in any ICE tree. At each frame, the ICETree node processes all nodes and compounds that are connected to its ports, from top to bottom. See ICE Simulation Regions and Nodes [ICE Guide] for more information. |
| B |
The Simulation Root node is "central station" for ICE simulation nodes. It needs to be plugged into the ICETree node. This node gives you easy access to many ports in which you can plug in nodes that are often used in simulations. To use the commands on the ICE toolbar, you need to have this node plugged into the simulated object's ICE tree. |
| C |
The Lagoa Emit node is responsible for creating and emitting the particles. At every frame, it adds points and sets their attributes such as size, color, velocity, mass, shape, etc. Emit compounds are usually plugged into the top of the Simulation Root node in a particle simulation because you need to emit the particles before anything else can happen to them. See Setting Up Emissions in Lagoa Simulations for information. |
| D |
A Get Data node represents the particle emitter object in the ICE tree and gets data from it so that it can be used in the ICE tree. In this case, the node is called Get null because that's the name of the emitter object. For multiple emitters, put them in a group, then plug the group's Get Data node into the Null Name or Emitter Name port on the Lagoa Emit node. |
| E |
The Lagoa Air Density node is a hub for other forces to be connected into it. It adds up the values of all those forces and then outputs a single vector value to the ICETree node. It sets a gravity and air density force by default. See Setting Up Forces for Lagoa Effects for information. |
| F |
The Lagoa Phase node determines which phase the particles are in, rather like a physical state. You can use multiple phases with different materials, and then decide to switch between them. See Creating Phases for Lagoa Effects for information. |
| G |
The Lagoa Material node sets the material properties of the particles or polygon mesh, such as elasticity, inelasticity, surface tension, and so on. The materials are calculated by the Lagoa Simulate Multiphysics node (see H): make sure that the corresponding material options are activated in that node. The Lagoa Main Material node is the base material node upon which all other Material Type nodes are created. |
| H |
The Lagoa Simulate Multiphysics node does all the simulation calculations. It drives the simulation in the same way that the Simulate Particles node drives typical particle simulations. This node takes all information from the compounds that are plugged in above it and then uses that information to update each point at each frame. It also acts as a control for activating the material and collision properties. |
| I |
A Get Data node represents a collision object for the simulated points. This can be a single object or a group of objects. See Setting Up Collisions for Lagoa Effects for information. |
 Except where otherwise noted, this work is licensed under a Creative Commons Attribution-NonCommercial-ShareAlike 3.0 Unported License
 1.0 (No State Machine)