


A phase is a separate part of a mixture of substances that have different material properties. In Lagoa, phases allow you to define different materials for the same point cloud, giving the illusion of different substances in the same element.
For example, a mixture of oil and water materials can be created using two phases, or you could make an elastic object become a fluid by plugging two states with different materials and using some type of trigger to switch from one phase to the other.
You also use phases when you create advection effects — see Advecting Geometry with Lagoa.
You can set phases only on point clouds. In the Lagoa point cloud's ICE tree, each phase needs to have its own setup consisting of an Emit node, a Phase node, and a Material node. Each phase needs be to identified by the same Phase ID that you define in the Emit and Phase nodes.
Once you have set up phases, you can define how each material interacts with each other using its interface pressure. You can imagine this pressure as the edge between particles with different materials. Changing the pressure creates the movement of particles with one material to the area of particles with another material.
Create a Lagoa ICE tree for a point cloud with the required nodes as described in Creating a Lagoa Effect from Scratch.
For each phase, connect a Lagoa Emit node, a Lagoa Phase node, and a Lagoa Material node as shown here:
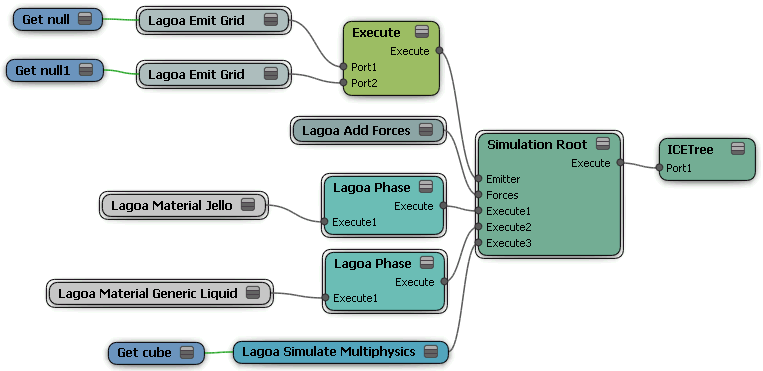
If you want multiple materials at once, you need multiple emitters, each with their own Emit node. Plug each one into an Execute node, then plug that node into the Emitter port of the Simulation Root node.
If you want to switch from one material to another based on a condition, you can use one emitter.
In each Lagoa Phase node, give the phase a unique Phase ID number.
Give the same Phase ID number to the accompanying Lagoa Emit node.
Set the Lagoa Material properties appropriately for each phase; for example, make one material denser than the other one.
Set the Internal Interface Pressure options in each material's property editor (see Lagoa Main Material) to define how the two materials create pressure on each other when they interact.
A trigger is something that causes an effect to happen when its value is reached, such as when the particle bubble reaches a certain size, it pops. If you know how to use particle states, using triggers for phases is the same basic process as it is for states (see Overview of Creating a Particle State Setup).
You can set a trigger so that one phase changes to another upon a certain condition. For example, the particles could change from jelly to liquid when the particles come in contact with a collision object.
Follow the steps above to set up phases, making sure to do these things:
Make sure that all phases you want to use have unique Phase IDs.
Define the Trigger value in a node that sets the condition, then plug this node into a Trigger port on the Lagoa Phase node.
Most of the nodes that can be used as triggers are found in the Conditionals group on the Particles tab. However, you can use any node that has a Boolean output so that it can be plugged into a Lagoa Phase node's Trigger port.
In the Lagoa Phase node, specify the ID number of the Next Phase, which is the phase to which the particles switch when the condition is reached.
For example, in the Lagoa Phase node for Phase 0, specify that the Next Phase used will be Phase 1 when the Trigger value is reached.
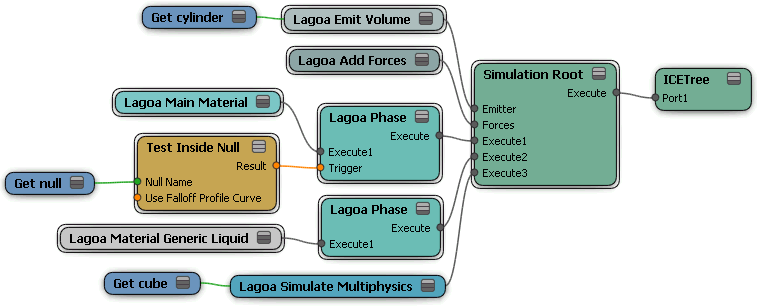
Here's an example ICE tree of particles switching phases upon a condition:
 Except where otherwise noted, this work is licensed under a Creative Commons Attribution-NonCommercial-ShareAlike 3.0 Unported License