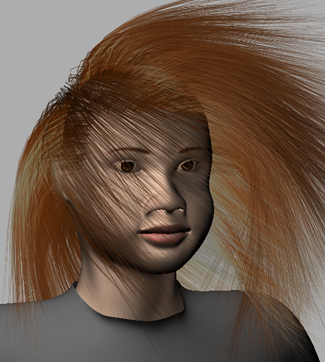
If you're creating medium or long hair, you will most likely need to set up obstacles with which the hair will collide. Collisions with obstacles affect only the guide hairs, so make sure that the obstacle collides with guide hairs — otherwise you won't see any effect.
For short hair, fur, or short grass, you may not need any obstacle objects, depending on what your hair-emitter object is doing. If you're creating a human head with long hair, the shoulders and neck need to be selected as obstacles; or if you have an animal run through a field of wheat, the animal would be considered the obstacle for the wheat.

Head and shoulders are set as obstacles for the hair.
Here are some tips for setting up the objects that will be used as obstacles:
You can use polygon or NURBS surface objects as obstacles, but you cannot use implicit objects or hair objects (that is, the actual hair strands) as obstacles. Obstacle objects can be either stationary or animated.
You can use the hair emitter object itself as the obstacle for hair. For example, select the head and shoulders of a long-haired character to be the obstacles for the hair.
If you're emitting hair from a geometry-approximated subdivided surface (see Emitting Hair from Subdivision Surfaces), you cannot also use it directly as the obstacle for its own hair.
To have a subdivided surface hair obstacle, create a subdivided polygon mesh (choose Create Poly. Mesh
 Subdivision from the Model toolbar) and set its subdivision level to what you need for the obstacle. Then set this subdivided polygon
mesh as the obstacle (you may want to hide it).
You may want to use polygons as obstacles to create more accurate collisions: a polygon's points lie directly on its surface unlike those of a NURBS surface object.
For best performance, make the object have as few polygons as possible and still have the hair conform to its shape.
Use an obstacle object that is large enough and closed so that the hairs do not intersect it. The obstacle should be bigger than the longest guide hair's segment length (that is, one of the hair's 15 segments).
For example, if the entire guide hair is 10 units long, but the obstacle is only 0.5 units in diameter, it won't work well, such as with the brim of a hat.
Keep the obstacle object simple. For example, if you have a complex character with which you want the hair to collide, use only the body geometry of where the hair will actually collide as the obstacle (that is, you don't usually need to include the lower body and arms).
Otherwise, all these elements are calculated as part of the collision, which slows things down considerably. You can, for example, tag only the polygons from the back and neck area, extract the polygons, and use this result as your collision obstacle instead.
Use simple proxy objects to stand in for complex obstacle objects. For example, use a simple sphere scaled to the proportions of your character's torso as the obstacle object. This proxy can be hidden or set to non-rendering after being constrained to the real obstacle object.
If an animated obstacle moves too much from one frame to the next, the hair may pass through it. Again, having an object large enough and closed can help avoid this problem.
Make sure that the obstacle is not touching the guide hairs in the first frame of the simulation. This can cause problems with the collision calculations.
You normally apply dynamics to the hair (see Making Hair Move with Dynamics), but you can also use obstacles without dynamics to use them as styling tools (the hairs stay outside the obstacles when it comes close to the hair).
Set the Hair Collision options on the General page the Hair property editor, depending on the type of collision you want to create:

Average Sphere (fast) creates a sphere around the obstacle object for the collision detection, giving fast calculations. This disregards the settings in the Obstacle property editor.
Exact (slow) uses the actual shape of the obstacle object for the collision detection, which is preferable for most collisions. This gives accurate results but may have a slower calculation time. This also disregards the settings in the Obstacle property editor.
XSI (fast, rough) is the only method that detects obstacle collisions based on the settings in the Obstacle property editor (see below). For example, if you have Actual Shape as the Obstacle Type and a Push Length value set for the obstacle, this is taken into consideration for the collision. This method is fairly fast and as accurate as the Actual Shape that you choose.
From the Hair toolbar, choose Modify  Environment
  Set Obstacle.
Pick one or more objects in the scene that will act as obstacles for the hair. Right-click to end the picking session.
Set the general and physical parameters in the Obstacle property editor that appears (see Obstacle Property Editor [Properties Reference]) to control the collision's behavior.
When you play the simulation, the hair collides with the obstacle.
 Except where otherwise noted, this work is licensed under a Creative Commons Attribution-NonCommercial-ShareAlike 3.0 Unported License