By applying dynamics to hair, you can have it respond to the movement of the hair emitter object, as well as any natural forces or obstacles you set up for it. You can play back the dynamics live while you're tweaking to get just the right motion, or write the simulation to cache files and then read them for faster playback and consistent rendering, even when skipping frames.
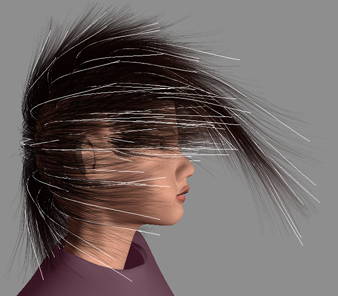
Hair with dynamics applied and a wind force from behind.
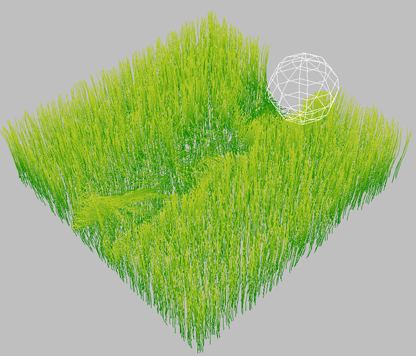
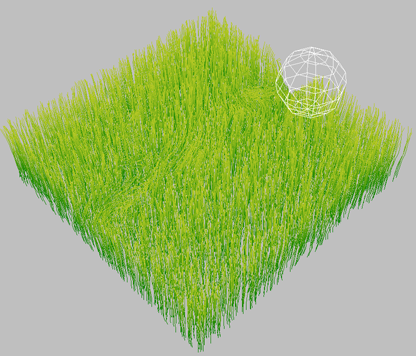
When you apply dynamics to hair, you make it possible for the hair to move according to the velocity of the hair emitter object, like long hair whipping around as a character turns her head quickly. The dynamics calculations also take into account any natural forces applied to hair such as gravity or wind (see Forces), as well as any collisions of the hair with obstacles.
You need to apply dynamics to hair before you can apply a natural force to it.
When the dynamics operator is active, you cannot do any styling on the hair. To get back into styling mode, see Muting the Dynamics Operator for Styling.
If you have animated the parameters of certain style operators (Clump, Comb, Puff, Rotate, or Scale) or have animated deformations on the hair, you cannot also use dynamics.
If you're applying dynamics to hair created from curves, make sure to select the "hair curves," not the source curves from which you generated the hair.
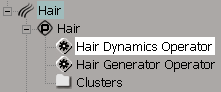
Choose Create  Dynamics on the Hair toolbar.
When you choose this command, a hair dynamics operator is added to the hair object's stack (above the hair generator operator), and the Dynamics Operator property editor appears in which you can cache files for faster playback (see the next section).
On the timeline, select the Loop icon and click Play. By default, the dynamics are played back in live mode.
Move the hair emitter object around or animate its transformations, apply a natural force to the hair, or have hair collide with obstacles.
You can also adjust the Dynamics parameters to determine how the guide hairs react to the effect of dynamics. See Adjusting the Hair's Reaction to Dynamics for information.
You can cache dynamic simulation files for faster playback using the options in the Hair Dynamics Operator property editor. Caching the simulation to file (using either the Read&Write or Read Only options) means you can move to any frame and get an update, as well as play the simulation backward. It also provides for consistent rendering results and motion blur calculations.
By default, the Cache Mode is set to Live (no caching) so that you can work with the time looped and have the hair update constantly based on any changes you make to the hair parameters. This mode is best for testing out different options as you're working; however when you're ready to render and/or calculate motion blur, switch the Cache Mode to Read&Write or Read Only (the latter for the final render that you don't want to change).
Select Read & Write as the Cache Mode. When you change a hair parameter, the simulation is reset and the cache is cleaned, but nothing is recomputed until you change frames.
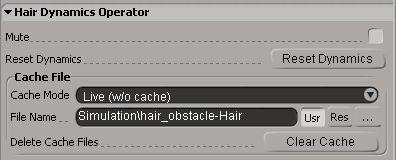
Enter a location and name for the cache file. By default, it writes to the Simulation folder of the current project. If you select Usr, the path is displayed as you entered it; if you select Res, the resolved path is displayed.
Click Clear Cache to delete the current cache files in the folder; that is, it won't clear cache files with names different from what is currently set for the Filename. The dynamics are not reset when you delete the cache.
Click Reset Dynamics to reset the hair to its state at the time that dynamics was applied to the style.
To increase the speed of the playback, mute any viewport that you're not using by middle-clicking its letter (A, B, C, or D).
Make sure to name the cache file with a different name for each iteration of the simulation you want to keep; otherwise, the cache will be overwritten each time you save the file.
If you keep the cache files, make sure to check the storage folder you have defined for them and delete any unused files. These can build up and take up lots of space if you don't occasionally do some housecleaning!
The cache file is not automatically copied with the scene if you save it in a new project. Make sure to copy the cache files to the Simulation folder (or wherever you want them) in the new project so that you don't lose valuable data!
When you're ready to render the final simulation, select Read only as the Cache Mode. The dynamics data is read from the current cache file, but does not write new cache files, even when you make a change to the hair. This prevents any changes from being made.
To get ready for the final render, follow these steps:
Go to the beginning of the simulation that you want to cache.
Enter a location and name for the cache file. By default, it writes to the Simulation folder of the current project. If you select Usr, the path is displayed as you entered it; if you select Res, the resolved path is displayed.
Click Clear Cache to delete the current cache files in the folder.
Click Reset Dynamics to reset the hair to its state at the time that dynamics was applied to the style.
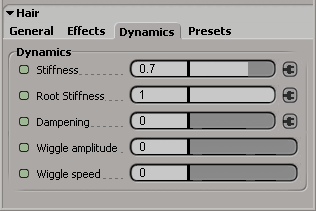
Once you have dynamics applied to the hair, you can set the parameters on the Dynamics page in the Hair property editor to determine how the hair reacts to the dynamics. These parameters are applied to the guide hairs.
The Dynamics parameters (except Wiggle) can have weight and texture maps connected to them, as identified by a little connection
icon  beside them. This allows you to create either specific patterns or random values for the hair, depending on the effect you
want. For example, you can use a weight map on the Stiffness parameter so that the hair is stiffer in specific areas, such as where the hair is shorter.
beside them. This allows you to create either specific patterns or random values for the hair, depending on the effect you
want. For example, you can use a weight map on the Stiffness parameter so that the hair is stiffer in specific areas, such as where the hair is shorter.
Because these parameters only affect guide hairs, subtle value variations in the maps be lost, so you may find weight maps to be generally more effective than texture maps.
For general information about mappable parameters, see Connecting Maps to Render Hair Parameters.
For an example on how to connect a weight map to a hair parameter, see Cutting the Render Hairs.
Stiffness is the tendency of the hair to hold its rest shape and resist the dynamics that are affecting it, rather like a good hair spray! This is the stiffness of the guide hair starting from the tip and going down to the root. A value of 1 means that hair will always keep its styled shape and resist the effect of dynamics on it, while a value of 0 means no resistance to dynamics.
Root Stiffness is the same as Stiffness except that it determines the stiffness at the root of each guide hair. The values are the same as for Stiffness, with the default value of 1 meaning that the root always keeps itself aligned in the direction of the style.
You can use Stiffness and Root Stiffness together to have varying levels of stiffness along the length of the guide hair. For example, with a low Stiffness value and high Root Stiffness value, you can have the hair affected by dynamics only toward the tips.
Dampening determines how quickly the hair recovers from the effect of dynamics. With a value is 0, the hair does not return to its position; with higher values (maximum value is 1), the hair bounces back into its styled position more quickly.
Wiggle simulates the effect of a light breeze, moving randomly about the points of the guide hairs. Its Amplitude controls the strength or amount of the point displacement, and its Speed controls how quickly or slowly the displacement occurs, like wheat stubble on a field quickly quivering in the wind or seaweed slowly swaying with the waves.
Once you've applied dynamics on the hair object, you cannot do any hair styling using the style operators on the Hair toolbar unless you mute the dynamics operator. This is because dynamics need to be calculated on a specific styling "state" that cannot change during playback.
If you style the hair with dynamics active, nothing will happen because no styling operator is added to the stack (and you'll see an error logged in the script editor).
Click the Style button at the bottom of the Hair toolbar.

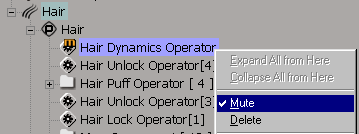
Select the Mute option in the Hair Dynamics Operator property editor.
Right-click on the Hair Dynamics Operator in the explorer and choose Mute.
Now when you play back the simulation, the dynamics operator uses this new "rest state" to update the dynamics.
If you freeze the hair operating stack (see Progressive Styling by Freezing the Stack) with the dynamics operator is muted, the dynamics operator is not removed.
When you reapply styling after dynamics, the hairs may have shifted a little. To get back to the "real" current hair state, click the Style button, click Reset Dynamics in the Dynamics Operator property editor, or move the hair emitter object.
 Except where otherwise noted, this work is licensed under a Creative Commons Attribution-NonCommercial-ShareAlike 3.0 Unported License