Before you render hair, either in a render region or to file, there are some settings that can make a big difference to the quality of the render. This includes setting the quality of the render, setting the geometry approximation, and setting up a BSP tree for hair.
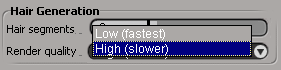
You can choose to render hair with a low quality for quick rendering, or with a higher quality rendering that takes longer to process. This setting affects only pre-processing time (hair generation). If the hair doesn't have a lot of kink or frizz, and has few segments (such as short hair or fur), use the Low setting for faster processing; otherwise, use the High setting for better quality.
Attach a shader to the hair object as described in Coloring Your Hair.
Open the Hair property editor and select either Low or High from the Render Quality list.
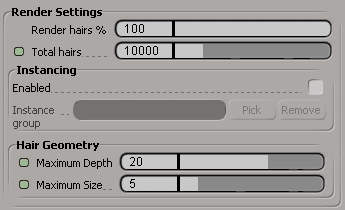
When either viewing or rendering hair, you can set its geometry approximation. Geometry approximation specifies how objects and curves should be tessellated (divided into triangles and line segments, respectively, at rendering time).
When you set the geometry approximation for hair, a general Bézier curve is created to represent the hair. You can reduce the number of segments in the hair curves and still render a very smooth surface.
Apply or edit a Geometry Approximation property as described in Applying and Editing Geometry Approximation [Scene Elements], and set options on the Hair tab.
For a complete description of all options, see Geometry Approximation Property Editor [Properties Reference].
You can set up a BSP tree exclusively for rendering hair. These settings work in the same way as do the standard BSP tree settings for the scene, but they are calculated separately. This allows you to deal with any special considerations that hair requires for rendering, apart from the rest of the scene.
You should spend a good amount of time tweaking the hair BSP settings to speed up rendering. Draw small render regions on the hair as you go so that previews are fast.
For some general tips about rendering hair, see Raytracing and Antialiasing.
When you render hair, it is split into separate mental ray objects in approximately 400,000-strand chunks. This results in approximately 40,000 hairs per object given the default 10-segment hair.
Splitting the hair objects into smaller hair objects allows you to speed up the rendering. This means that you can render more hair, which increases the overall realism. As well, making smaller hair chunks can help render hair with motion blur because memory requirements increase when motion blur is used.
Enter SI_HAIR_CHUNK_SIZE as an environment variable in the setenv.bat file (in the Softimage Application\bin folder) and enter a value for the maximum hair strands you want per hair object.
For more information about setting environment variables, see Environment Variables [Advanced Setup and Configuration].
Currently the default is set to 40,000 strands, so say you have 1000 hairs with 80 segments each, this give you a total of 80,000 strands. when you render this we'll generate two hair objects of 40,000 strands each at render time to optimize it.
Render hairs can be generated differently depending on the number of processors that a machine has. To fix this, you can split the hair generation into the same number of batches as there are processors.
As a result, you can have up to 8 hair (shave) instances for creating batches of hair. You can set the environment variable XSI_SHAVEINSTANCES to control the number of instances you want to use.
For more information about setting environment variables, see Environment Variables [Advanced Setup and Configuration].
Hair can often slow down the rendering of a scene, and you may want to render the scene without rendering the hair. Instead of hiding the hair or putting it on a separate scene layer and making that layer unrenderable, you can easily deactivate an option in the Render Manager to achieve faster preview rendering. This applies only to hair that uses the geometry render type, not instanced geometry.
Choose Render  Render Manager on the Render toolbar to open the Render Manager.
On the Renderer options panel on the right side of the Render Manager, make sure that the mental ray tab is displayed.
Then click the Rendering tab and deselect the Enabled Features Hair Geometry option. The hair is still generated, but not rendered.
For more information about all of the rendering (and render region) options, see Managing Rendering Options [Rendering].
 Except where otherwise noted, this work is licensed under a Creative Commons Attribution-NonCommercial-ShareAlike 3.0 Unported License