Replacing hairs with objects allows you to use any type of geometry in a hair simulation. You can replace hair with one or more geometric objects (referred to as instances) to create many different effects. For example, you could instance a feather object for a bird or instance a leaf object to create a jungle of lush vegetation.
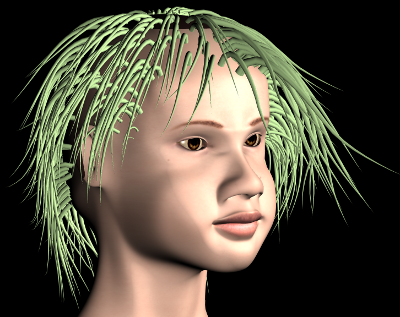
The instanced geometry can be animated, such as its local rotation or scaling, or animated with deformations. This allows you to animate the hair without needing to use dynamics, such as instancing wriggling snakes on a head to transform an ordinary character into Medusa!
To render instances for the hairs, simply put the objects you want to instance into a group, and each object in the group is assigned to a guide hair. The instanced geometry is calculated at render time so you'll only see the effect in a render region or when you render the frames of your scene.
You can choose whether to replace the render hairs or just the guide hairs. You can also control how the instances are assigned to the hair (randomly or using a weight map values), as well as control its orientation by using a tangent map or have the instances follow an object's direction.
When the instanced geometry replaces the hair, its local Y axis is aligned along the guide hair strand, and it is scaled to fit the length of the strand. Objects that aren't generally the same shape and length as the hair strand can get distorted, so be sure to choose an object that is proportionally appropriate.
The instanced geometry takes on the hair's grooming state and dynamics, deforming with the shape of the guide hair. To have the instanced object deform smoothly with the hair, make sure that it has enough subdivisions, especially along its Y axis.
Select one or more objects you want to instance and create a group that includes them (press Ctrl+G or click the Group button on the Edit panel).
Select the hair object to which you want to attach the instances and open its Hair property editor.
|
|
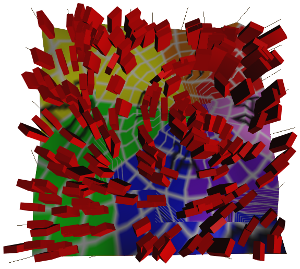
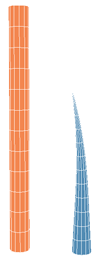
On the left the orange cylinder and blue cone source objects are put into a group for instancing. These objects are proportionally correct to be instanced along the hair strands. Their geometry also has enough subdivisions to allow for smooth deformation according to the hair strand's grooming and dynamics.
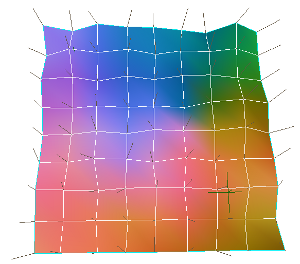
On the right is the Hair object whose hairs will be replaced by the two objects.
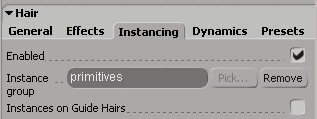
On the Instancing page in the Hair property editor, select the Enabled option to activate instanced geometry as the render type instead of the hair geometry.
Click the Pick button beside the Instance Group text box, then in the explorer, pick the group of objects you want to instance.
Click the Remove button to remove that group of objects from being used.
|
|
Draw a render region around the hair or render the scene to see the instanced object geometry on the hair.
By default, the instances are applied to the render hairs. However, if you select the Instances on Guide Hairs option, the instances are applied only to the guide hairs. This is an easy way of having the instances appear only at the hair emitter's vertices.
|
|
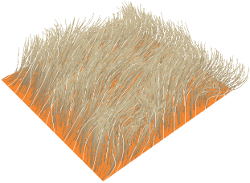
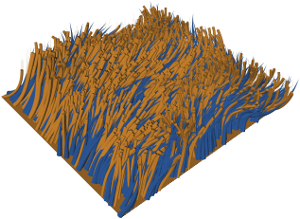
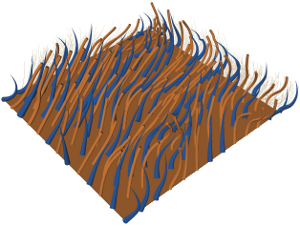
On the left, render hairs are replaced by the two source objects in the group.
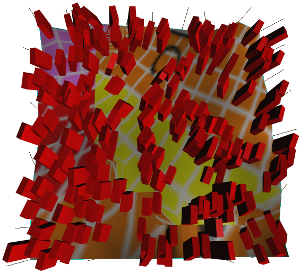
On the right, guide hairs only are replaced by the two source objects in the group.
Notice how the two objects in the group keep their own material and texture properties.
If you make changes to an instanced object (such as changing its topology or material attributes), it is updated immediately on the hair.
Set how the instances are assigned — see Selecting How Instances are Assigned.
Set how the instances are oriented — see Setting the Instances' Orientation.
You can select the method by which the instanced objects are assigned to the hair: either randomly or by using the values on a weight map.
On the Instancing page in the Hair property editor, select the Object Assignment  Random option.
Random distributes the objects in the instance group on the hair in a random manner, meaning that you can't control how which instance object is assigned to which hairs.
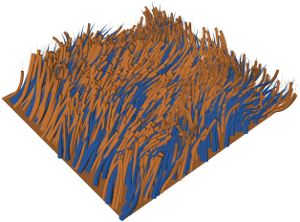
Hairs are randomly replaced by the two instanced objects in the group.
Create a weight map for the hair emitter object and paint (press W) the values you want.
For general information about weight maps on hair parameters, see Connecting Maps to Render Hair Parameters.
Select the hair object and click the Transfer Map button on the Hair toolbar to transfer this weight map from the hair emitter to the hair object.
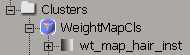
In the explorer, pick the emitter object's weight map that you created: it is under the hair emitter object's geometry Clusters > WeightMapCls node.
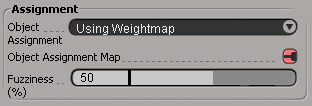
On the Instancing page in the Hair property editor, select the Object Assignment Using Weight Map option.
This option uses the values on a weight map to assign the instances to the hair. Where the weight map's values are 0, the object listed at the bottom of the instance group (in the explorer) is used; where the values are 1, the object listed at the top of the instance group is used.
If you have more than two objects in the instance group, the objects listed in the middle of the group are mapped accordingly to values between 0 and 1. Make sure that your weight map has the appropriate range of values to see the effects of more than two instance objects.
Beside the Object Assignment Map option that appears below when you select Using Weight Map, right-click the connect (little plug) icon and select Connect.
In the pop-up explorer, select the weight map under the Hair Clusters WeightMapCls node.
The connection icon turns red to show that a map is connected.
After you connect the map, you can go back and adjust the weight map on the emitter object's original map, and see that the connected map (and the results on the hair) is updated.
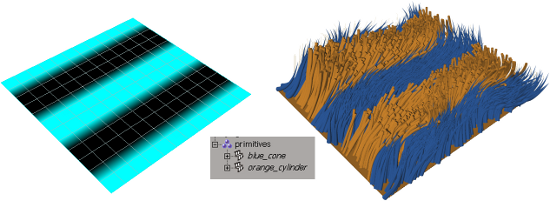
On the left, a weight map showing black areas at a value of 0 and turquoise areas at a value of 1.
On the right, Hairs are replaced by the two instanced objects in the group using the values on the weight map.
The instance object at top (blue cone) of the group in the explorer is mapped to values of 1 on the weight map, whereas the bottom object (orange cylinder) is mapped to values of 0.
You can also set the Fuzziness (%) option, which uses a percentage value (0 to 100) to blend the values of the weight map so that the division between instanced objects is less distinct.
You can control the orientation of the instanced geometry in two ways: by using a Tangent Map or by having the instances Follow Object (one or more objects). You can, of course, choose to not control the orientation at all by leaving the Orientation Type option on the Instancing page set to None.
In addition to setting the type of orientation, you can set a Spread value in degrees (0 to 360) to locally rotate each instance. A distribution method is used to allow for some randomization of rotation values among the instances.
Select Linear for a simple, linear distribution of the Spread value among the instances.
Select Gaussian for a normalized distribution of the Spread value among the instances based on a bell-shaped curve.
When a hair emitter's surface is constantly deforming, you need to keep the hairs oriented in the same direction along the surface. To keep themselves in a fixed orientation relative to the emitter as it's being deformed, the hairs need a local coordinate system based on the emitter's surface. This local coordinate system does not exist by default and without it, the instances could rotate around the hair as the emitter surface deforms.
Happily, you can create a local coordinate system for the instances by means of a tangent map. A tangent map provides a direction, known as a tangent, along the surface that each instance can orient itself against. When you create a tangent map, the Tangent operator uses the RGB values that are stored in the polygon mesh's VertexColor property to give each hair instance a local XYZ coordinate system. The RGB values in the map correspond respectively to the XYZ axes of the instance. Tangent maps then orient each instance so that its X axis follows the U direction of the hair emitter.
Because the RGB color values on the map correspond to the XYZ axes of the instances, you can edit the orientation of the instances by painting the vertex colors. You can also translate or rotate the texture support, or change the texture projection method or plane, to alter the RGB values of the vertex colors, which changes the orientation of the instances.
Create a texture projection (choose Get Property Texture Projection from any toolbar) and a tangent map (choose Get Property Tangent) for the hair emitter object.
Open an explorer to find the tangent map under the hair emitter's geometry > Clusters > Texture_Coordinates > VertexColor node.
Click the TangentOp icon to open the Tangent property editor, and make sure that the State is set to Active.
You can increase the Smoothing value to smooth out any sharp angles on the tangent map. Oversmoothing can also introduce artifacts, so you should increase the smoothing value in small increments.
Now you must transfer the tangent map via the VertexColor property from the emitter to the hair object: select the hair object and click the Transfer Map button on the Hair toolbar. In the explorer, pick the emitter object's VertexColor property.
On the Instancing page in the Hair property editor, select the Orientation Type Tangent Map option.
Beside the Tangent Map option that appears when you select this option, right-click the connect (little plug) icon and select Connect.
In the pop-up explorer, select the VertexColor property under the Hair > Clusters > Texture_Coordinates node. The connection icon turns red to show that a map is connected.
To control the orientation using a tangent map, you can edit the emitter's Vertex Color property. Press W to activate the brush tool, and press Ctrl+W to open the brush properties, then click the Vertex Colors tab.
The RGB color values on the map correspond respectively to the XYZ axes of the instances.
When instances follow one or more objects, they are oriented according the direction of these objects. You can use multiple objects for which the instances will pick a direction which is a weighted average by distance to each target object; that is, the target object closest to the hair has more of a "pull" than a target object that is farther away. For a single object, the instances always point toward that target.
Note that the effect of the instances following the objects works best when the target objects are fairly close to the hair object.
Select one or more objects you want the hair to follow and create a group that includes them (press Ctrl+G or click the Group button on the Edit panel).
On the Instancing page in the Hair property editor, select the Orientation Type Follow Object option. Instances will be oriented according to the location of the target objects.
Click the Pick button beside the Target Group option that appears. In the explorer, select the group of objects whose location the instances will follow.
Click the Remove button to remove the effect of the target group on the instances.

 Except where otherwise noted, this work is licensed under a Creative Commons Attribution-NonCommercial-ShareAlike 3.0 Unported License