You can emit hair from clusters of polygons or NURBS subsurfaces, or from selected polygons. Emitting hair from clusters lets you choose which areas of an object you want to have hair, a common example being the scalp of a human character.
If you select individual polygons, a cluster containing them is automatically created when you apply hair. As with complete polygon mesh objects, one guide hair is created at each polygon vertex.
You can create, edit and render as many instances of hair as you like in a scene. When you create hair, a hair primitive object and its hair generator are created for each cluster to which you have applied hair.
Select the cluster or polygons from which you want to emit hair.

Choose Create  Hair from Selection from the Hair toolbar.
Guide hairs appear on the emitter object or cluster, sticking out in the direction of the object's normals. One guide hair is created at each vertex.
Guide hairs are curves that you use to style the hair — styling operations are described in Styling and Animating Guide Hairs.

Resulting guide hairs are emitted only from the selected cluster.
The Hair property editor also opens as soon as you create hair. This lets you view the render hairs and set their properties — see Viewing the Hairs for more information.
Emitting hair from a smaller area on an object (using clusters) creates thinner and shorter hairs than emitting hair from the whole object. This is because the bounding box of the cluster is smaller than the bounding box of the entire object.
|
|
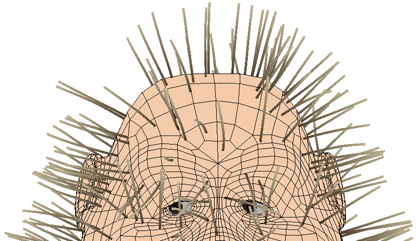
| Hair applied to the whole head. |
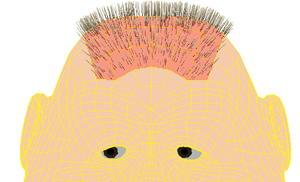
Hair applied to only a cluster of polygons on the same head. Notice how the hairs are much shorter and thinner. |
By default, the hair thickness and length is proportional to the size of the emitting surface's bounding box. This means that a large object with a scaling of 1,1,1 will have bigger hairs than a small object with a scaling of 1,1,1.
However, you can change the hair thickness to remain as an absolute value (in Softimage units), regardless of the size of the emitter. This may be useful if you're emitting from smaller clusters on an object but you want them to match the hair thickness of the whole object's hair. For more information on this, see Setting the Render Hair Thickness.
You can extract polygons from an object to make a new object from which to emit hair. This may increase the performance of hair because the number of polygons in relation to the overall object is fewer. However, because the extracted polygons are a new object, you'll have to add a texture to them: they do not inherit the texture from the object from which they were extracted.
 Except where otherwise noted, this work is licensed under a Creative Commons Attribution-NonCommercial-ShareAlike 3.0 Unported License


