After you have solved, tuned, adjusted, calibrated, and animated a head in Face Robot, you can prepare it for and export it to a game engine using the Game Export tool. This tool exports the envelopes and bones in a model file (.emdl).
To use Game Export, the head model in Face Robot must be a completed high-resolution mesh. Make sure that this mesh has all the wrinkles and folds built into its geometry, and that you're satisfied with the animation on it. As well, make sure that materials are applied to the head mesh, not to clusters on the mesh.
Remember that the quality of the resulting game export rig will only be as good as what you start with! The game model that you create allows realtime playback of the performance and is ready to be brought into a game engine.
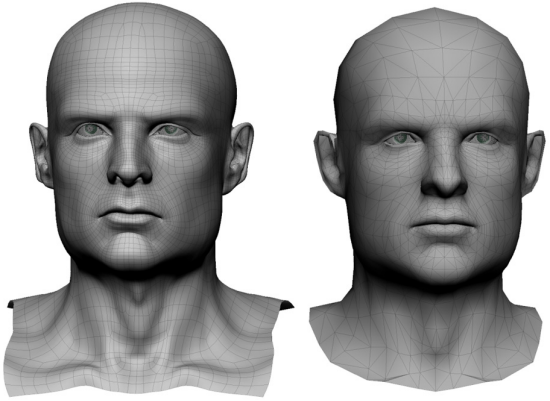
On the left, the original high-resolution head in Face Robot.
On the right, the low-resolution duplicate head that will be exported to a game.
The basic Game Export workflow involves the following steps. See each corresponding section for details on what you need to do:
Create a game version of the original Face Robot head for exporting — see Selecting the Game Mesh, Parts, and the UVs.
Align the game mesh and the original Face Robot mesh in the same physical space when they're in a neutral/base state — see Selecting the Game Mesh, Parts, and the UVs.
Click the Import/Export tab on the Act panel (see Saving and Loading a Fast Playback Cache File) and choose the Game Export - Plotted Bones option. The Game Export property editor opens.
On the Mesh page in the Game Export property editor, select the game mesh and its parts to export, as well as its non-overlapping UV set — see Painting Bone Locators for the Envelope.
On the Envelope page, paint the bone locators on the face and set the other envelope options — see Envelope Timeline Resampling Options.
If you have built an eyelash rig using the Build Eyelashes tool, you can transfer it to the game rig for export — see Transferring Eyelash Rigs.
Export the envelope with the animation and then check for problems. Go back and fix any issues on the envelope, if necessary.
On the Normals page, generate the rest and stress normal maps for the face — see Generating the Masks.
On the Masks page, generate the normal masks to be exported — see Building Realtime Shaders.
On the Shaders page, build up and apply a realtime shader to the game mesh to be exported — see Building Realtime Shaders.
When you're done everything, export the GameExport model as an .emdl file.
To use Game Export, the original head model in Face Robot must be a completed high-resolution mesh. Make sure that this mesh has all the wrinkles and folds built into its geometry, and that you're satisfied with the animation on it.
As well, make sure that materials are applied to the head mesh, not to clusters on the mesh.
Once you have a good head, you need to create a game version of it for exporting.
Click the Export tab on the Act panel and choose the Game Export option. The Game Export property editor opens.
On the Mesh tab in this property editor, click the Use Duplicate button to create a copy of the original Face Robot mesh. The copy is automatically selected as the game mesh.
You can then do either of the following:
Leave the game mesh head "as is" so that you have a high-resolution mesh that's identical to the original head. The result is an optimized model that doesn't include the entire Face Robot solver, so it can be more easily exported.
Create a lower-resolution version of the original Face Robot head for the game mesh. You can use the Polygon Reduction command to do this.
This is the most common route to take. Even though the head has fewer polygons, you can transfer the animation from the original head without losing quality. As well, all wrinkling details from the original head will be preserved in the game mesh.
Once you have created a game mesh, you need to align it and the original Face Robot mesh in the same physical space when they're both in their neutral/base state. This has implications for transferring the envelope later, so you should try to match the location of the original and game mesh as closely as possible.
Because the original mesh is animated, it may be moving around a bit, so you need to first mute the operators in the head's Animation construction history, which returns it to its neutral pose.
Select the points on the game mesh and then use the Deform  Shrinkwrap command on the Model toolbar to make it match exactly with the original head. Use the Closest Surface option. Remove the shrinkwrap operator from the game mesh's operator stack when you're done.
When you're done, unmute the operators in the head's Animation construction history so that you're using the correct animation data.
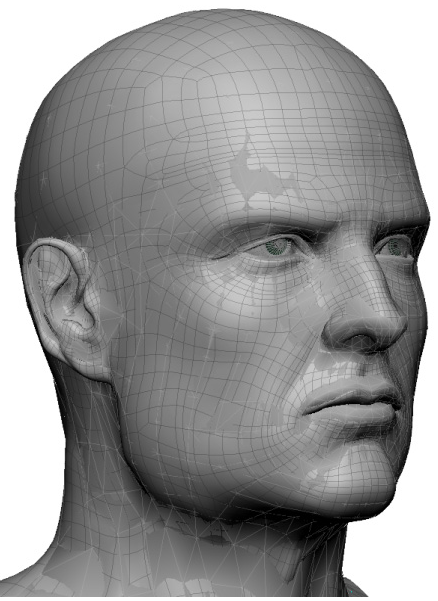
Original high-resolution head is spatially aligned with the game mesh.
After the head meshes are aligned, you need to select the mesh that you want to export, also known as the game mesh.
On the Mesh page in the Game Export property editor, click the Pick Mesh button and select the game mesh that you want to export.
If you clicked the Use Duplicate button to create a copy of the original Face Robot mesh, the copy is already selected as the game mesh.
Click the Copy Face Parts button to copy the character's eyeballs, teeth, and tongue meshes to the game mesh.
If your character has eyelash meshes, select the Eyelashes option to copy those meshes to the game mesh.
You also need to select a set of UVs for the game mesh, or generate a new set. The UVs should be non-overlapping with as little discontinuity as possible. If you want to reuse the same UVs from the Face Robot mesh, you can use GATOR to transfer the UVs from it to the game mesh.
On the Mesh page, select UV Map Pick UV. This opens an explorer from which you can select an existing UV set.
Click UV Map Generate to create a new set of UVS called texcoords, which is based on the angle grouping. You can find this set under the geometry node of the game mesh head or in the Texture
Editor (press Alt+7).
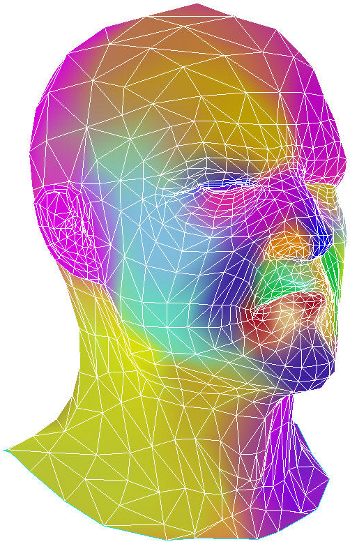
The purpose of painting locators is to define the location of the bones that will be exported to your game engine. These are the bones that deform the envelope.
You paint the locators on the original Face Robot mesh, then transfer the envelope weights and/or animation to the game mesh.
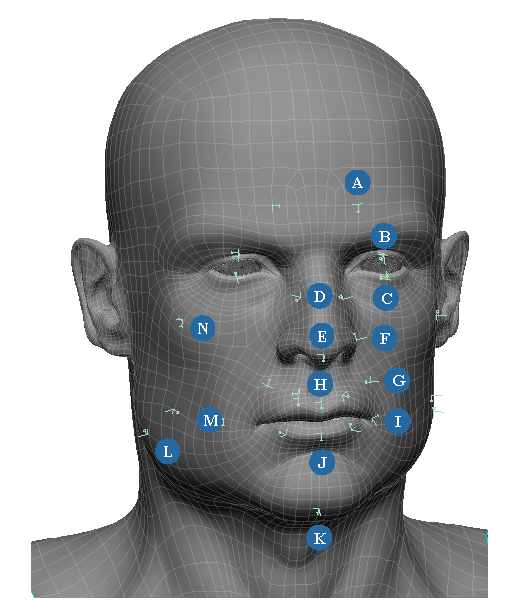
You need to paint locators at anchor positions in the areas of greatest deformation, such as the mouth region. Every major deformation area should be covered by a bone.
You want to capture the face's deformation as accurately as possible with the minimum number of bones (30 bones is often the maximum number used in games). This is often a trial-and-error process requiring a few iterations to get the bone positions just right.
Always refer to your reference animation or live action video to figure out which areas of the face move the most.
On the Envelopes page in the Game Export property editor, click the Locations button and start painting on the map where the bones should be.
If you already have a weight map created for the locators, click the Import button to open a browser from which you can select the weight map.
Generally, it's good to start with more bones, and then test; if necessary, you can then adjust and optimize the bone locations.
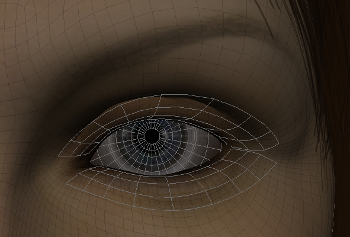
To avoid problems like bone flipping, don't paint in highly-detailed areas. Stay outside the lip area to prevent this from happening.
The corner of the mouth can have points that rotate, so it's best to paint outside this area.
Points within wrinkles are best handled by the shaders instead of painting locators.
To tweak the bone rotations, click the Bone Spin button and adjust each locator's rotation. Doing this can prevent envelope fitting problems.
The current number of Bones you've painted is displayed in the upper-right corner of the viewport (DisplayInfo set). The maximum number of bones allowed for most games is 30.
For more information about using the Paint tools, see Painting Weight Maps.
Paint where you want bones that deform the envelope. Start off with highly deformed areas such as the mouth.
Create a flipbook to see if there are any problems with bone flipping, etc. Then go back and repaint the locators as necessary.
Click the Hierarchy Jaw Parent button to paint the area around the jaw that will be deformed by the jaw bone (mandible) at runtime. This creates a jaw map.
By painting the jaw bone properly, you can improve the quality of interpolation between animation clips. If you don't create a jaw map, the jaw will not be parent to any bones.
Clicking the Jaw Parent button activates the paint brush and hides the game mesh so that you paint only on the original high-res mesh.
You should select a frame where the mouth is open so that you can more easily paint the bottom half of the mouth and jaw.
Smooth out the edges between the jaw and the rest of the head.
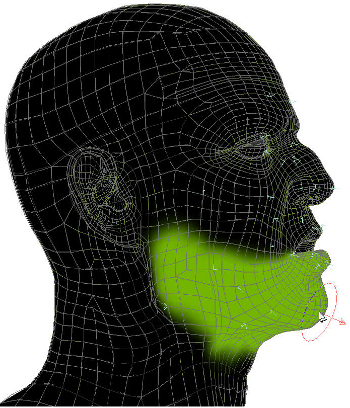
Paint the area that you want to be deformed by the jaw bone.
Click the Hierarchy Neck Parent button to paint the area around the neck to define which part of the skin is parented to the neck bone. This creates a neck
parent map.
If you don't create a Neck Parent map, the neck will not be parent to any bones.
Clicking the Neck Parent button activates the paint brush and hides the game mesh so that you paint only on the original high-res mesh.
Smooth out the edges between the neck and the head.
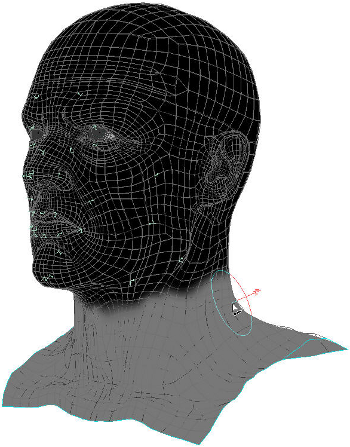
Paint the neck area that you want to be parented to the neck bone.
After picking the bones and painting the jaw and neck maps on the original high-res mesh, Face Robot can automatically set envelope weights on your low-res mesh and transfer the animation from the high-res mesh to it.
Set the options in the Envelope Settings group on the Envelopes tab in the Game Export property editor — see Envelopes [Properties Reference] for details.
Before you export, you may want to smooth the envelope in the difficult areas around the eyes and mouth using the options in the <Driven> Envelope Smoothing group.
Note that <Driven> options have are extra steps that you can perform manually after the envelope has been generated.
When you're done painting and setting up the envelope, export all this information to the game mesh by clicking the big Generate button.
The envelope weights and animation are transferred from the original high-res mesh to the low-res game mesh.
After the animation is transferred, check that the general deformation is good on the low-res mesh envelope by moving the nulls on the face.
Scrub through the timeline or create a flipbook of the animation and study the low-res mesh to check for flipping problems: if you notice some flipping, it indicates that a locator was not placed properly. You can either remove the locator or pick a new position for the locator and re-export it.
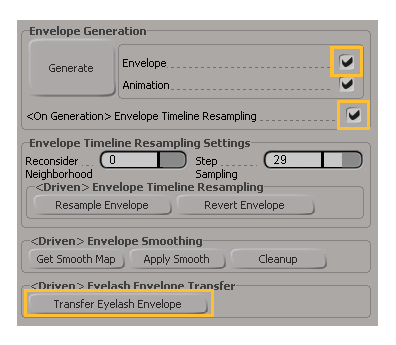
Select the <On Generation> Envelope Timeline Resampling option on the Envelopes tab in the Game Export property editor to have the Envelope Timeline Resampling Settings group appear. See Envelopes for details.
Resampling can be used to improve the quality of the envelope if it does not fit a certain animation. This option should be used only if there is animation associated to the export.
The Envelope Timeline Resampling options work by reconstructing a set of best possible envelopes per point per frame along a timeline, and then fitting the resulting combinations. This allows the game export mesh to match the closest possible weight combination to the Face Robot mesh.
If you've created an eyelash mesh rig using the Build Eyelash tool (see Building Eyelash Meshes), you can transfer it to the game rig for export using the Eyelash options in the Game Export property editor.
On the Mesh tab, select the Eyelashes option in the Face Parts group, then click the Copy Face Parts button to transfer the eyelash rigs to the game rig.
On the Envelopes tab, select the Envelope option in the Envelope Generation group to have all envelope settings appear.
Select the <On Generation> Envelope Timeline Resampling option to have the Envelope Timeline Resampling Settings group appear.
If eyelash meshes are found, they are automatically enveloped to the head and their animation is transferred when you click the big Generate button.
If eyelashes are attached to the rig after the game export has been done, you can be transfer them by clicking the Transfer Eyelash Envelope button at the bottom of this tab.
Face Robot can automatically generate stressed and unstressed (rest) normal maps to "feed" the runtime shader. These maps take all the surface details from the original high-resolution Face Robot mesh and transfer them to the game mesh. Normal maps need to be generated to get a good looking export.
For the best quality, you should also generate a stressed mesh, then export it and tune the visual quality of the wrinkling by using general modeling and detailing in a paint program (such as Autodesk Mudbox, ZBrush, etc.). Then bring it back into Face Robot and pick it as the stress normal map to create better definition for the facial expressions.
On the Normals page in the Game Export dialog box, select the options for the maps that you want to generate — see Normals for details.
For the best quality, you should generate a stressed mesh, then export it and enhance the visual quality of the wrinkling by adding detail in a paint program, such as Autodesk Mudbox or ZBrush.
Then when you bring it back into Face Robot, you can use it as the stress normal map to create better definition for the expressions.
You need to generate the rest and stress normal maps before you create a stressed mesh.
On the Normals page in the Game Export dialog box, select the Stressed Mesh option to create a version of the game mesh with the results of the stress map applied to it.
Click the big Generate button to generate the stressed mesh.
Bring the stressed mesh image into a paint program and add detail to it as you like.
Back on the Normals page, select Use Custom Stress Mesh to pick and use a specific mesh that has been generated from a stress map. If not, then the current stress map is used.
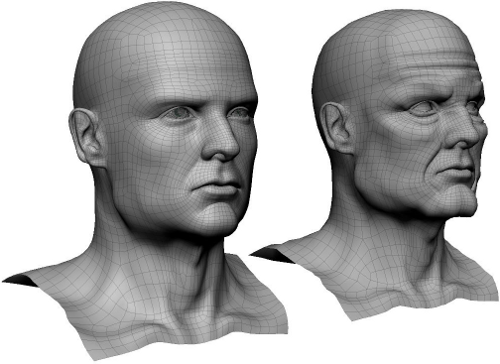
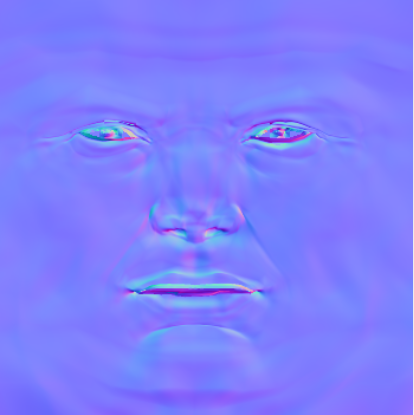
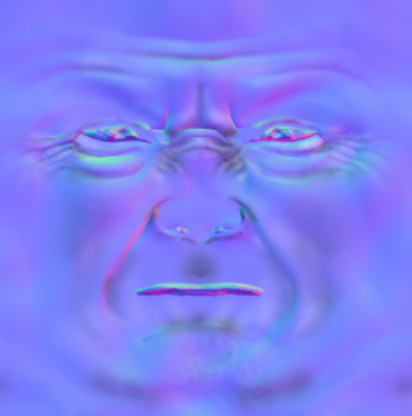
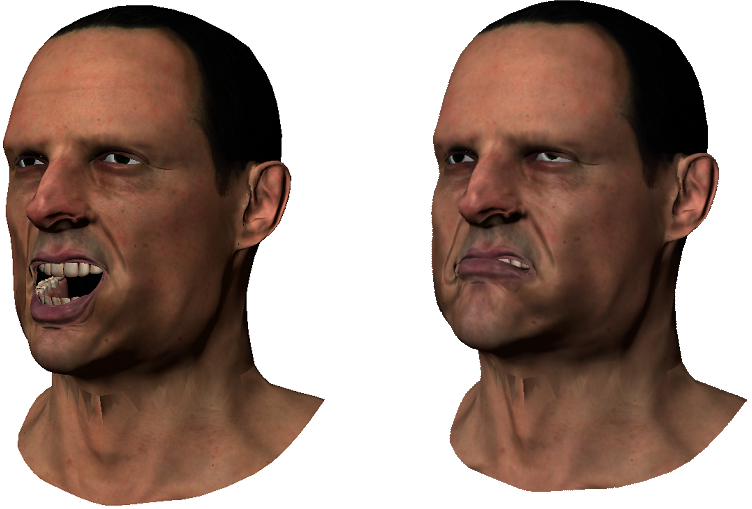
On the left, the original high-resolution head in its rest state.
On the right, a stressed mesh version of the game mesh is created using the results of the stress map applied to it, which causes the man to age quite a bit.
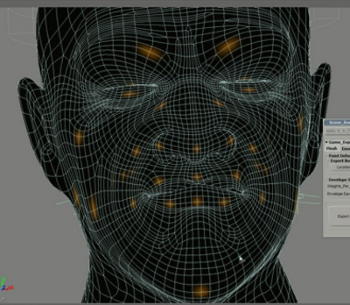
Masks modulate the blending between the stress and rest normal maps. They are automatically generated in 1, 2, or 3 vertex color map sets, where each color channel contains one mask (3 per vertex color map) so that you can have 3, 6, or 9 region masks.
Masks consolidate the region deform areas on the face (see Working with the Region Deform Areas) into a smaller set of regions (as many as 9) for the game engine. One mask can cover a group of deform areas, such as one mask for the forehead, one for each cheek, etc.
On the Masks page, select Generate Masks to generate the masks.
Select the Animate Masks option to generate the animation on the masks. The animation determines which area of the mask turns on or off at the right time to reveal the stress normal map.
You can control the animation of the regions using the sliders in the Region Masks property set (see step 6 below).
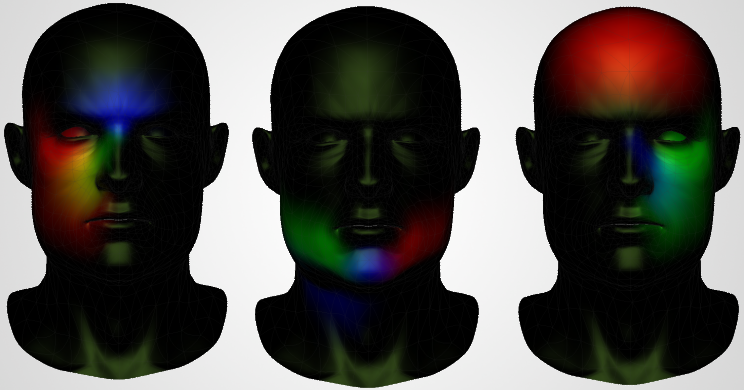
Set the number of regions on the face that are to be used for generating the Region Masks for the shader: 3, 6, or 9. Each mask can control three regions of the face at once. It's recommended you use 9 regions for the best results, which creates 3 region masks, as shown below.
When you've set all the mask options, click the big Generate button to generate the masks you've selected.
In the explorer, check under the game mesh's cluster to see the masks that are generated, as well as a tangent operator.
Click the Toggle Display Map button repeatedly to toggle through the masks that have been created for the game mesh.
Masks are generated for use by the shader. Each mask shows a group of three different regions of deformation that are controlled by that mask.
Use the Vertex Color tools to paint on the masks to add or subtract definition.
After the shader is applied, select the Region Masks Pset to experiment with the sliders. This lets you exaggerate the animation to tweak the normal maps' influence. You can also animate each of the slider's weights separately.
You can build a game realtime shader to which you can add textures. This shader is applied to the game mesh head's Material node.
On the Shaders tab in the Game export property editor, you can select the type of realtime shader you want to create (CgFX, HLSL, or Custom OGL) and add textures to it in the Texture Stack — see Shaders [Properties Reference] for details on each of the options.
Click the big Apply button at the bottom of the Shaders tab to apply the realtime shader to the game mesh's Material node. All the textures that you specified are plugged into their appropriate ports on the shader.
After the shader is applied, select the Region Masks Pset option on the Masks page to experiment with the sliders.
If the wrinkles aren't strong enough or the expressions are weak, you can create more pronounced effects after you've hooked up the shader. To do this, click the Region Masks Pset button on the Masks page to open the set. In it, you can edit the sliders' fcurves in the fcurve editor. Select them all and scale them up to create overall stronger effects.
 Except where otherwise noted, this work is licensed under a Creative Commons Attribution-NonCommercial-ShareAlike 3.0 Unported License