The Build Eyelash tool on the Tools tab of the Tune panel helps you to quickly build and rig eyelash meshes on a Face Robot head. You create or select eyelash clusters, then build a mesh based on the points in each of these clusters. This mesh is lofted from a series of curves that correspond to each point that was tagged for the cluster.
You can transfer the completed eyelash rigs to a game rig for export using the Game Export tool — see Transferring Eyelash Rigs for more information.
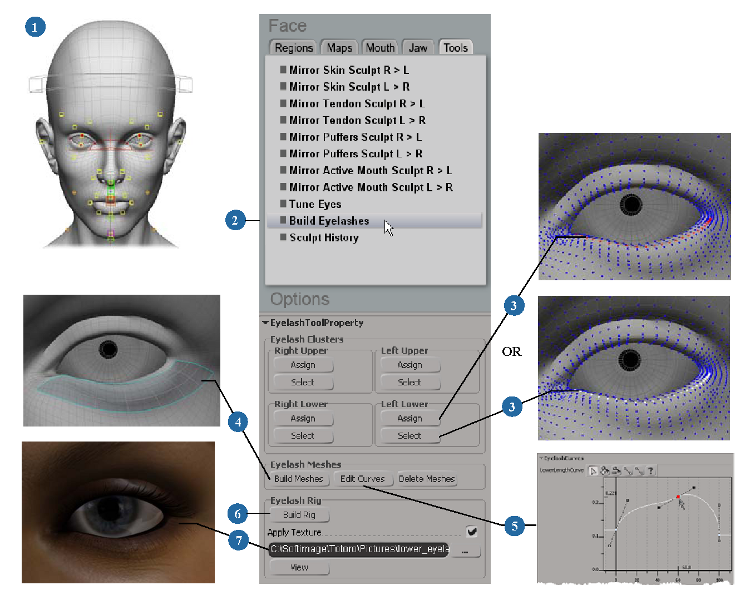
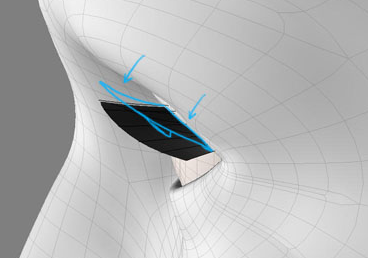
Follow the steps outlined here — detailed information on each step follows this image.
Make sure that the face is in a neutral pose so that the eyelash meshes will be properly shaped for the face's neutral state.
You can do this by resetting all animation controls to zero, muting the animation, or removing the animation or motion capture data from the animation controls.
On the Tune panel, click the Tools tab, then select Build Eyelashes. This opens the Eyelash Tool property editor in the Options panel below.
Either tag a set of points from where you want to grow an eyelash or select an existing cluster for the eyelashes:
To tag points, press T, then press the F10 key to use raycasting so that you don't select points on the opposite side of the head. Carefully select each point that you want to include in the cluster. Press Ctrl to toggle the selection of the points. Then click the appropriate Assign button. This stores these points as a cluster with a name like Left_Lower_Eyelash_Cluster.
Select an existing cluster for the eyelashes and click the Select button in the Eyelash Clusters group for the appropriate eyelash.
You must have the following naming convention for the existing clusters so that the Build Eyelash tool can recognize them as the correct clusters to use:
When you have one or more eyelash clusters ready, click the Build Meshes button in the Eyelash Meshes group.
This creates an eyelash polygon mesh for each cluster you assigned. The name of the mesh is the same as its corresponding cluster, such as Left_Lower_Eyelash. This mesh is lofted from a series of curves that correspond to each point that was tagged for the cluster.
To adjust the mesh shape, click the Edit Curves button. This opens a property editor with fcurves you can edit to adjust the eyelash shape — see Editing the Eyelash Curves.
Make sure that you don't move the last row of points that attach to the face mesh, or else there will be a gap in the rig.
After you make any changes, you need to click the Build Meshes button again to recalculate the meshes based on your changes.
If you want to start over, click the Delete Meshes button to clean up the curves and eyelash mesh objects.
When you are happy with the eyelash meshes, click the Build Rig button in the Eyelash Rig group.
This creates rig objects and then envelopes the eyelash mesh to them so that they are now part of the face. When you move the eyelid controls, such as for blinking, the lashes should follow correctly.
In the text box below the Build Rig button, select an eyelash texture to be applied to the eyelash meshes.
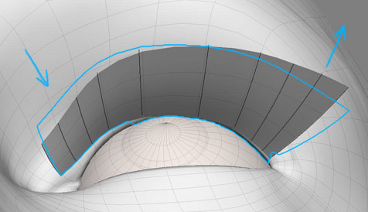
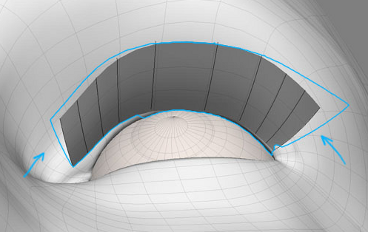
You can adjust the shape of the eyelash mesh with a set of curves. To do this, click the Edit Curves button on the Eyelash Tool Properties panel. This opens a property editor with fcurves you can edit to adjust the eyelash shape.
These curves provide a quick method of adjustment for things such as the spread of the eyelashes or the curl from one end to the other. You can use these curves to manipulate the eyelash mesh, or you can modify the mesh directly with standard modeling tools.
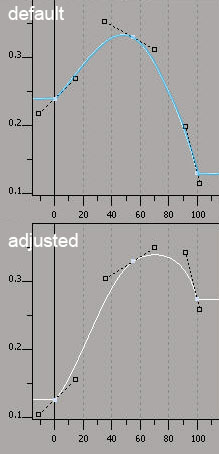
For all of the curves, the left side of the graph represents the inner corner of the eye and the right side of the graph is the outer corner. All of the curves affect both the right and left lashes symmetrically.
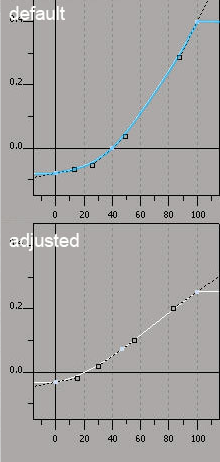
The UpperLength curve controls the length of the guide curves (the curves that the mesh is lofted through), from the vertex where they start to the tip. Use this curve to control the length of the lashes across their width.
|
|
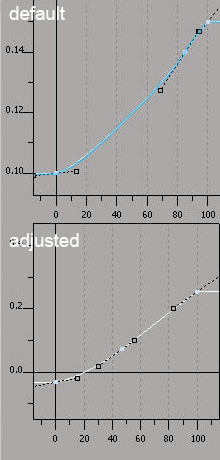
The SpreadCurve controls the inward and outward angle of the guide curves, relative to the center of the lash (how the lashes fan out). Use this curve to control the amount of fanning of the lash across its width.
|
|
The DropCurve controls the angle at which the guide curves grow out from their vertices. Use this curve to vary the angle at which the lash extends from the mesh, across the lash's width.
|
|
The BendCurve controls how tightly the guide curve bends from the vertex to its tip.
 Except where otherwise noted, this work is licensed under a Creative Commons Attribution-NonCommercial-ShareAlike 3.0 Unported License


