The FxTree is where you create networks of linked operators to composite images and create effects. Operators are represented by nodes that you can link together manually or connect beforehand using the Fx Operator Selector.
If you need to build several different networks, you can create multiple instances of the FxTree workspace — called trees — to organize them more efficiently. Each tree is a separate operator in the scene with its own node in the explorer.
For more information about building effects in the FxTree, see Building Effects.
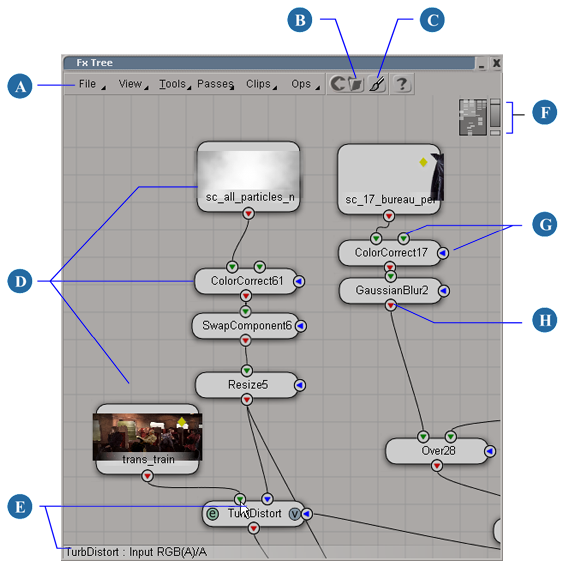
There are a number of different ways in which you can move about in the FxTree. You can use the same pan and zoom tools that you use in 3D views, or you can use the Navigation Control. The Navigation Control lets you pan and zoom using only the mouse.
Press Z to activate the Pan and Zoom tool. You can now left-click to pan in any direction, middle-click to zoom in, or right-click to zoom out.
Press S to activate the Navigation tool. You can now left-click to pan in any direction, or middle-click+drag to zoom in and out.
On the numeric keypad, press + (plus) to zoom in by one level or - (minus) to zoom out by one level.
Use the Navigation Control to navigate. This is described in Using the Navigation Control below.
By default, you can zoom using the mouse wheel. Scroll forward to zoom in and backward to zoom out. Press Ctrl to zoom quickly, Shift to zoom slowly, and Ctrl+Shift to zoom even more slowly.
If desired, you can disable the mouse wheel zoom or restrict it to the Navigation tool so that you can use the mouse wheel with other tools. See Mouse Wheel in Camera Preferences [Preference Reference].
The Navigation Control combines a rectangular bird's-eye view of the FxTree, used for panning, with a slider, that controls zooming. The rectangle represents the entire FxTree workspace in miniature. Inside this rectangle, a light gray rectangle represents the visible portion of the image, while an even lighter gray rectangles represent the operators in the workspace.
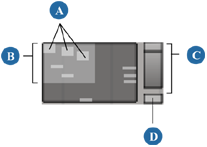
With the zoom slider on the right, you can move the pointer up and down to zoom in and out.
The Navigation controls are automatically displayed when you place the first operator in the FxTree.
A tree is an instance of the FxTree workspace. If your workspace becomes too crowded, you can always create extra trees and organize your effects accordingly. In the explorer, each tree is represented by an FxTree node, which is located directly under the scene root.
By default, each tree is named FxTree (FxTree 1, FxTree 2, and so on). You can easily rename trees to identify the effects that you've created in them.
You can rename an FxTree in the same way as other elements in the explorer. See Renaming Scene Elements in the Explorer [Windows and Views].
The change is reflected in the FxTree's File  Choose Tree menu.
 Except where otherwise noted, this work is licensed under a Creative Commons Attribution-NonCommercial-ShareAlike 3.0 Unported License


