Scaling a clip makes it longer or shorter, slowing down or speeding up its animation, respectively. You can scale a clip interactively by dragging, scale it to the location of the playback cursor at a specific frame, or use a clip's Time Control property editor.
You can scale action, shape, and compound clips, including clips that have extrapolation (cycles, bounces, or holds). Scaling a compound clip also scales the clips within it accordingly.
Be aware that scaling is different from trimming (changing the source's in and out values). Scaling a clip scales the weight curve along with the clip, but trimming the in/out points crops the clip independently of the weight curves. For more information, see Trimming (Cropping) Clips.
Scaling a clip is affected by rippling, which controls how other clips on a rippled tracks move in relation to the scaled clip — see Rippling Clips.
Move the playback cursor to the frame to which you want the clip to be scaled.
The frame must be after (to the right of) the start of the selected clip; either within the clip to scale down or further right to scale up. You cannot scale negatively, you cannot scale to a frame before (to the left of) the start of the selected clip.
Choose Edit  Scale to Current Frame from the mixer's command bar.

The clip is scaled up to the playback cursor that's at frame 150 when you choose Scale to Current Frame.
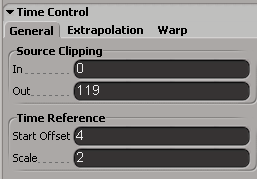
Scaling a clip using its Time Control property editor lets you enter the exact scaling values.
Display the Time Control property editor by right-clicking the clip and choosing Time Properties or pressing Ctrl+T.
On the General property page, set the Time Reference  Scale to the desired value.
This Scale value refers to how much time has been scaled. For example, if you increase the scaling, you speed up the relative time of the clip, which decreases the duration of the clip. Therefore, if you scale time by a factor of 2, the length of the clip is cut in half (the animation is two times faster). Smaller values result in a longer clip.
To scale a shape clip to zero frames, right-click it then choose Time Control and set the Source Clipping In and Out values to 0.

 Except where otherwise noted, this work is licensed under a Creative Commons Attribution-NonCommercial-ShareAlike 3.0 Unported License