There are a number of ways to move a clip in the animation mixer, the simplest being clicking and dragging. You can also move a clip using its Time Control property editor to accurately specify the offset, which is especially useful for moving multiple clips by a certain amount or to a specific frame.
Moving a clip is affected by rippling and it controls how other clips on a rippled track move in relation to the selected clips — see Rippling Clips. If ripple is off and you move a clip to where there isn't enough space, the clip is trimmed so that it fits into the new position (except audio).
Make sure the Select and Move tool is active (the cursor has double-arrows). If it isn't active, press the space bar.
Select a clip and drag it to a new location on either the same or a different track.
As you move the clip on the same track, a shadow remains of the clip's former location. When you release the mouse button, the shadow disappears.
As you move a clip to another track, a shadow outline of its new position appears so that you can place the clip accurately. When you release the mouse button, the clip snaps into its new location.
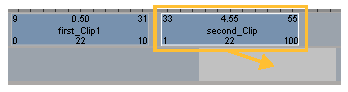
As you move the selected clip to another track, a shadow of its new location is displayed in gray.
Display the Time Control property editor by pressing Ctrl+T or right-clicking a clip and choosing Time Properties.
On the General property page, set the Start Offset to the frame where you want the clip to start.
For example, to move one or more clips to frame 200, set the Start Offset to 200. You can also move a certain number of frames to the right (forward in time) or left (back in time) by adding the + or - signs to the value (such as 20- moves all the clips to the left by 20 frames).
You can also start or end a selected clip at a specific frame as defined by the position of the playback cursor.
Move the playback cursor to the frame at which you want to clip to start.
Select a clip and choose Edit  Start at Current Frame from the mixer's command bar. The clip's first frame starts at the playback cursor's position.

On the left, the playback cursor is at frame 300.
On the right, the selected clip moves so that it starts at frame 300 when you choose the Start at Current Frame command.
 Except where otherwise noted, this work is licensed under a Creative Commons Attribution-NonCommercial-ShareAlike 3.0 Unported License


