


The animation mixer looks like a digital video editor, but instead of editing video sequences, you create animation sequences, transitions, and mixes. It takes all the underlying animation data and packages it into clips. Each clip is an instance of an animation source that you create. On the frames "covered" by the clip, the data stored in the source drives the animation.
Once you have a library of sources created, you can bring them into the mixer in a completely non-destructive manner (the original data stays untouched), making it easy to experiment.
After you start mixing, you can always go back and change the original data and all your changes will automatically be applied. Or if you're working with animation that can't easily be edited, you can just add a layer of animation on top of it, much like an animation layer on top of the base animation layer.
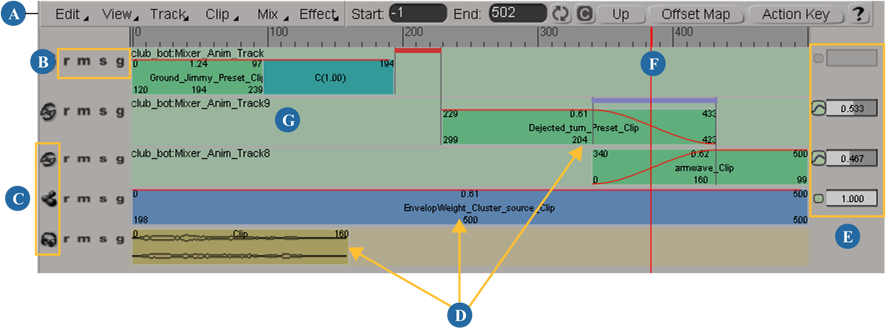
| A |
Command bar contains all menu commands and buttons for using the mixer. |
| B |
Letters let you ripple (r), mute (m), solo (s), and ghost (g) tracks. See Rippling Clips; Muting and Soloing Tracks for Playback; and Ghosting Clips for information on each of these options. |
| C |
Icons indicate the type of track (animation, shape, audio, layer, cache, and image) and let you select the track. See Working with Tracks for more information. |
| D |
Clips appear as colored bars indicating their type on tracks. See Working with Clips for more information. |
| E |
Weight panel contains sliders. You can mix clips that overlap each other in time by setting and animating each of their weight values. See Mixing and Weighting Clips for more information. |
| F |
The playback cursor shows the current frame on the timeline. |
| G |
Tracks contain clips of their type: action, shape, audio, layer, cache, and image. Multiple tracks let you overlap clips in time and mix their weights. See Working with Tracks for more information. |
You can use the animation mixer for these types of data:
Animation (fcurves, expressions, and constraints) — see Actions
Shape animation — see Animating Shapes
Audio — see Audio and Animation
Animation layers — see Animation Layers
Cached animation and simulation sources — see Caching Animated Deformations and Simulations
Image Clips — see Manipulating Image Clips in the Animation Mixer
The animation mixer can only display the mixer for one model at a time. Whether the mixer window is currently empty or already showing a model, you can open a different model.
If the animation mixer is in a floating window, the name of the current model is displayed in the window's title bar.
Click the Lock icon on the command bar to "lock" the mixer and prevent it from updating if you select a different object.

Click the button again to deactivate it (and update the mixer if the selection has changed).
To update to a new object while keeping the mixer locked, select the model or object and click the Update icon.

This refreshes the mixer's contents to the currently selected object.
 Except where otherwise noted, this work is licensed under a Creative Commons Attribution-NonCommercial-ShareAlike 3.0 Unported License
 Animation Mixer