When an object is driven by two or more clips at a time (the clips overlap in time), you can choose to see the contribution of each clip's animation on the object as a ghost in the viewport. Because you can see the original animation from each clip and the results on the model, ghosting can help you create smooth transitions and weighting between clips, as well as set up offsets for poses.
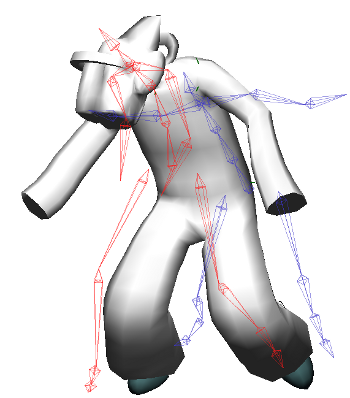
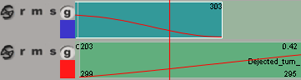
Contribution from Clip A shows the ghost in blue; from Clip B, the ghost is in red.
The results of the two being blended together at the current frame is shown on the character. The weight curves on each clip indicate the percentage of contribution at that frame.
Ghosting in the mixer works by grabbing an object's wireframes in a 3D view to generate the ghosts, then it caches the results that are displayed in that view.
Ghosting uses 3D fast playback-like caching for its data. Like 3D caching, you can orbit and manipulate the camera and still get the benefit of caching. The data for each clip is cached so when you edit the clip (such as its values or create a pose offset), the view is updated. When clips have static data (like shape and pose-based action clips), a single frame is cached for it, which saves memory.
Make sure at least two clips are driving the object (overlapping in time) in the mixer. These can be action, shape, or compound clips of either type.
Do one of the following to ghost any number of tracks:
Click the g button on the left side of the track whose clips you want to be ghosted (all clips on the track are ghosted).

Open a track's Track property editor by choosing Tracks  Track Properties or by right-clicking the track and choosing Track Properties. Select Ghost in the Track property editor.
Each track and its associated clip use a different color for easy identification (see Selecting a Ghost Color).
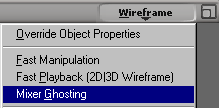
Choose Mixer Ghosting from the display menu in a 3D view to view the ghosting in that view.
You can also choose Visibility Options from the display menu and select Enable Mixer Ghosting from the Ghosting page in the Camera Display property editor.
Move to a frame where the clips are overlapping and see the contribution of each clip in the viewport. Now you can easily set up transitions, adjust the weighting, set offsets, etc., and see how each clip blends.
The ghost color appears in the track controls and on the object that is associated with the ghost clips.
Click the color chip below the g button in the tracks controls and select a color from the color editor that appears.

Open a track's Track property editor by choosing Tracks Track Properties or by right-clicking the track and choosing Track Properties.
In the Track property editor, do one of the following:
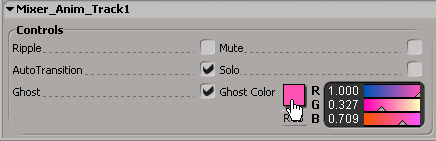
The track and ghost image in the viewport update immediately with the new color.
Compound clips are a little different from basic actions and shape clips because you can ghost them at two levels: the contents of the compound clip (each clip within the compound) and the compound result (top level).
Although you can ghost shape compound clips at the top level, you usually have all shape clips for an object inside a compound. This way you can open the shape compound clip and ghost its contributing clips.
If you want to ghost the contents of the compound, you can only view the compound by itself because it's using local time (time related to the compound clip, not the scene).
If you're ghosting a compound clip at its top level, you can ghost it with any other clip (action, shape, or compound) because they're all using global (scene) time. You may want to ghost at the top level when you need to see the animation as a whole.
 Except where otherwise noted, this work is licensed under a Creative Commons Attribution-NonCommercial-ShareAlike 3.0 Unported License