You can cut, copy, and paste one or more keys in the timeline to edit an object's animation. Cutting removes the keys from the timeline and puts them into the paste buffer until they are pasted. Copying puts a copy of the keys into a paste buffer, where they stay until they are replaced, allowing you to paste the same keys as many times as you like.
You can paste the cut or copied keys within a region, in which case the pasted animation is scaled up or down to fit into the target region.
Make sure that Ripple is on or off, depending on what you want to do when pasting (see Pasting Keys).
Activate the Merge Keys or Replace Keys option (see Merging or Replacing Existing Keys When Pasting), depending on what you want to do when pasting the cut keys.
Press Shift and drag in the timeline to create a region of frames.
Make sure that Ripple is on or off, depending on what you want to do when pasting (see Pasting Keys).
Activate the Merge Keys or Replace Keys option (see Merging or Replacing Existing Keys When Pasting), depending on what you want to do when pasting the copied keys.
Press Shift and drag in the timeline to create a region of frames.
Do one of the following to copy the keys:
Press Shift and draw a region into which you will paste the cut or copied keys, or move the playback cursor to the frame where you want to paste.
Right-click on the target region or frame and choose Paste.
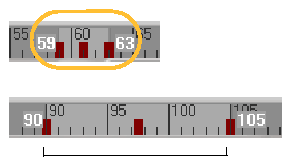
If the region into which you are pasting is smaller than the region of cut or copied keys, the keys are squeezed into the new region, resulting in the animation being faster.
If the region into which you are pasting is larger than the region of cut or copied keys, the keys are spread out in the new region, resulting in the animation being slower.

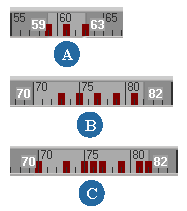
On the top, region containing 3 keys is copied.
On the bottom, the keys are pasted into a larger region resulting in the animation being slower because there are more frames between each of the keys.
If you have copied keys, you can continue pasting the clipboard contents to other regions on the timeline.
You can paste the cut or copied keys with or without moving the other keys on the timeline, depending on whether Ripple is on or off.
To paste the keys and push the existing keys to the right (forward in time), right-click in the timeline and turn the Ripple command on.

On the top, region containing 3 keys is copied.
Copied keys are pasted into the same size region a few frames down. The offset between the copied keys and the keys to their right remains the same.
Copying and pasting regions without keys (empty regions) with Ripple on is an easy way to offset the animation. The number of frames in the blank space you copy doesn't matter: it's the size of the region into which you paste the blank frames that determines the amount that the animation ripples.
To paste the keys without moving other keys in the timeline, right-click in the timeline and turn the Ripple command off.
If you paste keys on top of existing keys in the timeline, the existing keys are either merged with the pasted keys or are replaced, depending on which option you have chosen (see the next section, Merging or Replacing Existing Keys When Pasting). With either option, keys that are pasted at the same frame as existing keys overwrite the existing keys.
When you paste keys, you can choose to either merge the cut or copied keys with the existing keys in the target (destination) region, or you can replace the existing keys with the cut or copied keys.
Right-click in the timeline and activate either of these commands:
Merge Keys When Pasting: Cut or copied keys are merged with any existing keys in the target region. If there are overlapping keys, the existing keys are overwritten with the cut or copied keys.

Replace Keys When Pasting. Any existing keys in the target region are first removed, then the cut or copied keys are pasted in.
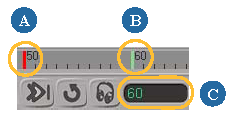
As you're setting keys, you can middle-click the playback cursor on the timeline and drag it to a different frame without updating the scene. The cursor and frame number beside it (and in the current frame box) turn green. To refresh the scene, click the cursor.
By middle-clicking+dragging a frame to another frame, you can copy the current values at this frame to any number of other frames and then set keys. This technique can also be used if you've made the mistake of changing the animated values before moving the playback cursor to a new key position.
With the animatable values set at the current frame, do either of the following:
Middle-click+drag the playback cursor to its new position on the timeline.
Right-click in the timeline and choose Set Key Time.
The scene does not refresh, so your object's values do not change. The playback cursor and current frame number beside it turn green, indicating that it is waiting for the key to be set. The key time is also shown in green in the current frame box.

Set the key using any method as described in Overview of Setting Keys, such as pressing K.
Once the key is set, the red playback cursor jumps to the same position as the green playback cursor and a key is created at this frame. The frame number in the current frame box is displayed in white again.
 Except where otherwise noted, this work is licensed under a Creative Commons Attribution-NonCommercial-ShareAlike 3.0 Unported License