When an action clip contains animation data from a function curve, you can modify its data in the clip effect's expression. When you do this, you create a clip effect which lets you use a number of variables and functions to modify the data "on top" of the original action source animation.
You may need to edit its animation for a number of reasons:
Animation coming from a library of stored actions often needs to be modified to fit a particular goal or environment. For example, you have a walk cycle available, but the character must now walk over an obstacle, so you have to animate the leg moving over the obstacle.
Animation that was originally created or captured for a given character must be applied to a different character that has different proportions.
Animation with numerous keys, such as motion capture animation, must be adjusted, but you don't want to touch the original animation because it can be difficult to edit.
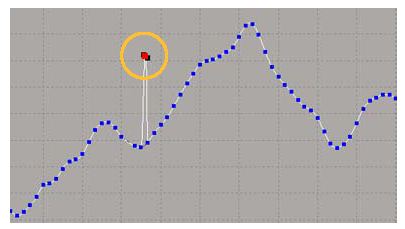
Moving a key point (in red) results in a peak in the curve.
Clip effects let you change the animation in an individual clip without affecting the action source (thus affecting all clips instantiated from that source) or having to re-create the action source. They do this by adding values to only that clip, such as noise, offsets, and other higher-level operations.
This means you can tweak the individual animation "channels" to change the nature of the motion, using the original source as a base. For example, you can add animation to motion capture curves without having to edit them.
Each clip effect is an independent object, associated with its action clip or a compound clip. It is represented in the animation mixer as a yellow bar above the action clip itself. Because the effect is an independent unit, you can easily activate or deactivate it, allowing you to toggle between the clip's original animation and the animation resulting from the clip effect. This makes it easy to test out changes to your animation.
You can apply clip effects to each item (parameter) within a clip, to a whole clip itself (all parameters), or to a compound clip for an overall effect on the multiple clips within the compound.
While you can't apply more than one clip effect on the same clip, you can have the "results" of multiple clip effects by creating a compound clip and applying a clip effect to it. With compound clips, you can have complex effects by nesting them in layers.
For example, you have clips effects on individual clips, then place all these clips into a compound clip and apply a clip effect to the compound clip (such as to add noise, warps, or random values). For a simple example of this, see Example: Creating a Nested Clip Effect.
After you've created a clip effect, the results are calculated in the animation mixer. If multiple effects are applied to a clip, they are calculated in sequence from first applied to last.
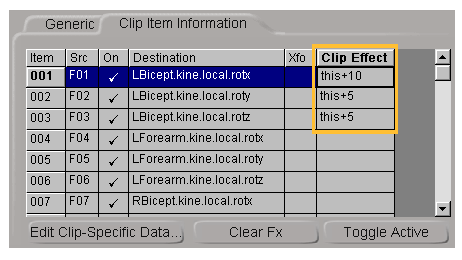
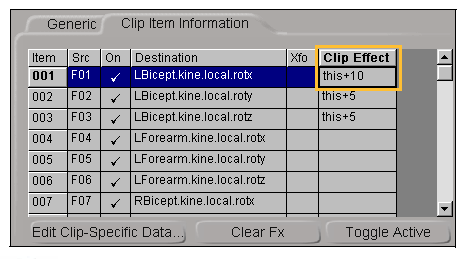
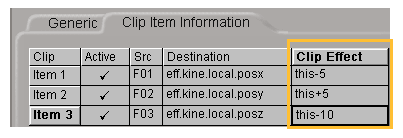
The basic way of using clip effects is to associate a clip effect expression with each of the items (parameters) within the action clip. In other words, you create a clip effect that has as many entries as the action clip has items.
Each item's clip effect expression references the associated sources within the action clip and then modifies them or overrides them in a variety of ways. For example, if you added this+3 as a clip effect expression for the foot's X position, the action clip supplies a value to the mixer. It first looks at the source of animation to obtain a result and then adds the value 3 to it.
The clip effect expressions can be blank (the default), in which case the animation is taken "as is" from the action. You can also build up arithmetic functions using a number of special effect variables (see Creating Effect Variables).
In the Instanced Action property editor, click the Clip Item Information tab.
Enter a formula in the Clip Effect column. You can use the variables and math operators as listed in Variables and Supported Operators and Functions.
You can copy and paste formulas in the Clip Effect column using the standard Cut, Copy, and Paste shortcuts: Ctrl+X, Ctrl+C, and Ctrl+V, respectively.
Select items by clicking their Item# (Shift+click or Ctrl+click to multi-select items, or click the Clip column to select all items), then click the Clear Fx button to clear the expression written for the selected items' Clip Effect column.
You can also define your own custom variables to be referenced in the expression (see Creating Effect Variables).
You can refer to that variable in any of the clip effect expressions by referring to it by name. For example, if your effect variable is called "Banana", then you can refer to it with this+Banana in an expression. Any of the variables can be combined in the same clip effect expression; for example: this+45*param+(Banana/weight)+gtime
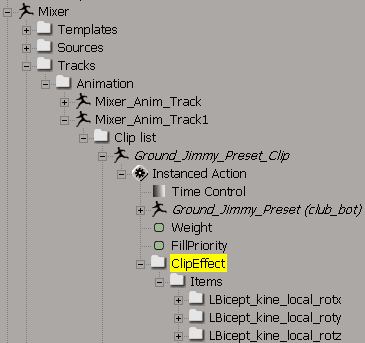
The clip effect is created and represented above the clip as a yellow bar.
To see where the clip effects live, open an explorer and look deep down in the model's Mixer  Tracks Animation Mixer_Anim_Track n Clip list Clip name Instanced Action Clip Effect Items folder.
To open the clip's path quickly, select the clip in the mixer and then press E in the explorer. This way, only the clip and its nodes appear in the explorer.
In the explorer, make sure to choose Show Animated or Animatable Parameters to see these parameters.
This example shows you how to add an offset to an action clip, then create a compound clip and add a custom variable to it for an overall jitter effect.
Create a simple 2D chain that represents a leg. Duplicate it and translate it so that you have two legs beside each other.
On one leg, select the effector and set a few keyframes of the leg moving up and then down.
Store an action for this animation by choosing Actions Store Transformation - Fcurves.
Open the animation mixer and load the action you just created.
Right-click the action clip and choose Clip Properties. In the Instanced Action property editor, click the Clip Item Information tab.
In the Clip Effect column, set a slightly different offset for each parameter.
In the mixer, a yellow bar appears above the clip, representing the clip effect.
Select the action clips and choose Clip Create Compound. This lets you combine a number of clips within a compound so that you can apply an overall effect to both clips.
Select the compound clip and create a custom parameter called jitter (choose Create Parameter New Custom Parameter). Change the Maximum value to 10 and click OK.
For information on creating custom parameters, see About Custom and Proxy Parameters [Customizing Softimage].
Right-click the compound clip and choose Clip Properties. The jitter custom parameter appears as a Variable on the Instanced Action > Clip Effect page.
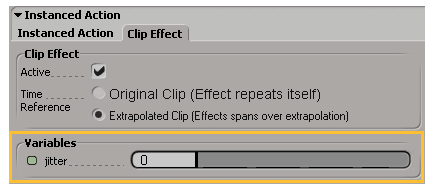
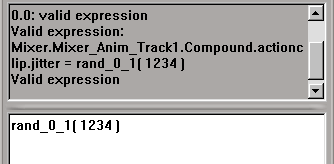
Right-click the jitter custom parameter's animation icon and choose Expression Editor. In the expression editor, add a random function and give it any values you like. The expression could look something like this:
For information on writing expressions, see Animating with Expressions [Animation].
For each of the clips, open their Clip Item Information pages. In the Clip Effect column, reference the custom parameter (variable) you created by entering this+jitter for each clip effect item (use Ctrl+C and Ctrl+V to copy and paste).
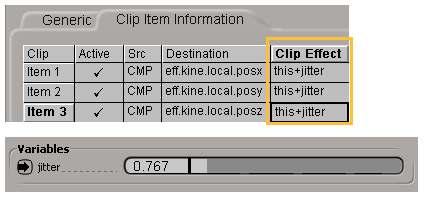
When you play back the animation, you'll see how there's an overall shakiness on the leg. The expression on the jitter slider is controlling the amount of jitter applied to the animation.
Clip effect expressions let you define the clip effect on a per-clip item basis.
Select items by clicking their Item number (Shift+click or Ctrl+click to multi-select items, or click the Clip column to select all items).
Click the Clear Fx button to clear the expression written for the selected items' Clip Effect column.
You cannot save a preset. However, you can copy and paste clip effect expressions using the standard Copy and Paste shortcuts: Ctrl+C and Ctrl+V, respectively.
You can also use scripting commands to read and write clip effect items. Use clipname.actionclip as the value of the MappingTemplate parameter with the GetNumMappingRules(), GetMappingRule(), and SetMappingRule() commands. See the online Command and Object Model Reference for more information.
When writing clip effect expressions, there are several special variables you can use:
| Variable |
Meaning |
|---|---|
| this |
The item's original parameter value. This lets you create offsets from the original value rather than use a new value entirely. |
| cid |
The cycle ID number. If you have cycled or bounced an action clip in the animation mixer, the original clip has a cid of 0, the first cycle has a cid of 1, and so on. This lets you continuously increment or decrement a value based on the cycle; for example, so that a car moves forward with every wheel rotation. See Using Cycles in Clip Effects. |
| time |
The current local time of the clip's source, in seconds. If you cycle or bounce the clip, the values in the first cycle are repeated in the second, and so on. |
| frame |
The current local frame of the clip's source. Again, if you cycle or bounce the clip, the values are repeated. Note that this is always an integer, even if the clip has been scaled and offset. |
| gtime |
The current global time of the scene. |
| gframe |
The current global frame of the scene. |
| weight |
The current mix weight value of the clip. |
| custom parameter name |
If you have created a custom parameter on the clip, you can access its value by using its name in the clip effect expression for any item. |
| param |
The item's effect variable at evaluation time. |
| iwarp |
The item's effect variable as a warp for using the original value. See Using Warps in Clip Effects. |
| warp |
If you have created a custom parameter on the clip called "warp", using this name in the clip effect expression of any item causes the source item to be taken at a time dictated by the warp parameter. |
The expressions in clip effects do not use exactly the same syntax as expressions in the expression editor. In clip effect expressions, you can use any operator or function supported by VBScript. The following tables list the most useful operators and functions.
The clip effect expressions use VBScript as a basic evaluation engine for non-trivial expressions, and in the simple cases, a private custom parser and evaluation engine is used.
For more information, see the Microsoft VBScript language documentation at http://msdn.microsoft.com/scripting/vbscript/doc/vbstoc.htm
An effect variable is a parameter that is associated with the clip effect. You can animate it independently in the time space of the clip and it can be referred to in the clip effect expression of a clip's items.
In other words, you can greatly modify the values within the action clip itself by using other parameters to change the value being supplied to the mixer without needing to alter the sources themselves.
There are two types of effect variables:
Per effect — These are variables for the entire clip effect. You can create and remove them dynamically at any time, so you can have as many or as few as you need. These variables can be referenced by any of the items within an action.
Per item — These are created automatically for each animation item that is present in the original clip. For every item within the clip, a custom variable is created within the associated effect and this variable can be referenced only in the clip effect expression for that item.
When you animate the effect variables (per-item or per-effect variables), you do so in local clip time. When the timing on the animation clip changes, any animation driving the effect variables also moves and updates with the state of the clip itself, so everything stays synchronized.
If you use an expression to drive an effect variable, and if that expression reads from objects in the scene, then those items are used in global scene time. If you tie together variables in the same effect, however, then one will use the other in the correct, clip local time.
You can create effect variables using custom or proxy parameters that can connect to expressions, linked parameters, or scripts (see About Custom and Proxy Parameters).
You can access a custom parameter directly by name inside each item's clip effect expression, allowing you to connect any animation source you please to the item's parameter. For example, you can add per-item noise by creating a noise expression on a custom parameter and then using its parameter name in the clip effect expression for a clip's item.
You can also use custom parameters that you create on the clip itself. If you select a clip and create a custom parameter for it, the custom parameter appears on the Clip Effect page instead of in a custom parameter set, making it easily accessible. See Example: Creating a Nested Clip Effect for an example of this.
You can then reference the values of those variables in each item's clip effect expression by using the word param to mean the parameter associated with that item and the custom parameter name itself to reference it. For example, you can connect a standard expression that generates noise to a custom parameter you create on the clip. You then reference that noise parameter inside an item on the clip by entering this + noise (the name of the custom parameter). Similarly, you could connect a scripted operator to the item's parameter, then reference it using this + param * 10+3/2 (for example). You can even override the channel of animation completely by just using the param variable or the name of the clip's parameter, and in this way, replace the contents of a clip at runtime.
A special use of the effect variables allows a weight control on a clip with extrapolation using either the warp or iwarp variable. This lets you create a timewarp for any of all items within a clip.
The warp variable allows you to define a custom parameter for the clip (called "warp") and refer to it in the clip effect expression strings for any item in the clip. The advantages are that:
You can connect any sort of animation source to the warp parameter (since it's a normal parameter).
You can decide if you want the warp repeated over cycles or not (that is, the warp can occur every cycle or encompass all cycles in an extrapolation).
In the basic use, you enter warp as the string for all the clip effect strings (you can script this too), then attach your own curve to a custom parameter called warp, and you're done.
With the iwarp variable, you can have a distinct per-animation item (such as per fcurve source in the action clip) warp effect by treating the per-item parameter as a warp, attaching a curve (or whatever), and using the string iwarp in the effect.
To do this, rather than using the this variable in the clip effect expression, you use the iwarp variable. What this means is that you use the value source(Parameter(t)); that is, the clip item's effect variable is used as a timewarp lookup to the source itself.
For information on timewarps in general, see Changing Time Relationships (Timewarps).
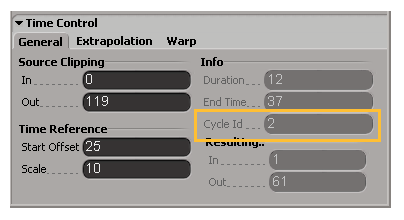
The cid variable in a clip effect expression is the cycle ID number. The cycle ID can be used in an expression to progressively offset a parameter in an action, such as for having a walk cycle with a progressive offset. You can find the Cycle ID of the current frame on the General page in the Time Control property editor (click the clip and press Ctrl+T). This information is read-only and cannot be modified.
If you have cycled or bounced an action clip in the animation mixer, the original clip has a Cycle ID of 0, the first cycle has a Cycle ID of 1, and so on. If the clip is set to extrapolate before with a cycle or bounce, the cycle immediately before the original clip has an ID of -1, etc. This lets you continuously increment or decrement a value based on the cycle; for example, so that a car moves forward with every wheel rotation.
For example, with a clip effect expression like:
(cid * 10) + thisThe parameter value of the action is used for the duration of the original clip, then 10 is added for the first cycle, 20 is added for the second cycle, and so on.
For information on cycles in general, see Cycling, Bouncing, and Holding Clips (Extrapolation).
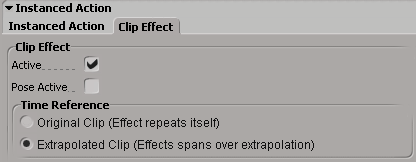
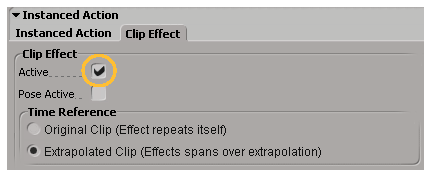
When you create a clip effect, you can force it to repeat with each extrapolation (each cycle or bounce) or have it span the entire extrapolation. For example, you can do a walk cycle and then use the offset effect to move the hand. You can then apply the hand movement to each cycle instance or have it span the entire walk cycle.
In the Instanced Action property editor, select one of the Time Reference options on the Clip Effect page:
Cycle or bounce the clip by dragging one of its corners. For more information on extrapolation, see Cycling, Bouncing, and Holding Clips (Extrapolation).
Right-click the clip and choose Clip Properties. On the Clip Effect page, toggle the Active option.
Right-click the clip's yellow effect bar or a pose offset's aqua bar and choose Remove Effect.
Select the clip and choose Effect Remove Effect on the animation mixer command bar. This removes the animation on all parameter curves and clears the clip effect expression
information for all clip, offset, and pose offset effects.
 Except where otherwise noted, this work is licensed under a Creative Commons Attribution-NonCommercial-ShareAlike 3.0 Unported License