


Value-mapping templates provide a way for you to automatically modify the animation values in an action when you create clips. For example, you can add an offset so that two characters don't try to walk in the same place at the same time. Similar to connection-mapping templates, value-mapping templates let you map out information before you perform an action.
Each model can have multiple value-mapping templates and each of these templates can be active or not. The order of templates
is the order of their creation, as listed in the explorer or the Effect  Value Template menu in the animation mixer.
When you create an action clip, the rules in the first active value-mapping template are copied locally onto the clip. You can modify this local expression as described in Modifying Action Clip Values, but the changes affect only that particular clip — the next time you instantiate a clip, the original rules in the first active value-mapping template will be used again (unless you have changed them in the meantime).
You can automatically create a template that contains the offsets of the current transformation values between two objects or you can create an empty value-mapping template and then add rules manually.
Select an object in the scene, then on the Animate toolbar choose Actions Templates Create Empty Value Template.
Although nothing appears to have happened, an empty value-mapping template was indeed created for the selected object's parent model. You can check for it in the model's Mixer > Templates > Value Mapping folder in the explorer.
In the animation mixer, choose Effect Create Empty Value Template. A template is created for the current model and the Value Map property editor opens.
Once you have created an empty value-mapping template, you can add and modify rules as described in Editing Value-Mapping Templates.
This procedure works properly only when the two hierarchies have the same number of children and the same subtree structure.
Select the target: this is the object or hierarchy whose animation will be offset from the original action.
From the Animate toolbar, choose Actions Templates Create Value Template.
Pick the source object or hierarchy in object mode (left-click), branch mode (middle-click), or tree mode (right-click).
A template is created by matching objects in the hierarchies according to their positions in their subtrees with their corresponding transformation offsets.
To see the template, choose the one you want from the Effect Value Template menu in the animation mixer.
Templates Value Mapping folder.
Once you have created a template in this way, you can fine-tune it as described in the next section, Editing Value-Mapping Templates.
Once you have created a value-mapping template, you can use the Value Map property editor to add, edit, and delete rules. You can also use this editor to activate and deactivate templates, as well as save and load preset templates.
Make sure the correct model is open in the mixer; if not, select the model or one of descendants and click Update on the mixer command bar.
Choose an item from the Effect Value Template menu. The Value Map property editor for the chosen value-mapping template opens.
If there is no Effect Value Template command in the animation mixer, that means that the current model has no value templates. Choose Effect Create Empty Value Template to create a blank one.
To see the rules better, you can resize the editor as well as the columns. To resize a column, move the pointer over the dividing line between column heading, then click and drag to set a new width.
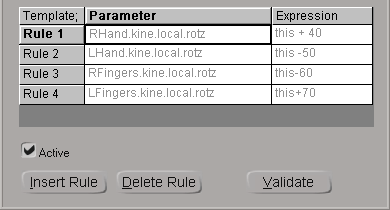
You can select a rule in the Value Map property editor by clicking its name in the Template column (for example, Rule 1) or by placing the cursor in either text box in the corresponding row.
To add a row for a new rule, click the Insert Rule button in the Value Map property editor. The new rule is added immediately above the selected rule — this is important to know because the rules are evaluated in order from top to bottom.
You can edit rules in the Value Map property editor by typing parameter names in the Parameter column and mathematical expressions in the Expression column. The rules use the same parameter names that are used in scripting — if you are not sure of a parameter's name, modify the parameter in a property editor and check the name that gets logged in the SetValue command in the Command Box at the lower left of the main window.
The rules work by applying the formula in the Expression column to the value of the corresponding parameter given by the action at a given frame. The value-mapping rules are applied after the connection-mapping rules, so if you have a connection-mapping template that maps torus to cone, your value-mapping rules should affect the parameters of cone not torus.
See these sections for more details on entering expressions:
Each model can have multiple value-mapping templates and each of these templates can be active or not. When you instantiate
an action, the value-mapping rules of the first active template are copied locally onto the clip. The order of templates is
the order of their creation, as listed in the explorer or the Effect Value Template menu of the animation mixer.
 Except where otherwise noted, this work is licensed under a Creative Commons Attribution-NonCommercial-ShareAlike 3.0 Unported License