You can apply shaders to many different types of scene elements and in several different ways. Regardless of which method you use to apply a shader, the shader's property editor is where you go to modify its parameters.
You can use any of these methods to apply shaders:
You can apply shaders to the following scene elements:
A cluster of polygons to define local materials and textures.
A tree of shaders connected to the parameter of another shader.
A render pass partition to affect specific elements within the scene.
When a shader is applied to an object, it is considered a local shader. Most shaders are applied locally using the methods discussed throughout this section. However, there is one exception which is the camera object, because you attach lens shaders to the camera using its shader stack. For more information, see Applying Lens Shaders to Cameras [Cameras and Motion Blur].
When a shader is applied to a scene, it is called a global shader. Global shaders are applied to the scene at the render pass level and control global rendering attributes like environment shading, volume effects, lens effects, and post-process effects which are applied as output shaders to the scene after rendering is complete. For more information, see Applying Shaders to Passes [Rendering].
You can also apply shaders to render pass partitions to override the shaders applied locally to objects in the scene (for that pass only). For more information, see Applying Shaders to Partitions [Rendering].
Using the render tree to connect shaders to each other gives you the widest possible range of control when connecting shaders. For more information on how to use and create effects with the render tree, see The Render Tree.

You can apply a shader to an object from the Get  Material menu which completely replaces the existing shaders on all ports of the material node. Essentially, this command replaces
the entire "material" definition for the object.
You can also apply shaders using The Material Manager. For more information, see Creating and Assigning Materials.
You can connect almost any shader to any parameter of the material node.
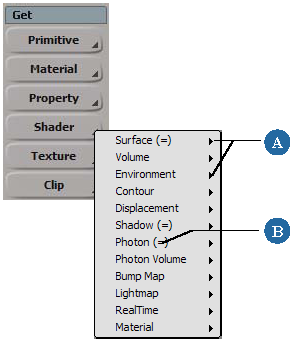
Select an object and choose Get  Shader from the Render toolbar. The menu that appears lists all of the object's Material node's inputs — or ports.

| A |
Each sub-menu connects shaders to one of the material node's ports. For more information about ports, see The Material Node. |
| B |
A parameter with an equals (=) symbol is already connected to a shader. |
To connect a shader to one of the Material's ports, open the port's sub-menu and choose one of the following options:
| Option |
Result |
|---|---|
| Edit |
If a shader is already connected to the port, this option opens its property editor. If the connected shader is a conversion shader, the next connected non-conversion shader's property editor is opened. See Methods for Editing Shaders for details. |
| Disconnect |
Cuts the connection between the port and an attached shader. |
| Insert |
Opens a sub-menu from which you can select a conversion shader (Invert, Color Correction, and so on) to connect to the port. If a shader is already connected to the port, the conversion shader is inserted between the port and the previously connected shader. |
| Edit Conversions |
Opens a combined property editor for all conversion shaders connected in series to the port. For example, if a Phong shader's diffuse parameter is connected to a Color Correction shader, which is connected to an Intensity shader, which is connected to an Image texture shader, choosing Edit Conversions opens a combined property editor for the Color Correction and Intensity shaders. For more information about conversion shaders, see Methods for Editing Shaders. |
| [Various shaders] |
Lists shaders that are commonly associated with the port. Selecting one of these shaders connects it to the port. If a shader is already connected to the port, it is disconnected and replaced with the new shader. |
| Clips |
Opens a sub-menu listing all of the scene's image clips. Choosing a clip connects it to the port via an Image shader. |
| Sources |
Opens a sub-menu listing all of the scene's image sources. Choosing a source creates a clip from it and then connects the clip to the port via an image shader. |
| More... |
Opens a browser so you can select any shader from the shader library. The selected shader is connected to the parameter. If a shader is already connected to the parameter, it is disconnected and replaced with the new shader. Note: Once you select a shader from the browser, it appears in a list of most recently used shaders under the More... option. |
Once you select a shader to connect to a parameter, the chosen shader's property editor opens automatically. You can now edit its parameters.
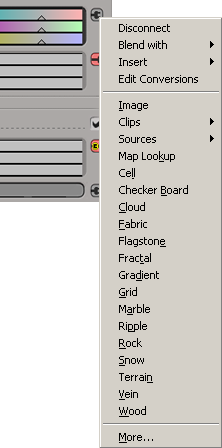
When you apply a shader to an object, the shader's property editor opens. To the right of each parameter, there is a connection icon (a "plug" ). Click the icon to open a menu of shaders that you can attach directly to the parameter. Applying a shader to a parameter lets you control the parameter with another shader instead of a simple color or numeric value.

Once a shader is connected to a parameter, you can use the same menu to disconnect it, connect another shader, or insert a conversion shader between the parameter and the shader you just connected to it. You can also use this menu to blend shaders with specific parameters using texture layers.
From any shader's property editor, click the connection icon for the parameter you wish to connect to another shader.

From the menu, choose one of the following:
| Option |
Result |
|---|---|
| Edit |
If a shader is already connected to the parameter, this option opens its property editor. If the connected shader is a conversion shader, the next connected non-conversion shader's property editor is opened. See Methods for Editing Shaders for details. |
| Disconnect |
Cuts the connection between the parameter and an attached shader. |
| Blend with |
Opens a sub-menu from which you can select a texture shader. The selected shader is blended with the parameter's value via a new texture layer. For more information about working with texture layers, see Blending Textures with Texture Layers [Texturing]. |
| Insert |
Opens another menu from which you can select a conversion shader (Invert, Color Correction, and so on). If a shader is already connected to the parameter, the conversion shader is inserted between the parameter and the previously connected shader. Once you connect a conversion shader to a parameter, a small "c" appears in the connection icon. |
| Edit Conversions |
Opens a combined property editor for all conversion shaders connected in series to the parameter. For example, if a Phong shader's diffuse parameter is connected to a Color Correction shader, which is connected to an Intensity shader, which is connected to an Image texture shader, choosing Edit Conversions opens a combined property editor for the Color Correction and Intensity shaders. For more information about conversion shaders, see Methods for Editing Shaders. |
| [Various shaders] |
Lists shaders that are commonly associated with the parameter. Selecting one of these shaders connects it to the parameter. If a shader is already connected to the parameter, it is disconnected and replaced with the new shader. |
| Clips |
Opens a sub-menu listing all of the scene's image clips. Choosing a clip connects it to the parameter via an Image shader. |
| Sources |
Opens a sub-menu listing all of the scene's image sources. Choosing a source creates a clip from it and then connects the clip to the parameter via an image shader. |
| More... |
Opens a browser so you can select any shader from the shader library. The selected shader is connected to the parameter. If a shader is already connected to the parameter, it is disconnected and replaced with the new shader. Note: Once you select a shader from the browser, it appears in a list of most recently used shaders under the More... option. |
The connection icon changes to indicate that a shader is connected to (or blended with) the parameter. For more information, see Working With Conversion Shaders.
You can now do one of the following:
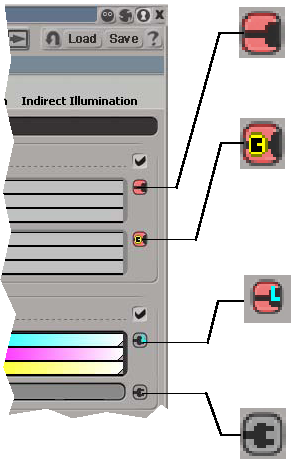
Depending on the type of connection that drives a shader's parameter, the appearance of the connection icon changes:


|
If the parameter is connected directly to another shader, its connection icon is red. Clicking the icon opens the connected shader's property editor. |

|
If a shader is connected to a parameter via one or more conversion shaders (or the parameter is connected directly to a conversion shader), its connection icon is red and marked with a small letter "c". In this case:
For more information about conversion shaders, see Methods for Editing Shaders. |

|
If a parameter has been added to one or more texture layers, a small blue "L" appears in its connection icon. Clicking the connection icon simply opens the menu, as it would if the parameter was unconnected. That's because the texture layers' property editors are appended to the shader's property editor, so you can edit the layers properties directly in the property editor. See Blending Textures with Texture Layers [Texturing]. |

|
A parameter can be directly connected to one shader and blended with others. |

|
An unconnected parameter's connection icon is gray and "unplugged". |
To see which shader is connected to a given parameter, hold the mouse pointer over the parameter's connection icon. The name of the connected shader appears in the tooltip.

| 1 |
Hold the mouse pointer over the connection icon... |
| 2 |
...to see which shader is connected to the parameter. |
If the parameter is connected to another shader, the tooltip lists all of the conversion shaders as well as the next (or the directly connected) non-conversion shader.

The parameter shown here is connected to an Image shader via two conversion shaders: the Invert shader and the Color Correction shader.
As you attach networks of shaders to your objects, you'll notice that some of them are designated as conversion shaders. Conversion shaders are utility shaders that modify one shader's output before it is connected to other shader's parameters.
Typically, these conversion shaders are automatically inserted between two shaders connected by parameters whose data type do not match. For example, when you try to connect a color output to a scalar input parameter, a Color to Scalar shader is automatically inserted to convert to the appropriate data type.
Having them designated as conversion shaders is useful for navigation purposes because, by default, they are bypassed when you navigate between shader property editors.
Generally speaking, conversion shaders can be classified as follows:
Type conversion shaders allow you to convert a shader's output from one type of information to another. For example, the Color to Scalar shader converts a shader's color output into a scalar value. See Processing > Conversion [Shader Reference].
Color conversion shaders allow you to modulate color information output from a given shader. For example, the Color Correction shader allows you adjust the hue, saturation, level, gamma, and contrast of a shader's color output. See Color Balance [Shader Reference].
Simple share shaders allow you to share the output of a given shader with other shaders. For example, the Scalar Share shader allows you to share a single scalar value between several other shaders. See Boolean Passthrough [Shader Reference].
 Except where otherwise noted, this work is licensed under a Creative Commons Attribution-NonCommercial-ShareAlike 3.0 Unported License