Once you have created a crowd simulation, you can add more actors to it, or remove actors from it.
You can add more actors to a crowd simulation at any time. There is no particular limit to the number of actors that you can add to the simulation - see Loading Actors for the Crowd Simulation for more information.
To add an actor to the current crowd:
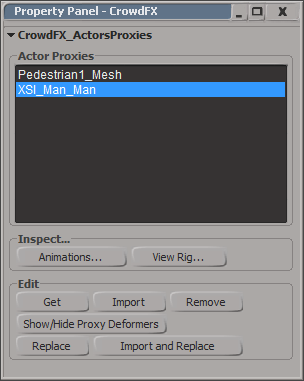
 Actors Edit Inspect Actor Proxies command from the ICE toolbar.
Get button and select a model or envelope mesh that's in the scene. If you pick a model, you will be prompted to select the body
envelope mesh to use if there are other meshes in this model.
Import button and select a model (.emdl file) from the browser that appears.
Actors Edit Inspect Actor Proxies command from the ICE toolbar.
Get button and select a model or envelope mesh that's in the scene. If you pick a model, you will be prompted to select the body
envelope mesh to use if there are other meshes in this model.
Import button and select a model (.emdl file) from the browser that appears.
The new actor model is added to the Actor Proxies list in the property page.
In the current Crowd model, an actor proxy model is added under the Actors_Proxies node and to the Actors_Copies group - see Anatomy of a Crowd Simulation.
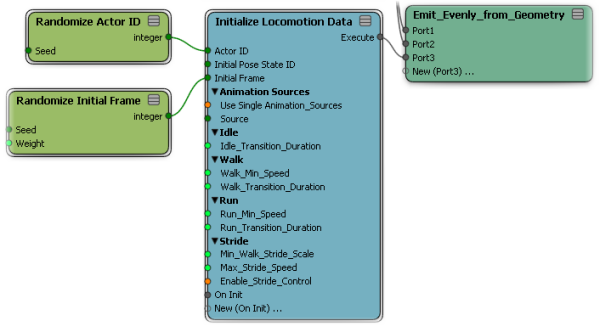
The new actor is assigned the next available number for its Actor ID, and the crowd simulation is recalculated to consider this new actor. The Initialize compound in the Emit ICE tree for the simulation point cloud uses the Actor ID data to determine which actor mesh is instanced for each particle - see below.
By default, the Actor ID is randomized so that each particle emitted doesn't instance the same actor mesh. This is done using a Randomize Actor ID node plugged into the Actor ID port of this compound.
You can change the Seed value in this node to change how the randomization occurs, or use some other logic to assign Actor IDs, such as based on emitter ID.
To have all instances use the same actor, simply unplug the Randomize Actor ID node from the port. Then set the Actor ID value in the Initialize compound to the one you want to use. For example, you can keep multiple actors in your crowd, but just test one at a time.
You can easily remove an actor from a crowd simulation. When you do this, the actor proxy model is removed from the Crowd model, but the original source model is not deleted from the scene.
Actors Edit Inspect Actor Proxies command from the ICE toolbar.
Remove button below the list.
In its appropriate Crowd model, the actor proxy's Actors_Proxies node is removed, and the actor is removed from the Actors_Copies group.
The crowd simulation is recalculated to reflect the actor's removal: the actor's Actor ID is not used anymore so the distribution of instanced geometry is done with the remaining actors, but the same number of particles are still emitted.
 Except where otherwise noted, this work is licensed under a Creative Commons Attribution-NonCommercial-ShareAlike 3.0 Unported License