A partition is a division of a pass, which behaves like a group. Partitions are used to organize scene elements within a pass. There are only two types of partitions: object and light. Light partitions can only contain lights, and object partitions can only contain geometric objects. You can add as many partitions as you need to a given pass, but an object can only be in one partition per pass.
Placing objects in partitions allows you to control their attributes by modifying them at the partition level rather than at the individual object level. The modifications only affect the objects in the partition for the specific render pass to which the partition belongs. This allows you to change object attributes on a per-pass basis.
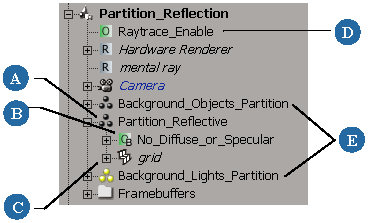
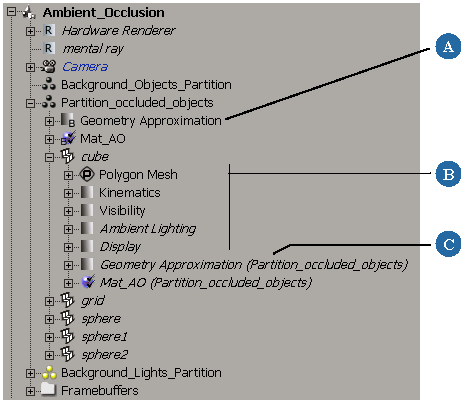
Every render pass contains two special partitions : Background Objects Partition and Background Lights Partition. These partitions automatically include all the objects and lights not explicitly assigned to other partitions.
The objects and lights that appear in the background partitions depend on how you create the pass. For example, if you create an empty pass, all of the scene's objects and lights are placed in the background partitions. Some pass presets, on the other hand, automatically create partitions (besides the background partitions) containing the objects that were selected when you created the pass.
These special partitions let you conveniently treat all the background objects together. For example, when you are defining a matte pass, you can turn off the visibility of all objects in the Background Objects partition so that they are excluded from the rendering process. You can define the contents of the background partitions by removing objects from the background partition.
There are several ways to create a partition: you can create an empty one and add elements to it or you can create one that includes the objects you have selected.
To create an empty object partition
Make the render pass (to which you want to add the partition) the current pass.
Choose Pass  Partition New Partition from the Render toolbar to add a partition to the current pass. An empty object partition has now been created.
You can now name and add the appropriate geometric objects to your new partition (see Adding Objects to a Partition).
To create a partition that includes objects
Make the render pass (to which you want to add the partition) the current pass.
Select the objects or lights that you want included in your partition.
If a geometric object is selected when a new partition is created, the object is placed inside the (object) partition.
If a light is selected when you make a new partition, the (light) partition contains the selected light.
If you select both objects and lights, two separate partitions are created : one for the lights and one for the objects.
Choose Pass Partition New Partition from the Render toolbar to add a partition to the current pass. A new partition is created with the elements you selected
and it is displayed as a subnode of the selected render pass in the explorer.
If you've created an empty partition, you probably want to put things in it. You can add objects to a partition by dragging-and-dropping them or by using the Add to Partition command in the Render toolbar.
In the explorer, make sure that the partition to which you want to add elements is displayed.
In a 3D view, select the object or objects you want to add to the partition.
Select only elements of the same type: you can add only geometric objects to object partitions, and only lights to light partitions.
After selecting the objects, Shift+click the partition to which you are adding the objects to include it in the selection.
Choose Pass Partition Add to Partition from the Render toolbar. The selected objects are added to the selected partition.
Dragging and dropping objects to partitions
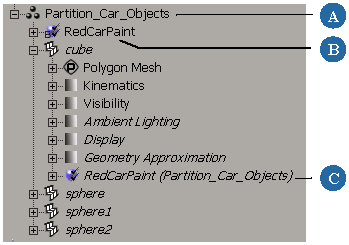
You can also add objects to partitions by dragging and dropping the objects directly onto a partition node in the explorer. The objects are added as subnodes of the partition. Notice that the objects still appear under the Scene node as usual, but now they are also associated to a particular render partition.
Applying and Overriding Properties on Partitions
You can apply or override properties on a partition: these properties are set for all objects in the partition. The partition properties take precedent over the individual objects' properties for the current render pass. If you do not explicitly apply or override partition properties, then any existing properties on the individual objects are used when rendering the pass.
You can apply an entire property using any of the Get Property (name of property) commands or you can override specific parameters with the Get Property Override command for all objects in a partition.
Applying Properties to Partitions
You apply properties to partitions in the same way you would to any object by using the Get Property (name of property) commands available from any of the toolbars. The property applied on the partition takes precedence over the same property
defined on each object in that partition. Once the property is applied, you can open its property editor and modify the parameters.
For a list of the propreties that can be applied, see Applying Properties [Scene Elements].
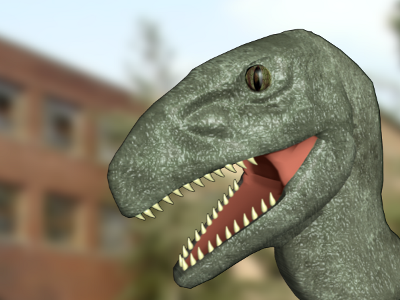
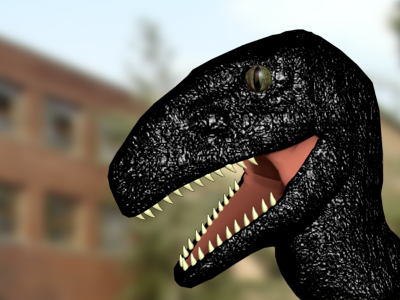
The following example shows what happens to a set of objects when a geometry approximation property is applied to the partition that contains them:
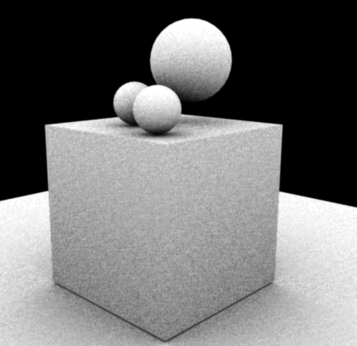
Object-level geometry approximation with subdivisions set to 0.0.
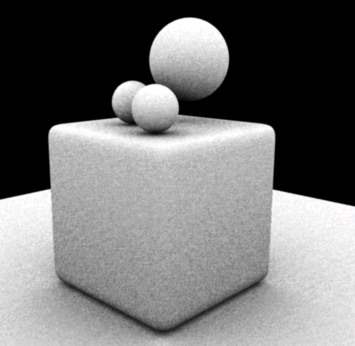
Partition-level geometry approximation with subdivisions set to 2.0.
You can use an override to redefine specific shader parameters in a pass–partition. For example, if a scene contains several hundred objects and you want to edit each object's transparency value without reapplying a new material, you would create a pass partition that contains all the objects you want to modify, and define an override property linked to each materials' transparency parameter. The override affects only the desired parameter(s) and leaves the other values untouched.
|
|
| This render tree was created from several materials' diffuse, ambient, specular, and transparency parameters. As you can see, a single shader can affect a parameter for several objects at once. |
|
To add an override to a partition
Click the Add Parameters button. A pop–up explorer appears listing each object in the partition.
Click any shader parameter's name to include it with your override property. Each parameter you select is highlighted in blue. Shift+click to select several parameters.
To close the window, click outside the explorer once you have selected the parameters.
For more information about working with overrides, see Overriding Properties [Scene Elements].
You can create powerful effects by expanding an override using the render tree. For example, you could create a 3D glow and connect its render tree to the Transparency parameter of all your objects, giving them all a glow without having to edit each object.
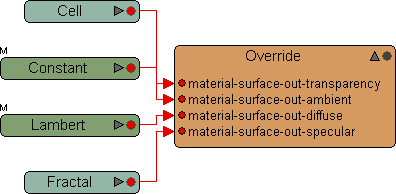
This render tree was created from several materials' diffuse, ambient, specular, and transparency parameters. As you can see, a single shader can affect a parameter for several objects at once.
Open the render tree to see the override property node. If nothing is visible in the render tree work area, click Update.
Add and edit shader nodes as you normally would in the render tree. For more information on working with the render tree, see The Render Tree [Materials and Shaders].
Overriding Rendering Visibility for Objects in Partitions
When setting up a scene, you may need to toggle the rendering visibility options for several objects at once. This might be required for scenes that use shadows, caustics, global illumination, final gathering, transparency, etc. and you need to define which objects are casters, which are receivers, and which are both (or neither). In complex scenes with many objects, the easiest way to do this is to use partitions and overrides to set visibility options for several objects at once.
Move the objects whose visibility options you wish to toggle to partitons that you created under a pass.
Expand any object's Visibility node and select one or more parameters that you wish to toggle for the partition (shadow caster, reflection receiver, final gathering sampling visibility, and so on).
Hold down Shift while selecting to add multiple parameters to the selection. Then Click outside of the pop-up explorer to accept the selection.
The selected parameter(s) now appears in the override property editor. Activate or deactive the parameters as required. This overrides the local properties of each object in the partition.
For more information about working with overrides, see Overriding Properties [Scene Elements].
Applying Shaders to Partitions
When you apply shaders to partitions, they override the shaders applied individually to objects in the scene (for that pass only). This means you can change the materials of objects in a particular pass without losing the materials of objects as defined for the whole scene.
To apply a shader to a partition
In the explorer, expand a pass (click the + sign) to display its partitions.
Select the partition node to which you want to apply a shader.
In the preset browser, select the desired shader and click OK to apply it to the partition.
Once the shader is applied, its property editor opens where you can edit its parameters.
Removing Objects From a Partition
While building your render pass, you may have to remove objects from an existing partition.
In the explorer, expand the pass partition (click the + sign) you want to modify to display the objects it contains.
In a 3D view, select the objects you want to remove from the partition.
Select only elements of the same type: you can add only geometric objects to object partitions, and only lights to light partitions.
After selecting the objects, Shift+click the partition to which you are adding the objects to include it in the selection.
Choose Pass Partition Remove from Partition from the Render toolbar. The selected objects are removed from the partition.
Copying Partitions Between Passes
You can also drag-and-drop partitions from one pass to another instead of recreating them individually for each render pass. This method is equivalent to copying and pasting the objects and attributes of one partition into another. Dragging and dropping a partition keeps all of the changes made to that partition until it is edited.


