Animation ghosting, also known as onion-skinning, is a viewing mode that lets you display a series of snapshots of animated objects at frames or keyframes behind and/or ahead of the current frame. This lets you easily visualize the motion of an object, which can help you improve its timing and flow.
Ghosting has its roots in cel animation, where animators use translucent sheets containing the previous and next keyframes as a reference while drawing. This gives the animator a feel for the motion of the object and serves as a guide when editing keyframes.

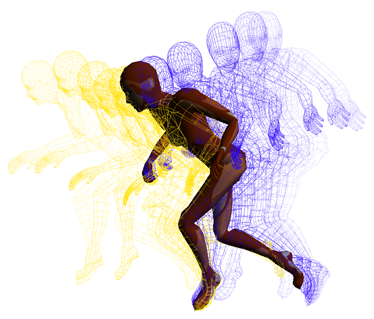
Ghosting displayed for a character with motion capture animation stored in an action clip. The geometry of the animated object is ghosted, but you change its display to motion trails, points, or vectors.
Ghosting works for any object that moves in 3D space, either by having its transformation parameters (scaling, rotation, and translation) animated or by having its geometry changed by shape animation or animated deformations (including envelopes, rigid body, cloth, and soft body). The transformation parameters can be animated in any way: by fcurves (keys), constraints, expressions, scripted operators, or an action clip in the animation mixer.
Ghost images themselves are not cached but are instead drawn for the animated object at each frame. As a result, the ghost images are updated automatically when you change the object's animation. You cannot select or modify ghosts, and they cannot be rendered.
You can also view other types of ghosts for:
An object that has overlapping clips in the animation mixer (mixer ghosting). This helps you blend the animation from two or more actions. See Ghosting Clips [Nonlinear Animation in the Animation Mixer].
An object with keys in animation layers. This helps you see the animation contribution from each layer — see Ghosting the Animation in Layers.
The blending between inverse and forward kinematics on the same chain (IK/FK blending) — see Ghosting FK/IK Blending [Character Animation].
To see ghosting on the animated objects, there are several steps you must take and several options you can choose.
You must activate ghosting in a 3D view — see Activating Ghosting in 3D Views
You must activate ghosting for the animated object — see Activating Ghosting for Objects.
You must activate ghosting per scene layer — see Activating Ghosting for Scene Layers and Groups.
If the animated object is in a group, you must activate ghosting for that group — see Activating Ghosting for Scene Layers and Groups.
You can set up the ghosting display options (such as which frames to ghost and the ghost color) in the Camera Display property editor — see Controlling the Ghost Display.
You can select the ghost display type (geometry, points, vectors, and so on) in the object's Visibility property editor — see Selecting the Ghosting Display Type.
Also note that scene layer and group settings override individual object settings.
Activating Ghosting in 3D Views
To see the ghost shapes for animated objects, you must activate ghosting for any 3D view in a viewport, object view, or the XSI explorer. Ghosting works in conjunction with any of the display modes for the 3D views, such as Wireframe, Shaded, and Textured. Ghost shapes, however, are always drawn in wireframe if the object's geometry is being used as the ghost shape — see Selecting the Ghosting Display Type for other display options.
Set up the ghost display options in the Camera Display property editor as described in Controlling the Ghost Display.
Activating Ghosting for Objects
You can set ghosting on a per-object basis. Remember that scene layer and group settings override individual object settings; for example, if ghosting is active for an object but not its scene layer, you won't be able to see the object's ghosts.
To activate the ghost display per object
In an explorer, click the Visibility icon for an object to open its Visibility property editor.
In the Animation area, select the Ghosting option.
If this option has a check mark but is unavailable (grayed out), it means that this object belongs to a scene layer or group whose ghosting setting is active (see next section, Activating Ghosting for Scene Layers and Groups).
Activating Ghosting for Scene Layers and Groups
In addition to setting ghosting per object, you can also set ghosting for all animated objects in a scene layer or group. Remember that scene layer and group settings override individual object settings.
To activate ghosting for animated objects in scene layers
Click the KP/L tab at the bottom of the main command panel to open the scene layer manager. Then choose View  Show Ghosting Visibility in the scene layer manager. This activates ghosting for objects in the current scene layer.
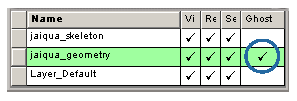
In the scene layer manager (press 6), click in the Ghost cell for the scene layers on which you want to have ghosting.

Click the appropriate scene layer icon in the explorer to open its Layer property editor, then select Members are ghosted as the Animation Ghosting option. This activates ghosting for only the objects in that scene layer.
To determine ghosting behavior for members in a scene layer or group
Click the scene layer or group icon in the explorer to open its Scene Layer or Group property editor.
Select an option in the Animation Ghosting list for the members:
Do not ghost members prevents ghosting for the animated objects. This overrides the Animation Ghosting settings in the members' individual Visibility properties.
Ghost members displays ghosts for the animated objects. This overrides the Animation Ghosting settings in the members' individual Visibility properties.
No effect on members: members are ghosted or not according to the Animation Ghosting settings in their individual Visibility properties. This does not override the members' Visibility properties.
You can view ghosting in any 3D view. Although you can use ghosting with any display mode (Shaded, Textured, Hidden Line, etc.), the ghost's geometry is always drawn as wireframes. You can choose to draw the ghosts on top of objects, as well as have the ghosts fade away (become more transparent) the farther they get (in time) from the current frame.
By default, the object's geometry is used as the ghost shape, but you can change the display type per object — see Selecting the Ghosting Display Type for more information.
You can have ghosts on any interval of frames before and/or after the current frame, keyframes set on an object's transformation parameters, and on static frames.
As well, you can set ghosts for any combination of frames, keyframes, and static frames. For example, you can display keyframes in one color and then display the interpolated frames between them in a different color.

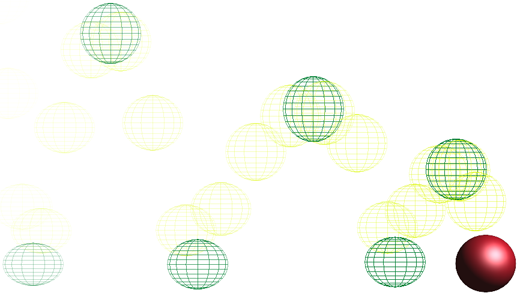
Ghosts with Keys Before set to 6 and a Key Step of 1. Ghosts in a lighter color are also displayed on frames between the dark green keys.
To control the ghost display in a 3D view
Choose Display Options in the Display Mode menu to open the Camera Display property editor.
Click the Ghosting tab and select Enable Animation Ghosting.
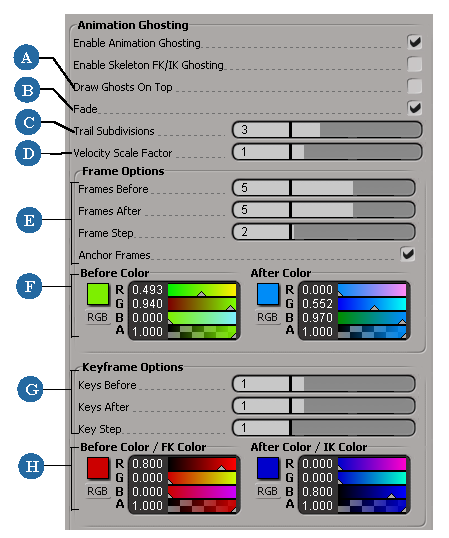
Set the Animation Ghosting parameters to set ghosts on:
For detailed information on each of these parameters, see Animation Ghosting in the Camera Display property editor.

| A |
Displays ghosts on top of objects in the view. |
| B |
Ghosts fade out (become more transparent) as they get farther away in time from the current frame. |
| C |
Number of subdivisions that affects the smoothness of the motion trail display — see Setting the Trail's Subdivisions. |
| D |
Size of the velocity vector when Vector is set as the ghost display type. |
| E |
Displays ghosts on any interval of frames. |
| F |
Sets the corresponding color of the ghosts on frames before and/or after the current frame. |
| G |
Displays ghosts only on keyframes set on local or global transformation parameters — see Drawing Ghosts on Keyframes. |
| H |
Sets the corresponding color of the ghosts on keyframes before and/or after the current frame. If you're using FK/IK ghosting for FK/IK blending on a chain, you set the FK and IK ghost colors here — see Ghosting FK/IK Blending [Character Animation]. |
Drawing ghosts only on keyframes lets you quickly see where an object's keys are. If you add or remove a key with ghosting on, the ghosts are immediately updated to reflect the change.
Drawing ghosts on keyframes works only with keys that are set on an object's local or global transformation parameters.
Drawing Static Ghosts on Specific (Static) Frames
You can specify exactly which frames on which you want to display ghosts. This lets you see the state of the animation at any frame. Because these ghosts remain static as the animation is played back, they are useful placeholders. However, if you change the object's animation, the ghosts are updated to reflect this.
Selecting the Ghosting Display Type
You can determines the appearance of the ghosted shapes for each animated object. By default, the object's geometry is displayed as the ghost.
The display types use the current settings as defined in the Camera Display property editor, including fading and whether ghosts are drawn on top of the object.
In an explorer, click the Visibility icon for an object to open its Visibility Property Editor [Properties Reference].
In the Animation area, select an option from the Ghost Type list: Object, Point, Pose, Velocity, or Trail.
For the Point, Pose, and Velocity display types, an icon is drawn at the current position in addition to one drawn for each ghost frame.
Setting the Trail's Subdivisions
The curve created with the Trail display type is generated from the ghost points. To increase its accuracy, you can increase the number of subdivisions used to draw it.
Select Trail as the Ghost Type in the object's Visibility property editor.
In the Animation Ghosting area on the Ghosting page in the Camera Display property editor, set the number of Trail Subdivisions.
The trail is drawn between the first and last ghost frames using the number of ghost frames and the Trail Subdivision value to sample the motion at regular intervals. A smooth curve is then drawn through the sample points. Higher settings make the trail more closely match the underlying motion, but take longer to compute.