A number of tool groups in the main window are designed specifically to help you accomplish your animation tasks. This section briefly introduces them and shows you where to get more information about them.
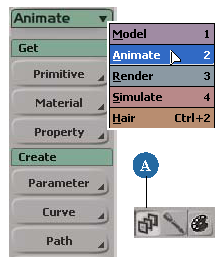
The main place to get commands for animation is the Animate toolbar. You'll find the Animate toolbar at the far left of the screen, as well as on the main menu bar at the top of the Softimage window. It contains all commands related to animation.
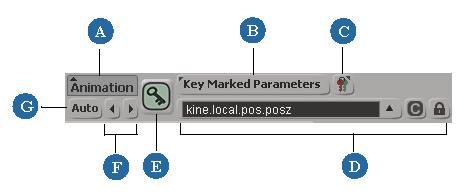
Located at the bottom-right of the Softimage window, the Animation panel contains controls for quickly accessing a number of important animation options:
| A |
The Animationmenu contains commands used for many general animation operations such as setting and removing keys, moving between keyframes, copying and removing animation, scaling and offsetting animation, setting expressions and scripted operators, linking parameters, unmarking parameters, and opening the expression and animation editors. For information on most of the commands available in this menu, see Tasks for Any Type of Animation. |
| B |
The Save Key preference menu lets you choose what gets keyed by default when you click the keyframe icon, press K, or choose the Animation > Save Key command. For information, see Selecting Which Keying Method to Use. |
| C |
The Character Key Set menu provides commands for creating and working with character key sets. These sets provide an easy way to keep parameters you want to key handy for an object for easy keying. For information, see Keying with Character Key Sets. |
| D |
The marked parameter arrow icon let you open the marked parameter list when you want to mark parameters for certain animation operations. The current parameter is displayed in the text box below the list. You can also lock and clear marked parameters using the appropriate buttons. For more information on marking, see Marking Parameters for Animation. |
| E |
The keyframe icon lets you add a key at the current frame, while the autokey button automatically sets a key every time you change a parameter's value. You can also move between keyframes using the arrow buttons below the auto button. For information on keyframing, see Animating with Keys. |
| F |
The arrow buttons move between previous and next keyframes. For information, see Moving Between an Object's Keys. |
| G |
The autokey button automatically sets a key after each parameter edit. For information, see Setting Keys Automatically. |
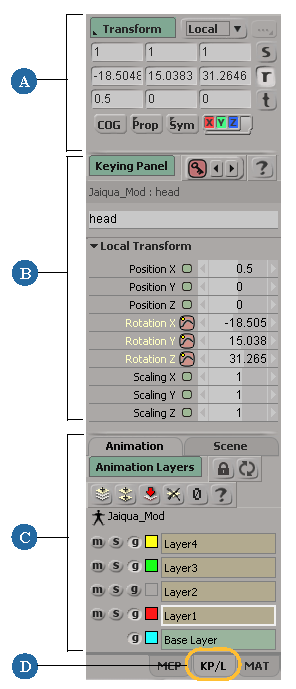
The Keying panel contains many of the tools that you use for keying. You can simply leave this panel open while you're animating to have easy access to all your favorite tools.
| A |
Mini Transform Panel: Lets you easily set transformation values for objects as you're keying them using the tools on this panel. This is the same as using the Transform panel on the main command panel. For information on transformations in general, see Transformations. For important information about animating transformations, see Animating Transformations. |
| B |
Keying Panel: Lets you easily set up and key an object's keyable parameters. For information, see Keying Keyable Parameters in the Keying Panel. |
| C |
Animation Layers Panel: Lets you create layers of keyframes on top of existing animation. For information, see Animation Layers. Scene Layers Panel: Lets you manage the different elements in the scene that are organized in layers. |
| D |
Click the KP/L tab at the bottom of the main command panel to open the Keying panel. |
You will see this in a lot of places in Softimage, such as the explorer or any property editor: the ubiquitous little green box beside any parameter indicating that it can be animated. This is called the animation icon and it lets you do a number of things.

Click it to set or remove a key for that parameter at the current frame.
Right-click it to use commands specific to the parameter, as well as to access animation tools such as the animation or expression editors.
Animation icons indicate animatable parameters with various animation statuses and ways of animation.
Depending on the status of the parameter's animation, the appearance of the icon changes:
| Animation icon |
Description |
|---|---|
|
|
Default green and small: the parameter is animatable, but not currently animated. |
|
|
Red with a curve: the parameter is keyed at the current frame. |
|
|
Green with a curve: the parameter is animated but the current frame is not a keyframe. |
|
|
Yellow with a curve: the animated parameter's value has been changed but not yet set as a keyframe. If you change the current frame without keyframing the parameter's new value, the parameter reverts to its interpolated value. |
|
|
Any state with a little yellow dot: the parameter has a key on it in an animation layer (see Animation Layers). |
|
|
White with a curve: the animation for the parameter has been deactivated (muted) in the keying panel (see Keying Keyable Parameters in the Keying Panel). |
|
|
With a letter C and a connection: the parameter is controlled by a constraint (see Animating with Constraints). |
|
|
With a curve and a letter L: the parameter is a linked parameter (see Linking Parameters). |
|
|
With a letter S: the parameters is driven by a scripted operator (see Scripted Operators [Customization]). |
|
|
Cyan with a black arrow: the parameter is controlled by an override. Overrides temporarily replace the current value of the parameter. Right-click the animation icon and choose Inspect Override to open the override's property editor. For more information on overrides, see Overriding Properties [Scene Elements]. |
| The next three icons indicate expressions of different types (see Animating with Expressions). |
|
|
|
With a letter C: the parameter has an expression that is a constant value. |
|
|
With an = sign: the parameter has an expression that makes the parameter equal to another one (links them). |
|
|
With an arrow: the parameter has any type of expression on it other than a constant value or an "equal" link. |
| The next two icons indicate parameters driven by action clips in the animation mixer (see Actions [Nonlinear Animation in the Animation Mixer]). |
|
|
|
Green or red with a plug: the parameter is driven by an action clip. |
|
|
Red or green with a plug and a plus sign: the parameter is driven by an action clip as well as a function curve, expression, constraint, or scripted operator at the same time. |