Marking parameters is a way of identifying which parameters on a selected element that you want to use for a specific animation task. For example, you mark parameters so that only their animation is copied or removed, or you mark the parameters you want to store in an action to be used in the animation mixer. You can also mark parameters to be used when scaling, offsetting, or plotting an animation, or with linked parameters or scripted operators.

Marked parameters are highlighted in yellow.
Marking parameters is also one of the most common and useful tools for setting keys. By marking only the parameters you need, you can keep the animation information small. For more information on keying, see Animating with Keys.
By default, when you activate any of the transformation tools (scale, rotate, or translate) from the Transform panel or by using their hot keys, their corresponding local transformation parameters are automatically marked. For more information on this, see Marking Transformation Parameters.
As well, there are a number of issues related to marking parameters when saving actions that are to be used in the animation mixer. For more information on this, see Choosing What to Store in an Action [Nonlinear Animation in the Animation Mixer].
You can mark parameters for selected objects only. This is the only way that Softimage knows what to mark. As well, the same parameters remain marked for an object even if the selection changes. For example, if you select a sphere and mark its scaling parameters, then select a cube, the scaling parameters are also marked on the cube. However, any marked parameters that do not apply from one object to the next are ignored.
You can also create marking sets to remember the parameters that were marked on an object — see Keying with Character Key Sets.
Setting a Preference for Keying Marked Parameters
Before you start marking parameters and setting keys, you need to make sure that the keying preference is set to marked parameters.
To do this, see Selecting Which Keying Method to Use. You can select the Key Marked Parameters option, or the Key Marked Keyable Parameters option to set keys only on keyable parameters that you have marked in the keying panel (see Keying Keyable Parameters in the Keying Panel for more information).
You can mark parameters from the marked parameter list, the explorer, any property editor, or the keying panel.
To mark parameters from the marked parameter list
Click the arrow icon on the Animation panel that opens the marked parameter list.

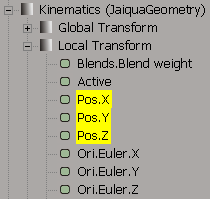
In the list, expand a property node until you display the parameters you want to mark. Animatable parameters are indicated by an animation icon (green box) beside their names.
Click the parameter name to mark it, or Shift+click to mark multiple parameters. The parameter name is highlighted in yellow, indicating that it has been marked. The name also appears in the marked parameter text box.
Click the name again to unmark it or Ctrl+click to toggle its marking.
You can also enter a name of a parameter in the marked parameter text box to mark it. For example, enter kine.local.pos.posy to mark the selected object's local Y translation.
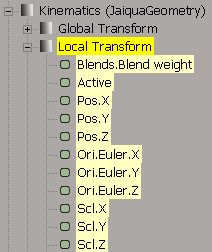
Click a parent property or folder name to mark all its parameters in a hierarchy, or press Shift+click to mark multiple folders. For example, you can mark the whole Local Transform node to mark all transformations (scaling, rotation, and translation) for all three axes (this works only in the marked parameter list). The parent/folder is highlighted in yellow and its children in pale yellow.
Click anywhere outside the marked parameter list to close it.
To mark parameters in the keying panel
See Setting Keys for Marked Keyable Parameters for more information.
To mark parameters in a property editor
Open a property editor with the parameters you want to mark.
Click the parameter name to mark it or Shift+click to mark multiple parameters, or Ctrl+click to mark multiple groups of random parameters.
Animatable parameters are indicated by an animation icon (green box) beside their names. You can also mark non-animatable parameters.
The parameter name is highlighted in yellow, indicating that it has been marked.

To mark parameters in the explorer
Expand an element's property tree until you display the parameters you want to mark.
Animatable parameters are indicated by an animation icon (green box) beside their names. You can also mark non-animatable parameters.
Click the parameter name to mark it or Shift+click to mark multiple parameters, or Ctrl+click to mark multiple groups of random parameters.
The parameter name is highlighted in yellow, indicating that it has been marked. Click the name again to unmark it.
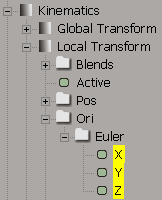
Click a folder name to mark it and the parameters it contains. The parent/folder is highlighted in yellow and its children in pale yellow.

Marking Custom Parameters and Sets
You can mark a whole custom parameter set or just individual parameters within the set. For example, you can store actions for individual custom parameters in a set or for the whole set itself.
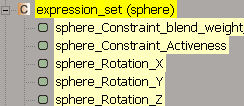
To mark a whole custom parameter set, select the object for which the custom parameter set exists and open the marked parameter list. You need to select the object because marking is relative to selection.
Then click the name of the custom parameter set — you'll see all its parameters highlighted in yellow too. You can't mark the set in the explorer because it supports only "leaf" marking.
To mark the individual custom parameters, click them in the explorer of the Marked Parameter list as you would any other parameter.
To ensure that your marked parameters don't get deleted or overwritten by other markings, click the Lock Marked Parameter icon on the Animation panel. This locks all marked parameters for all objects in the scene.
Locking is especially important to do if you're using transformations (scaling, rotation, or translation). Activating any of the tools from the Transform panel automatically marks the appropriate scale, rotate, or translate parameters, but also has the effect of removing any existing marking from other parameters.

Locked parameters cannot be cleared — make sure to unlock them first (click the Lock icon again) if you want to clear them.


 Unmark All Parameters