In many basic ways, rendering particle simulations is similar to rendering any other object in Softimage. You can use all standard lighting techniques (including global illumination and final gathering), set shadows, and apply motion blur.
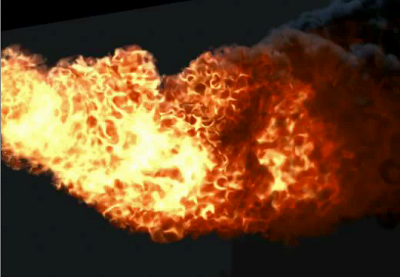
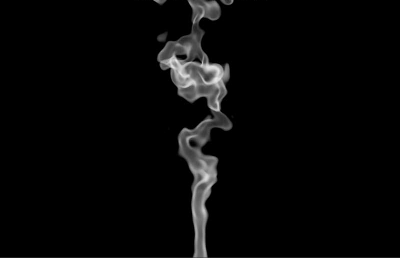
To the mental ray renderer, particles (point clouds) are a surface, just like any other object in Softimage, which means that you can use any shader on them to render them as objects (solid surface). However, when you render particles, you often want them to look like certain types of phenomena, such as smoke, fog, fire, or water. To help you do this, there are some special ICE shaders that are designed to create these effects on the particles, especially volumetric effects.
You can have multiple particle clouds in a scene and they can all render happily, even if the clouds' volumes intersect one another.
For general information about rendering, see these sections:
To set up render passes, see Passes & Partitions.
To render the final scene, see Rendering Methods.
There are special particle shaders for particle simulations that give you the control to make particles look the way you want. All particle shaders are texture shaders except for the Particle Volume Cloud shader, which is, appropriately, a volume shader.
Once you have shaders hooked up together as you like to create an effect, you can create a compound that contains all of these shaders, just as you can with nodes in the ICE tree. This allows you to create a standard effect or look you want to use in several scenes or send to several users, and keep it in one container. See ICE Particle Shader Compounds for more information.
Particle Volume Cloud — see Particle Volume Cloud Shader.
Particle Density — see Particle Density Shader.
Particle Gradient and Particle Gradient Control — see Particle Gradient Shader
Fractal Scalar and Cell Scalar — see Fractal and Cell Scalar Shaders.
Attribute shaders — see Bringing ICE Data into the Render Tree with Attribute Shaders.
Color, Scalar, and Vector Multi Switch shaders — see ICE Particles Change Color or Shape Based on State. You can use these in conjunction with state systems that you've set up in the ICE tree.
Scalar Multi Math — see Scalar Multi - Math for more information.
Particle Info — see Particle Info for more information.
Realtime OGL Particle shader — see OpenGL Particle Shader. This is a realtime shader that allows you to shade your particles in an 3D view set to the OpenGL display mode.
In addition to these special particle shaders, you can plug many of the regular shaders into a point cloud's render tree to shade the particles as surfaces. Because you can use different particle shaders together, as well as throw other shaders into the mix, the visual possibilities are virtually endless.
Connecting ICE Particle Shaders in the Render Tree
Connecting shaders in a particle system's render tree gives you full control over which shader you want attached where. You can attach shaders directly to each point cloud for ultimate control.
When you create a particle simulation, the Phong shader is connected to the point cloud's Material node by default, just as with any other object in Softimage.
To apply other shaders to the point cloud, you connect them in the render tree. This gives you more control over which shader is connected to which node. In addition, you have access to the standard shaders, most of which can be plugged into any particle shader.
For general information about using the render tree, see The Render Tree.
Previewing Shaders in the Render Region
As you're tweaking your particles to perfection, you'll find that the render region is an invaluable friend and ally for checking things. Once you have applied a shader to the particles, you can use the render region to preview a mental ray rendered image of the final look of the particles.
For more information about the render region, see Previewing Interactively with the Render Region.
In many basic ways, rendering particle simulations is similar to rendering any other object in Softimage. You can use all standard lighting techniques (including global illumination and final gathering), set shadows, and apply motion blur.
Particles, Render Passes, and Partitions
You can use point clouds in render passes and partitions just like any other object.
You can use motion blur on particles in the same way that it is used on any other type of object in Softimage. Motion blur calculates the speed of the particles using the camera shutter speed. The camera motion is mapped as particle motion relative to the camera, so blur vectors are computed in any condition of absolute and relative motion. For more information on motion blur in general, see Motion Blur.
Here are some tips for using motion blur on particles:
To render motion blur on particles, make sure that the whole particle simulation is cached because Softimage stores motion from the last frame to compute the motion blur - see Caching ICE Simulations.
You may get better results with the renderer's Primary Rays type set to Raytracing instead of Scanline in the mental ray Render Options Property Editor.
The Rasterizer type is not designed to work with particles, so it does not give any benefits to them as such.
You probably want to use the End of Frame option as the On-Frame Shutter mode: the default is Center of Frame - see Scene Motion Blur Settings.
If you want to have motion blur only on the particles but not on other objects in the scene, create a group with all the objects on which you don't want motion blur, apply the motion blur property to the group, and deselect Blur for it.
Lighting and Shadows for Particles
You can have particles cast shadows on other objects in the scene as well as on each other. As with anything else in Softimage, casting shadows with particles depends on the number and types of lights you're using.
When you're using shadows, make sure you have shadows activated for the lights you want to use — see Shadows.