Particle Gradient Shader


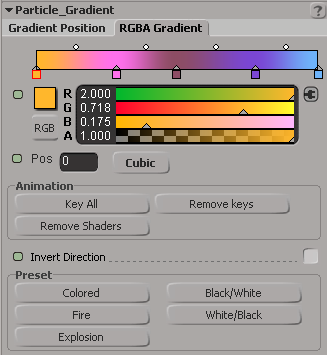
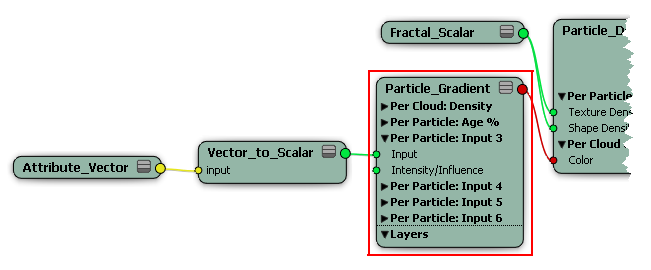
Using the Particle Gradient shader, you can change the color and/or density of the particles based on density, age, or any other ICE attribute that you define for the particles.

A gradient is applied to the particle

This image shows how the color gradient is influenced by the density of the particle.

A fractal is used for the density shape input of the Particle Density shader to which the Particle Gradient shader is also connected.


The shader parameters on the Gradient Position page in the Particle Gradient shader's property editor control the position of a gradient or "ramp". The gradient/ramp position is controlled by six attributes. The first two attributes (Density, Age %) are predefined while the other four attributes (Inputs) can be controlled by any input shader, such as a fractal texture (like Fractal Scalar or Cell Scalar).

You can render the particle's color using an RGBA color gradient/ramp. The shader uses the same gradient controls as found in the Gradient Mixer shader (see Creating Gradients) but is designed to be "particle friendly" for color shifts based on a particle's age. As well, it is optimized for working with a large number of particles.

To connect the Particle Gradient shader

  1. Select a point cloud.

  2. Open a render tree in a viewport and click the Update icon or press F6 to display the render tree for the selected point cloud.

  3. In the render tree, drag the Particle Gradient shader from the Particles group in the preset manager on the left, or choose Nodes Particle Particle Gradient from the toolbar.

  4. Plug the output from this shader into any of the Per Cloud or Gradient ports (such as Color and Density) of the Particle Density shader which, in turn, is connected to the Particle Volume Cloud shader's Density and Color ports.

    You can also plug the Particle Gradient shader into any Gradient port of the shader compounds.

  5. You can also use any of the Attribute shaders as inputs into this shader to drive the color gradient based on almost any ICE attribute for the particles, such as their velocity, size, orientation, mass, point position, etc.

    For details on each parameter in the Particle Gradient property editor, see Particle Gradient.

Using the Gradient Controls

The gradient sliders on the Gradient Position page in the Particle Gradient shader's property editor is where you create and adjust the gradient. The bars displays the gradient left-to-right that is used from the particle's birth (Pos of 0) to its death (Pos of 1).

TipThe Particle Gradient Control shader contains only the parameters on the Gradient Position page, allowing you to apply a gradient controller independently. See Particle Gradient Control for information on this shader.

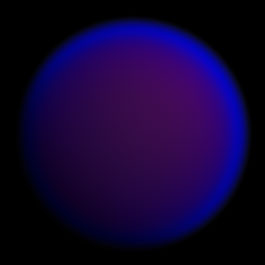
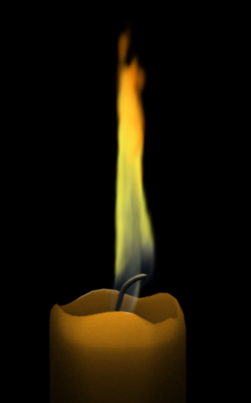
Below, the candle flame uses color gradient based on its age percentage.

  • If the Gradient Start At is set to 0 (particle birth), the color in the color box on the farthest left of the gradient control is used.

  • If the Gradient Ends At is set to 1 (particle death), the color in the color box on the farthest right of the gradient control is used.

For example, if the Gradient Start At value is set to 0 the color at the left end of the gradient is used at the birth of the particle. But if the Gradient Ends At value is 0.5, only half of the particle's lifetime has been reached, so the colors stop changing in the middle of the age of the particle.

Using the RGBA Gradient Controls

The color sliders on the RGBA Gradient page let you determine the color range used by the attributes on the Gradient Position page.

A

Gradient slider displays how the color/alpha values change.

B

Selected square marker shows current color value and its Pos (position) value.

Drag the RGBA sliders to change the color defined for this marker.

C

Use these buttons to animate the markers on the gradient.

D

Inverts the direction of the colors on the gradient slider.

E

Click a Preset button to load that color scheme into the gradient.

F

Round markers indicate the mid-point of the blending between two square color markers.

G

Click anywhere in the gradient slider to add a color marker at that point.

To select color markers

  • Click a square marker below the gradient slider. You can then set its color using the color sliders or key its position.

To set the gradient color/alpha values

  1. Click a square marker to select the color you want to adjust.

  2. Use the color sliders below the gradient control to set the RGB/alpha values to use for this marker.

    TipClick one of the Preset buttons to load a specific gradient control setup.

To change the gradient composition

  • Drag a color marker anywhere along the gradient.

To insert a color marker

  • Click at any point along the gradient slider.

    By default, the new marker assumes the color at that point in the gradient. You can use up to eight color markers, each with its own color.

To delete a color marker

  • Select it and press Delete, or right-click it and choose Delete marker.

To change the blending between two colors

  • Drag a round marker above the gradient slider closer to one of the square markers on either side of it.

    Round markers appear between each pair of color markers, indicating the mid-point in the blend between those two colors.

To set the gradient's interpolation

  • Click the Cubic/Linear button to toggle between these types of interpolation of the gradient.

    Cubic interpolation results in a smoother transition between alpha values, while linear interpolation results in sharper transitions.

To invert the colors on the gradient

  • Select the Invert Direction option. All colors switch to opposite positions on the gradient.

To animate the markers

  1. Go to the frame at which you want to set keys.

  2. Do one of the following:

    • Click the Key All button to key all markers' positions on the gradient slider (both square and round markers).

      or

    • Select a square color marker and click the Pos parameter's animation icon.

To remove the animation on the markers

  • At any frame, do one of the following:

    • Click the Remove Keys button to remove all keys from the markers (both square and round markers).

      or

    • Select a square color marker and go to a frame where there is a key. Then click the Pos parameter's animation icon.

To remove all shaders from the markers

  • Click the Remove Shaders button. Any shaders attached to any of the gradient markers' Color/Alpha and position parameters are disconnected.