Animations can be created within Showcase by transforming objects (changing their Translation, Rotation, or Scale) and setting
“keyframes” of each position to keep. Separating these keyframes on a timeline determines how fast or slow the object moves
from position to position.
Keyframe animations are based on object transformations changing over time. The transform tools are used extensively in animating
this behavior. See Transform objects for more information on transforming objects and using the Handles.
Create a keyframe animation
Create the behavior
- Press B to show the Behaviors interface.
- Select the objects in the scene you wish to animate.
Note
Any objects currently selected when a Keyframe Animation is created are automatically added to the animation.
- Click the arrow beside the button and select .
A new keyframe animation behavior is added, with an icon in the Behaviors interface.
- If an object is selected when the animation is created, the Keyframe Properties window will open.
Setting keyframes
Keyframe animations require that two “key frames” be defined for an animation to occur. The animation is the automatic interpolation
of an object between two or more positions in space (with Translation, Rotation, and Scale).
- Select the object you wish to animate. If the object was selected when you created the behavior, it can be selected by clicking
on its timeline in the Properties window.
Note
Only single hierarchy nodes (single objects or group nodes) in the scene can have keyframes applied on a timeline. However,
multiple objects can be added to the same Keyframe Animation behavior - each with their own timelines and keyframes.
- Position the object in the scene where you would like it to be at one time in your animation. Use the Transform Handles (H)
for the easiest manipulation.
- Open the window by double-clicking on the behavior icon. Or right-click the keyframe animation icon in the Behaviors interface, and
select from the menu.
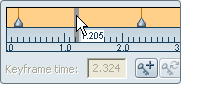
- Click in the timeline to set the keyframe location in time.
A gray bar will appear on the timeline as a marker, and a tooltip will indicate what time you are at.
Note
All times are in marked in seconds. The frame rate of the animation is determined by your hardware, and at the output stage
of animation rendering.
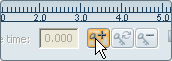
- Press the button (shown in the following image) or press the “,” (comma) hotkey.
The current position and orientation of the selected object in the scene will be “saved” in this key. A new line will appear
on the timeline with an orange triangular handle on the bottom to indicate it is selected.
- Use the Transform Handles (H) to reposition the object in the scene.
- Press the button or use the “,” (comma) hotkey to set a second keyframe.
The timeline will automatically advance by 1 second to prevent overlapping keyframes.
- Drag the new keyframe to the desired location along the timeline in relation to the first.
Note
If an exact time is desired, type the value in the box below the timeline.
- Preview the animation by “scrubbing” the timeline. Click and drag in the timeline between the two keyframes. The animated
object will move in the viewport at the speed you drag.
- Press the Playback Controls button to play the animation at full speed.
Animating more than one object
Multiple objects in the scene can be animated within a single keyframe animation behavior. Each will have its own timeline
and keyframes, and they can be viewed relative to each other in the window, and played back all at once with the behavior .
Note
Parent nodes (groups higher in the hierarchy) cannot be added to keyframe animation behaviors that already contain their children
(or sub-objects in the hierarchy). You can combine animations using storyboards.
Add additional objects to the behavior
- Open the window by double-clicking on the behavior icon. Or right-click the keyframe animation icon in the Behaviors interface, and
select from the menu.
- Select the objects in the scene you wish to add.
- Press the button for Associated Objects, and select from the menu.
An additional timeline with the name of the new object to the left of it will appear in the Properties window.
- Click and drag in the second timeline to set a keyframe position, and keyframe as usual.
Switch between multiple timelines
Each object timeline must be keyframed and edited individually. They are stacked to allow synchronization of the timepoints
and reference to each other.
- Click in the timeline of the object you wish to keyframe or transform.
The timeline will turn orange, and the associated object in the scene will be selected for transformation.
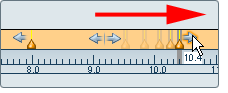
- Move the time location bar (gray vertical bar) to set the location for new keyframes.
- Scrubbing the timeline (sliding the time location bar) will cause the animations in other timelines to display in the viewport
as well.
Note
If the movement of other objects in the same keyframe animation behavior is distracting, those objects can be hidden using
the standard command.
Basic Keyframe Animation Properties
- Name:
-
Click in the box and type to set the name of the behavior.
- Associated objects:
-
Click the button and Add or Remove objects from the behavior, or Select all objects in the behavior.
- Duration:
-
The total duration of the animation. The time between the first keyframe and the last keyframe.
- Play Mode:
-
Set the way the overall animation will play back. Once to start and stop from first to last keyframe. Loop to continually restart when the end of the animation is reached. Oscillate to play backwards and forwards when either end of the animation is reached.
- Position or Pivot mode:
-
Timeline Controls
Keyframe action buttons
- Keyframe time
-
The current time of the selected keyframe. Type a numeric value to move the keyframe to that precise time.
- Add new keyframe
-
Hotkey: “,” (comma). Adds a keyframe at the current time with the current position and orientation of the selected object.
- Update keyframe
-
Hotkey: “.” (period). Updates the currently selected keyframe with the position and orientation of the object. Overwrites any previous
keyed values.
- Delete keyframe
-
Hotkey: k”. Deletes the currently selected keyframe. If multiple keyframes are selected, all are deleted.
Frame navigation buttons
- Go to first keyframe
-
Moves the playback location to the first keyframe in the active timeline, and selects it.
- Go to previous keyframe
-
Moves the playback location to the next keyframe to the left of the current time in the active timeline, and selects it.
- Go to next keyframe
-
Moves the playback location to the next keyframe to the right of the current time in the active timeline, and selects it.
- Go to last keyframe
-
Moves the playback location to the last keyframe in the active timeline, and selects it.
Timeline navigation buttons
- Zoom In
-
Zooms the timeline in around the currently selected keyframe(s). The duration of the animation does not change, but the displayed
time fits into the window.
- Zoom Out
-
Zooms the timeline out around the currently selected keyframe(s). The duration of the animation does not change, but the displayed
time fits into the window.
Note
Timeline navigation can also be done with the standard navigation shortcuts and mouse movements. Alt-RMB to zoom in/ out, and Alt-MMB to pan left/ right.
Editing animations
Animations can be adjusted by editing single or multiple keyframes along the timeline.
Editing individual keyframes
- Move a keyframe interactively: click on the keyframe handle (it will turn orange to indicate it is selected) and drag it on the timeline. The Keyframe time
will update with the current position of the selected keyframe.
Note
Individual keyframes can be dragged “past” other keyframes in the timeline. This will significantly alter your animation!
- Move a keyframe numerically: click on the keyframe handle to select the key, and type a new time position in the Keyframe Time window.
- Delete a keyframe: press the k key or the button.
Editing multiple keyframes
Multiple keyframes on a single timeline can be edited at once. This permits scaling of the keyframes relative to each other,
as well as movement.
Keyframe animation modes
Keyframe animations are created by interpreting the changes between two or more set keyframes. The way the pivot rotations
and transforms are interpreted can be changed by setting the keyframe animation mode.
Set the keyframe animation mode
- Position mode: Preserves object positions at all keyframes. The animation between keyframes is based entirely on the object position and
orientation at the time the key was made. To alter the animation, reposition the object at either keyframe and update the
key.
For example: a door opens by rotating along a set axis. If the axis of rotation is not perfect in Position Mode, alter the
position at the end keyframe to match what is expected. If the rotation changes within the animation, set another key after
correcting the rotation at the interior time.
- Pivot mode: Updates object positions when the object pivot is moved. The animation between keyframes is based on the object position
and the pivot point for orientation. To alter the animation, reposition the pivot or reposition the object at either keyframe.
Changing the object pivot position will not alter the relative animation, but will affect object position at all keyframes.
This is similar to a traditional animation workflow. For example: a door opens by rotating along a set axis. If the axis of
rotation is not perfect in Pivot Mode, simply move the pivot to where the object rotation axis should be.
Keyframe animation limitations
- All transforms are keyed at once: In many dedicated animation applications, rotation, translation, and scale can be keyframed and manipulated separately for
each object on a single timeline. In Showcase keyframe animation behaviors, all three transforms are keyframed together.
For example: an object must move 10 units in 10 seconds, and rotate 90 degrees in 5 seconds. To achieve both of these, three
keyframes are needed. #1 at the initial (non) transformed location, #2 at 5 seconds with 90 degrees of rotation and 5 units
of movement, and #3 at 10 seconds with 5 more units of movement.
Note
This limitation can be overcome by grouping objects to themselves and animating the group nodes separately from the main object.
This allows each timeline and keyframes to be adjusted independently, while the single object inherits all transforms.
- Rotation greater than 180 degrees: Keyframe animation works by finding the shortest distance between keyframed positions and orientations. In cases of rotation,
this can mean that the shortest distance is actually the reverse of the direction the object was originally rotated.
For example: an object must rotate 270 degrees (3/4 of a revolution). A keyframe is set at rotation=0, and again after rotating
the object 270 degrees. The second keyframe is actually rotation=270 or -90, as the position is all that is considered. So
playback will result in -90 degree rotation (backwards of what is intended).
Note
To correctly rotate objects beyond 180 degrees, set keyframes at regular intervals less than 180. For 270 degrees, use 4 keyframes.
#1 at 0 degrees, #2 at 90 degrees, #3 at 180 degrees, and #4 at 270 degrees. Each increment is less than 180 degrees, so the
rotation takes place in the right direction.
- Relative speed: The common Playback Controls include + (plus) and - (minus) buttons to adjust the speed of playback. Once these are used,
the per-second notations on the timeline lose their absolute timing, but retain their relative distance to each other. In
other words, the animation speed has become relative.