To view the parameters for a particular material, select an object with that material and press Ctrl+M.
Select the surfaces you want to work with.
(The texture is applied over all of the surfaces you select.)
Click the Use image file radio button. (Decals require the use of an image file.)
Click the folder icon to browse to and select a texture map file.
Note
File names should not contain special characters.
(After importing the file, the date the file was imported appears beneath the browse field for your reference.)
To align the texture map to the surface, use the appropriate Mapping type option:
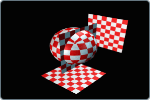
Parametric (UV)
No projection is used. Instead, the image is mapped to the UV coordinates of the surface. Each surface is mapped separately,
so adjoining surfaces may show seams.
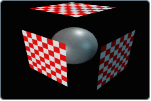
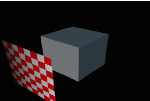
Planar
The projection of a texture or image as if the image were placed on a level surface and projected onto the object. Use this
option to apply a texture to one or more surfaces that are relatively flat, such as wood paneling.
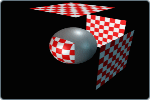
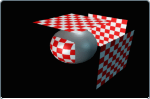
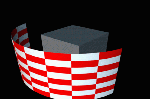
Triplanar
The projection of a texture from three perpendicular planes. Use this option for complex surfaces where the texture needs
to be applied from multiple angles to follow the contours of an object.
Cylindrical
The projection of an image onto an object, as if the image were rolled into a tube and projected inwards towards the object.
Use this option to apply a texture to the edge of a circular surface, such as a car tire tread.
Move the image map to best fit the surface. (See the next topics.)
To reload an image file after you have made changes to it, click the Reload button.