Show in Contents

Add to Favorites

Home: Autodesk Showcase Help

Exporting geometry

Exporting geometry

Enhance the APF model in Maya 2009

Export
As...
Showcase can export files
for use in other applications, or for use by other Showcase users.
This is also a convenient way to “compact” a file to contain just
selected or final information.
Exporting a scene as APF
- Hide
objects in the scene that you may not wish to export.
- Select File > Export As...
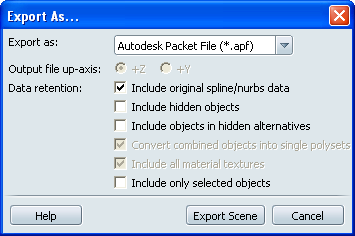
The Export options window
appears:
- Select Autodesk Packet File
(*.apf) from the file type dropdown menu.
- Check the appropriate Data Retention
options
- Include original spline/
nurbs data: will write out any referenced spline data
into the same APF file as the polygonal data used in Showcase. If
the original spline data is not available (see
Import models into your scene)
then no spline/ nurbs data will be included.
NoteHaving this option
checked can dramatically increase the file size, processing time,
and system resource (RAM) use, depending on the source files for
your scene.
- Include
hidden objects: will include any hidden objects in the
scene at export. Look in the Organizer (see
The Organizer)
for objects that are hidden before choosing this option.
- Include objects in hidden
alternatives: will include any objects that are part
of model alternatives that are not currently active (see
Set up and view model lineups).
- Convert combined objects
into single polysets: will write out objects that have
been combined (see
Combine and separate working guidelines and limitations)
in the Organizer as single polygonal objects in the APF file. To
preserve the current Showcase scene organization, this option is
checked by default.
- Include only selected
objects: will write out only the objects that are currently selected,
while applying any options above.
- Press the Export Scene button
and browse to the location for the file.
Supported entities
The Export as APF function
will only write out certain entities in your Showcase scene. Not
all elements of the scene file or referenced files will be exported.
Entities and objects
supported are:
- Polygonal object geometry:
this includes all LODs and alternatives (if hidden objects or hidden
alternatives are included), and any duplicated or mirrored objects
in the scene.
- Spline object geometry:
if the option to include spline/ nurbs data is checked. This option
will also increase the file size and processing time.
- Basic material colors:
this includes the Color and Highlight properties of Showcase materials,
but not image maps or ambient shadowing.
- Organizer hierarchy:
this includes only those nodes that are included in the export, and
some names may be modified on import in other applications.
- Flipped normals, patch reversals, and
patch deletions are preserved.
Exporting
a scene as FBX
Export as FBX is useful
for sending data prepared in Showcase to other applications that support
FBX, such as Autodesk®Maya™ or Autodesk®3DSMax™. The data can be
animated and brought back into Showcase (through FBX) or rendered
in the host application.
- Hide objects in the scene that you may
not wish to export
- Select File > Export As...
The Export options window
appears:
- Select FBX file from the file type dropdown
menu.
- Select your up-axis for the output file,
either Z-up or Y-up.
NoteMost animation systems are Y-up, while most
CAD and Design systems are Z-up, like Showcase.
- Check the appropriate Data Retention
options:
- Include hidden objects:
will include any hidden objects in the scene at export. Look in
the Organizer (see
The Organizer)
for objects that are hidden before choosing this option.
- Include objects in hidden
alternatives: will include any objects that are part
of model alternatives (see
Set up and view model lineups),
which may be hidden in the current view.
- Convert combined objects
into single polysets: will write out objects that have
been combined (see
Combine and separate working guidelines and limitations)
in the Organizer as single polygonal objects in the APF file. To
preserve the current Showcase scene organization, this option is
checked by default.
- Press the Export Scene button
and browse to the location for the file.
Included entities
The
Export as FBX function will only write out those entities in your
scene that are both supported by the FBX format and can be translated
from the Showcase scene. Not all elements of the scene file or referenced
files will be exported.
Entities and objects
supported are:
- Polygonal object geometry:
this includes the visible LOD and alternatives (if hidden objects
are included), and any duplicated or mirrored objects in the scene.
- Basic material colors:
this includes the Color and Highlight properties of Showcase materials,
but not image maps or ambient shadowing.
- Shots, as cameras:
this includes only the first frame of animated shots, for position and
orientation of the 3D camera.
- Organizer hierarchy:
this includes only those nodes that are included in the export, and
some names may be modified on import in other applications.
- Flipped normals and patch reversals are
preserved.
Exporting
as A3S (Autodesk Scene File)
Showcase uses the A3S
file as its basic container for scenes. Both Save and Save As... will
create these scene files, but exporting as a Scene File provides
further options for “compacting” the scene. This is useful for sharing
finished projects with others without all of the working files and
intermediate data.
- Hide
objects in the scene that you may not wish to export.
- Select File > Export As...
The Export options window
appears:
- Select Autodesk 3D Scene File
(*.a3s) from the file type dropdown menu.
- Check the appropriate Data Retention
options
- Include original spline/
nurbs data: will write out any referenced spline data
into the companion directory for the Scene. If the original spline
data is not available (see
Import models into your scene)
then no spline/ nurbs data will be included.
NoteHaving this option
checked can dramatically increase the file size, processing time,
and system resource (RAM) use, depending on the source files for
your scene.
- Include hidden objects:
will include any hidden objects in the scene at export. Look in
the Organizer (see
The Organizer)
for objects that are hidden before choosing this option.
- Include objects in hidden
alternatives: will include any objects that are part
of model alternatives that are not currently active (see
Set up and view model lineups).
- Include all material
textures: will write out any associated image texture
files into the companion directory with the scene file. To preserve
the visible textures in the scene, this option is checked by default.
- Include only selected
objects: will write out only the objects that are currently selected,
while applying any options above.
- Press the Export Scene button
and browse to the location for the file.
Tips and warnings
- When reading
the FBX into Maya or other 3D applications, uncheck the FBX import option Import
Edge Smoothing. Showcase does not write any edge smoothing
information, and this function can add visual artifacts and significant
extra processing time to imports in Maya.
- Save your scene before exporting to FBX.
The FBX export works entirely in available RAM. If your scene has
a large amount of polygons, many LODs, or you have many other applications
running, the export may fail to write all the data, and you may
lose data in Showcase.
- Export only the objects you want in the
FBX. Hide objects that do not need to be in the exported file, and
optimize the scene before exporting large heirarchies.