When ambient shadows are applied to a scene, it looks more realistic, with shadows added to corners and other dark areas of the scene. These shadows are the result of occlusion, or the blocking of objects by other objects.
When you bake (apply) ambient shadows onto a surface, they will darken the surface, regardless of which material is later applied to the surface. Because ambient shadows have this darkening effect on the look of materials, it is recommended you bake the ambient shadows before fine-tuning the look of materials.
Ambient shadows can be applied to imported mesh data, but their visual quality will be best when calculated from NURBS data.
Performance warning
Calculating ambient shadows can take a long time for a large complex model. For the most efficient workflow, experiment with a small and easily visible piece of a model to ensure that ambient shadowing provides the effect you’re looking for. Then ensure you are calculating ambient shadows on visible parts only. Calculations can be interrupted if they are taking too long, but no shadows will be applied.
Include ambient shadows in a scene
(If normals are not facing outward, unpredictable results may occur.) Check surface normals
(For example, you don’t need to create ambient shadows for bright parts of the model that don’t have crevices, holes or occluded parts. Decals and transparent objects such as glass should also be excluded to ensure they don’t occlude the surfaces underneath.)
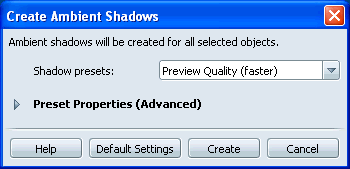
For most situations, the preset settings should be adequate. Use the faster shadow presets for faster calculations (but less quality); the slower presets for higher quality.
As you refine your scene and want to lighten dark areas, you may wish to customize the settings in this window. See Advanced ambient shadows settings.
(Select Default Settings to return to the default (recommended) settings.)
To avoid a patchwork appearance, don’t use different settings for adjoining surfaces of your model.
The program begins calculations to create the ambient shadowing. Do not try to use the software until this process is finished.
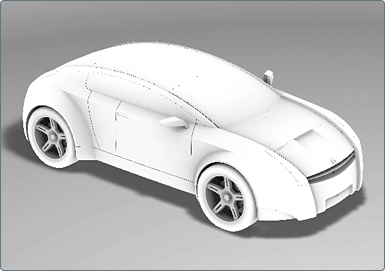
Verify ambient shadow maps
To see the maps that create the ambient shadows:
The materials disappear so that you can see which objects have ambient shadows calculated for them.
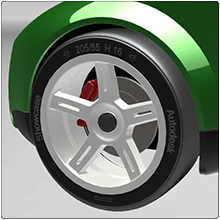
The darker areas show where ambient shadows are strongest (for example, the wheel wells in the image above). The white areas show where they are not applied.
Adjust ambient shadowing for individual surfaces
To lighten up or darken particular surfaces with ambient shadowing already applied to them:
The Adjust Ambient Shadows window appears.

Or, type a value larger than 100 into the field to darken the ambient shadows.
Adjust ambient shadow color by material
Each material can override the color of the ambient shadowing that is applied to it. This can both lighten and colorize the effect of the ambient shadows by material assignment.
To set the Self-shadow color:
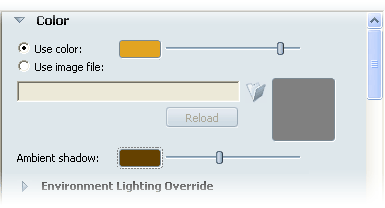
This color filters the color and brightness of any Ambient Shadows on the object that the material is applied to. (Black = default black ambient shading, White = no ambient shading visible, Color = colored ambient shadows on top of the current material)
For details on how to create and edit Materials, see Material property parameters.
Remove ambient shadows
(To remove it from every object, drag a selection box around all objects in the scene.