Why adjust ambient shadow settings?
Standard ambient shadow calculations may make objects too dark or muddy in certain situations. You may want to:
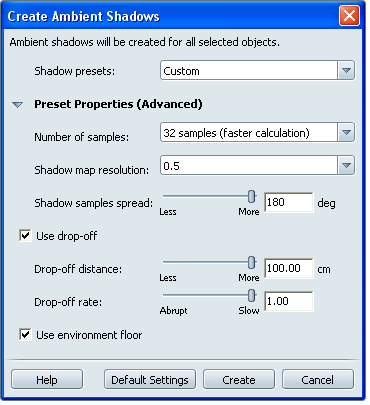
Use the Preview quality (faster) shadow presets for faster calculations (but lower quality). Use the High Quality (slower) presets for higher quality. To set custom properties, select Custom to use the Advanced preset properties.
(To add presets to this list, edit the file at C:\Program Files\Autodesk\Showcase \support\AmbientShadowsPresets\Presets.txt. Copy and paste the text for an existing preset, and then edit it to fit your needs.)
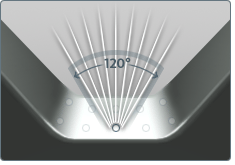
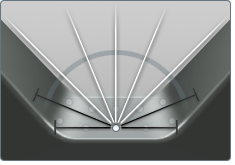
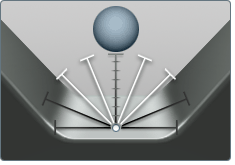
When calculating ambient shadows, the software shoots out a hemisphere of rays (samples) from a grid of sample points on the surface, and calculates how many of these rays hit other geometry. The larger the proportion of rays that hit other geometry for any particular point, the darker that point will appear.
A small number of samples means a fast calculation. A large number of samples means a slower calculation time but could result in more realistic ambient shadows.
Shadow map resolution determines how many sample points are used per given area to calculate ambient shadows. A higher resolution (with a large number of samples) could result in sharper detail, but will take longer to calculate.
A resolution value of 1.0 is recommended. A value less than 1.0 will provide a faster calculation time, but poorer results. Values higher than 1.0 will give sharper detail, but will increase calculation time.
This value is related to the texture resolution used in materials, and influences the size of material textures. For example, a shadow map resolution or 2.0 will result in material textures of roughly twice the area of those with a shadow map resolution of 1.0.
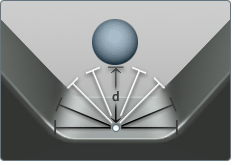
Select this check box to consider the distance of surrounding objects as one criteria when calculating ambient shadows. Drop-off is useful to lighten up surfaces in corners or recesses that are surrounded by other surfaces.
(When this setting is not checked, the same level of ambient shadowing is calculated for surrounding objects, regardless of their distance away.)
This check box must be selected to use the following controls:
Calculates lighter ambient shadows as surfaces are further away from the sampling point.
An Abrupt setting creates darker ambient shadows for surfaces close to the sampling point, and then quickly reduces the influence of surrounding objects the further away they are.
A Slow setting creates the same brightness of ambient shadowing regardless of the distance of surrounding objects, up to the drop-off distance.
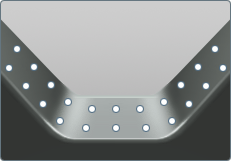
When checked, the environment floor (if any) is included when ambient shadows are calculated. For example, the undercarriage of a car will be dark.
Turn this setting off to illuminate the bottom of a model (for example, to show the effect of it floating in space or being underlit).