Paint Layers window


The Paint Layers window lets you create and organize layers of texture information (for example, diffuse color, specular, bump, reflection, and so on) as you paint on your 3D model.
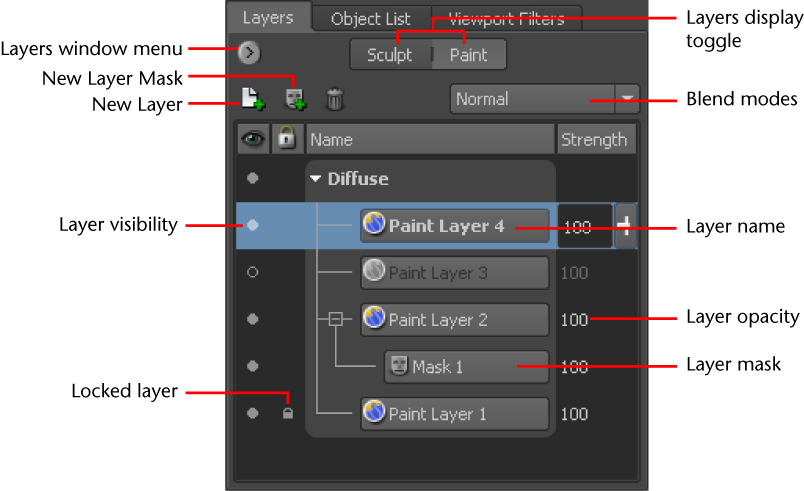
Paint Layer Blend modes

The following describes the behaviors of the layer blend modes available from the Paint Layer drop-down list. You can select blend modes on a per-layer basis and affect the appearance of the composite result. For more information, see Blend paint layers.

Note

Using layer blend modes on multiple layers does not necessarily produce the results described. Some experimentation with the settings (and changing the paint layer stacking order) are generally required.

Blend Paint Layers list

The following table lists the available layer blend modes in Mudbox and how they affect the appearance of the resulting texture for the layer to which the blend mode was set. That is, blend modes only affect layers at and below the layer to which the blend mode was set.

Layer Blend Mode Description

Normal

Displays A without any blending. This is the default setting.

Dissolve

Edits or paints each pixel to make it the result color. However, the result color is a random replacement of the pixels with the base color or the blend color, depending on the opacity at any pixel location.

Darken

Compares the values of A and B, and, for each pixel, uses the darker of the two.

Multiply

Multiplies the color values of each A and B pixel. Because non-white color channels have values of less than 1.0 (using a range of 0.0 to 1.0), multiplying them tends to darken colors.

Color Burn

Colorizes darker pixels from B with the color from A.

Linear Burn

Same as Color Burn but with less contrast.

Darker Color

Compares channel values total for blend and base color and displays the lower value color.

Lighten

Compares the A and B pixels at each location and uses the lighter of the two.

Screen

Makes the light areas much lighter, and the darker areas somewhat lighter.

Color Dodge

Colorizes lighter pixels from B with the A color.

Linear Dodge (Add)

Same as Color Dodge but with lower contrast.

Lighter Color

Same as Darker Color except displays the higher value color

Overlay

Darkens or lightens the pixels depending on the B color.

Soft Light

If the A color is lighter than mid-gray, the image is lightened. If the A color is darker than mid-gray, the image is darkened.

Hard Light

If a pixel color is lighter than mid-gray, screen mode is applied. If a pixel color is darker than mid-gray, multiply mode is applied

Vivid Light

Dodges or burns the colors by alternately increasing or decreasing the contrast, depending on the blend color.

Linear Light

Same as Vivid Light, except increases or decreases the brightness.

Pin Light

Replaces the B colors depending on the brightness of the A color. If the A color is lighter than mid-gray, B colors darker than the A color are replaced. And vice versa: If the A color is darker than mid-gray, B colors lighter than the A color are replaced.

Hard Mix

Produces either white or black, depending on similarities between A and B.

Difference

For each pixel pair, subtracts the darker one from the brighter one.

Exclusion

Similar to Difference but with lower contrast.

Subtract

Subtracts A from B.

Divide

Analyzes the color information in each channel, and then divides the base color from the blend color.

Hue

Uses the color from A; the value (brightness) and saturation from B.

Saturation

Uses the saturation from A; the value and hue from B.

Color

Uses the hue and saturation from A; the value from B.

Luminosity

Produces a result color from the saturation and hue of the base color, combined with the luminance of the blend color.
Note

Using layer blend modes on multiple layers in combination will not necessarily produce the results described. Some experimentation with the settings (and changing the paint layer stacking order) may be additionally helpful.

Paint Layers menu

Items available from the Paint Layers () menu.

New Layer

Creates a new layer directly above the selected layer.

Delete Selected

Deletes the selected layer.

Duplicate Selected

Makes a copy of the selected layer. The duplicate layer is inserted directly above the selected layer.

Freeze from Selected

Freezes the mesh based on the luminosity of your paint layers. Areas of low luminance (black) produce more freezing, and areas of high luminance (white) less freezing. If the layer has integer color, the freeze levels correspond to the full range of luminance. If the layer has floating-point color, the range of freeze levels is calculated relative to the lowest and highest image values. The lowest value produces the strongest freeze, and the highest pixel value produces no freeze.

See also Freeze mesh based on a paint layer.

Refresh Selected

Updates the selected paint layer with edits made to the texture image outside of Mudbox.

For example, if an image is edited and saved in Photoshop while that image is referenced in the current Mudbox session, you can refresh the paint layer associated with the edited image to update with those edits. When a paint layer is modified within Mudbox since the last file save, a warning message displays before executing the layer refresh to help avoid overwriting unsaved paint edits.

Merge Visible

Combines the visible paint layers into a single merged layer and then deletes them. See Merge paint layers.

Solo Selected

Toggles the display of all paint layers so that only paint from the selected layer displays on the model. The Visibility icon for the selected layer is on, while Visibility for all other paint layers is turned off, hiding paint from all other layers. See also Solo a paint layer.

Solo As Diffuse

Toggles the display of all paint layers so that only paint from the selected layer displays on the model, and sets the paint to display in flat color.

Unsolo

Toggles the display of paint layers so that paint from all layers is visible.

Import Layer

Imports a bitmap image from disk and applies it to a paint layer.

Import Layer Mask

Export Selected

Lets you save the selected layer as an image file. File formats include: .psd, png, bmp, tif, gif, jpg, tga, and OpenEXR. See also Create and edit paint layers using Photoshop.

Export Channel to PSD

Exports a paint channel containing one or more paint layers as a Photoshop .psd format file. The .psd file is 8 bit (RGBA). (Images that are 16 bit depth and higher are converted to 8 bit for the export).

A color background layer (Mudbox Background) and mesh layer (Mudbox Base Mesh) containing an image of the UV layout are included with the file. See also Export a paint channel containing multiple layers to Photoshop.

Import Channel from PSD

Imports a Photoshop .psd paint channel containing one or more paint layers that was previously exported from Mudbox. Mudbox determines what edits were made on the paint layers and imports only the layers that have changed since the original export, scales them if required, and converts them back to their original bit depth. The contents of the Mudbox Base Mesh and Mudbox Background layers are ignored during the re-import. See also Export a paint channel containing multiple layers to Photoshop.

Normal Map From Bump

Opens the Normal Map From Bump options, which let you set the Coordinate Space and Compatibility options you want, then creates a normal map from the selected bump map. One copy of the original bump map is kept unchanged in the Bump Map channel, and the converted normal map is added to the Normal Map channel.

See Convert a bump map to a normal map.

Adjust Color

Opens the Adjust Color options, letting you perform color correction operations on the selected paint layer. See Adjust Color window.

Related topics

Create a new paint layer

Rename a paint layer

Duplicate a paint layer

Import a paint layer

Save or export paint layers

Delete a paint layer