When different types of tracks are selected in the Story window, different settings that display in the Asset Settings window. These settings are generally the same as what is found on the track’s Action Track list area and the settings change depending on what type of track is selected.
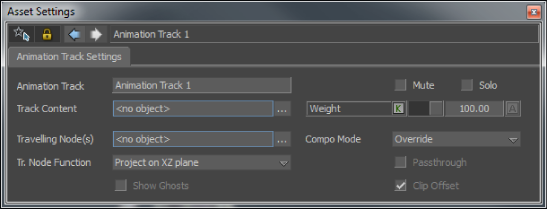
Animation track settings A. Track Name field for an Animation track B. Track Content field C. Travelling Node(s) field D. Tr. Node Function menu E. Show Ghosts option F. Mute option G. Solo option H. Weight settings I. Compo Mode menu J. Passthrough option K. Clip Offset option.
The Track Name indicates the track type. Double-click the Track Name to display additional track settings in the Asset Settings and in the Properties windows.
Use the Solo (S) and Mute (M) options (A and B) to activate or disable tracks. When a track’s Solo option is active, only that track plays and when a track’s Mute option is active, that track does not play. This means that all animation, video, audio, command, or constraint clip on a muted track is disabled.

Track Controls A. Solo option B. Mute option
For more information about tracks, see Edit Track list and Action Track list.
The Weight field lets you determine and animate what percentage a track’s clips are in effect, with 100% meaning fully animated and 0% meaning disabled.
For example, a Constraint track’s Weight field lets you define how much a track’s constraints are in effect. If you set the Weight value for a Constraint track containing a Position constraint at 50%, the position of the constrained object is halfway between its original position and the position of its source object.
The Destination menu in Audio tracks lets you select the audio card on which the audio track plays. When <none> is selected in the Destination menu, the track’s audio does not play.

Audio track A. Audio Destination menu
The Back Plate option lets you hide or display a Shot clip’s background image or video clip.
The background plane is a separate plane used only for projecting images or video clips. The size of the background plane matches the camera’s viewing area and remains a part of the camera’s view, even with the 2D magnifier, and the Turn Table options. For more information, see Back Plate pane.
Use a Character track’s Character menu to select the character you want to animate. Only characterized characters can be selected in Character tracks.

Track Controls A. Character menu
Use the Body Parts menu to select the parts of the character that are to be used in the animation. Use the menu to also select or deselect any character extensions or props included as track content.
Only the body parts selected in the Body Parts menu can be animated.

Track Controls A. Body Parts menu
For example, when only Right Arm and Right Hand are selected in the menu, you can only transform and animate the character’s right arm and hand. No other body part moves from its original location.
Selecting only a few parts of a character’s body also lets you create local blends. A local blend consists of replacing the motion in one track with motion from another track on only part of a hierarchy. For example, blending the lower body of a running character with the upper body of a waving character to create animation of a character running and waving at the same time.
The Track Content list displays the name of the asset that you drag onto an Animation, Character, or Camera Animation track. A track’s clips affect the asset selected in the Track Content list. These selected assets are often referred to as the track content.
Clicking the Track Content list displays the entire list of assets you have dragged into the track. The Remove button lets you remove objects from the list.
The Track Content button displays the Asset list. This Asset list lets you select assets and create local blends.
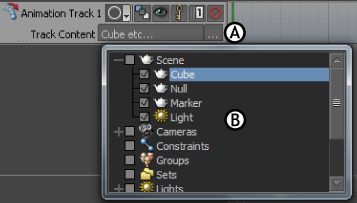
Animation track A. Track Content button B. Asset list
You can also find the Track Content list in the Asset Settings window when you double-click an Animation, Character, or Camera Animation track.
Double-click a character track in the Story window to access the Travelling Node(s) field in the Asset Settings window.
The Travelling Node(s) field lets you define a different travelling node. You can change where the travelling node displays by changing the option in the Travelling Node function menu (see Tr. Node Function).
The Travelling Node Function menu lets you determine where the travelling node displays. See Tr. Node Function for more information on travelling nodes.
The Show Ghost option lets you show or hide the ghosts of a selected clip. Ghosts are hidden by default. This option displays when an animation, camera animation, or character clip is selected.
The ghosts affected by the Show Ghost option include a selected clip’s model, clip vector, and match object ghosts. The Show Ghost option controls the visibility of these ghosts as a group.
Also, clip ghosts can display only if the ghost visibility options of the clip’s track is active. See Ghosts options for more information on track ghosts.
The Compo Mode menu lets you prioritize your track order and includes the following options:
| Option | Track behavior |
|---|---|
| Override | When you set a track to Override, you give the current track priority over any the tracks above it that have the same track content. The animation of any tracks above is disabled. For example, if the first track contains animation of a cube moving back and forth, and the track beneath contains animation of the same cube moving up and down, the first track’s animation does not play if you set the second track to Override. The track also overrides the current take selected in the Transport Controls window. |
| Additive | When you set a track to Additive, the track influences animation on other tracks. For example, if the first track contains animation of a cube moving back and forth, and the track beneath it contains animation of the same cube moving up and down, the animation in both tracks blend together. |
When you activate the Passthrough option, the animation on tracks beneath the selected track plays when there is no clip on the selected track.
When there is only one track in the Story window, and that track has no clips, the animation of the take selected in the Transport Controls window plays.
When you disable Clip Offset, the clip trajectories are locked in their original location. If you activate Clip Offset, you can translate and rotate clip trajectories in the Viewer window.
Clip Offset is useful when you need to keep part of a model in its original location. For example, when only a character’s upper body is selected in a track, translating the track’s clips stretches the character’s body apart unnaturally.
The character’s upper body is translated but the lower body is left behind. To keep this from happening, disable the Clip Offset option.

Using Clip offset A. When Clip offset is active, translating clips can create unwanted results B. When Clip offset is disabled, clips remain in their original position and cannot be translated or rotated.
If you want to use the Clip Offset option but freeze the clip vector in a location, you can move the clip vector, save the clip, then enable Clip Offset.
 Except where otherwise noted, this work is licensed under a Creative Commons Attribution-NonCommercial-ShareAlike 3.0 Unported License


