In the Story window, every time you insert a track, track controls appear in the Action Track list.
These Action Track controls let you move, stretch, expand, and collapse tracks. They also let you select animation options, hide or show ghosts, and activate or disable tracks.
The Track Controls change depending on what track you have. For example, all tracks have Solo and Mute buttons, but only a Character track has a Character menu.
Track controls include the following:
You can expand and collapse folders and tracks when you have a hierarchy of folders, tracks, or subtracks.
To hide or show the selected track’s subtracks, click the Collapse/Expand (- +) button (A and B) located at the upper left of the Track controls. Collapse and expand tracks when you use multiple hierarchies of tracks, or do not want to view all tracks simultaneously. See Insert Subtrack for more information on creating track hierarchies.
You can also resize tracks vertically if you want to display additional options or a better view of a track’s audio waveform. To resize the track, drag the bottom of its Track controls up or down.
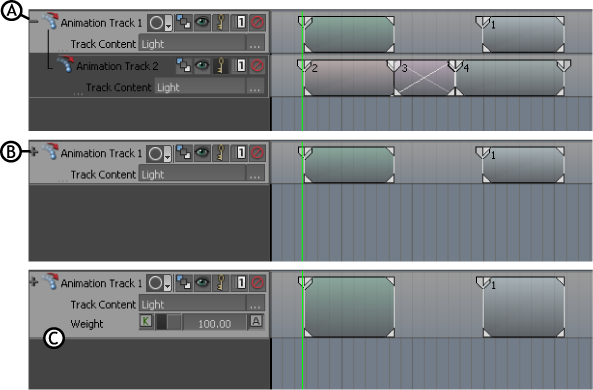
Tracks A. Collapse symbol B. Expand symbol C. Stretch track
The Track Name indicates the track type. Double-click the Track Name to display additional track settings in the Asset Settings and in the Properties windows.
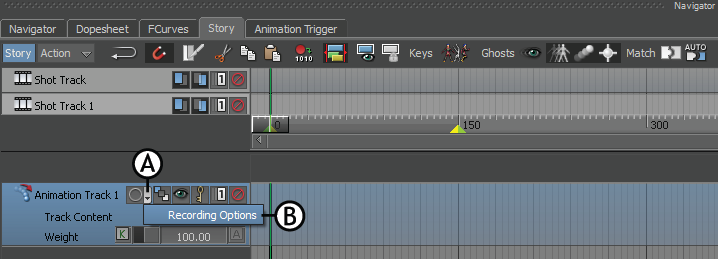
When you click the Record Mode button ( ) in the Story window > Generic, Character, or Camera Animation Track, the Animation Track Recording options window for that specific track appears. In this window, by default, the Always display checkbox is turned on. If you turn this checkbox off, then in your next session, you cannot invoke the Animation Track Recording options window by clicking the Record Mode button.

Animation Track Recording options window A. Always display checkbox turned on by default
The Record Mode menu includes the Recording Options.
Click the Recording Options option to display the Animation Track Recording options window.
Navigator window A. Drop-down list button B. Recording Options menu option
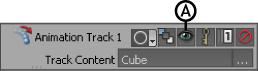
The Track Options button displays a menu, where you can select options that set how Animation, Character Animation, and Camera Animation tracks interact.
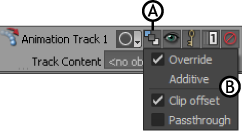
Track Controls A. Track Options button B.Track Options menu
When you select an Animation, a Character, or a Camera Animation track, these options also display in the Asset Settings window. You can find the Override and Additive options in the Compo Mode menu.
The Track Options menu includes the following options:
| Option | Function |
|---|---|
| Override | When you set a track to Override, you give the current track priority over any the tracks above it that have the same track content. The animation of any tracks above is disabled. For example, if the first track contains animation of a cube moving back and forth, and the track beneath contains animation of the same cube moving up and down, the first track’s animation does not play if you set the second track to Override. |
| Additive | When you set a track to Additive, the track influences animation on other tracks. For example, if the first track contains animation of a cube moving back and forth, and the track beneath it contains animation of the same cube moving up and down, the animation in both tracks blend together. |
| Clip Offset | When you disable Clip Offset, the clip trajectories are locked in their original location. If you activate Clip Offset, you can translate and rotate clip trajectories in the Viewer window. Clip Offset is useful when you need to keep part of a model in its original location. For example, when only a character’s upper body is selected in a track, translating the track’s clips stretches the character’s body apart unnaturally. The character’s upper body is translated but the lower body is left behind. To keep this from happening, disable the Clip Offset option. If you want to use the Clip Offset option but freeze the clip vector in a location, you can move the clip vector, save the clip, then enable Clip Offset. The Clip Offset option displays in the Track Options of Animation, Character, and Camera Animation tracks, as well as the Asset Settings window. |
| Passthrough | When you select Passthrough for a Animation, Character, and Camera Animation track, the animation on tracks beneath the selected track plays when there is no clip on the selected track. When there is only one track in the Story window, and that track has no clips, the animation of the take selected in the Transport Controls window plays. |

Using Clip offset A. When Clip offset is active, translating clips can create unwanted results B. When Clip offset is disabled, clips remain in their original position and cannot be translated or rotated.
Activate the Ghost Visibility option to hide and show all a track’s ghosts. Ghosts are hidden by default.
Track Controls A. Ghost Visibility option
See Ghosts options for more information on hiding all ghosts or only certain types of ghosts.
When a track’s Animate option is active, you can set keyframes on the track. You can see and edit these keyframes in the FCurves, Transport Controls, Dynamic Editor, and Dopesheet windows.
The Animate option is always disabled by default.
See Keyframe (K) and Animate (A) buttons for information on Animate options elsewhere in MotionBuilder.
Use the Solo (S) and Mute (M) options (A and B) to activate or disable tracks. When a track’s Solo option is active, only that track plays and when a track’s Mute option is active, that track does not play. This means that all animation, video, audio, command, or constraint clip on a muted track is disabled.

Track Controls A. Solo option B. Mute option
Use a Character track Character menu to select the character you want to animate. Only characterized characters can be selected in Character tracks.

Track Controls A. Character menu
Use the Body Parts menu to select the parts of the character that are to be used in the animation. Use the menu to also select or deselect any character extensions or props included as track content.
Only the body parts selected in the Body Parts menu can be animated.

Track Controls A. Body Parts menu
For example, when only Right Arm and Right Hand are selected in the menu, you can only transform and animate the character’s right arm and hand. No other body part moves from its original location.
Selecting only a few parts of a character’s body also lets you create local blends. A local blend consists of replacing the motion in one track with motion from another track on only part of a hierarchy. For example, blending the lower body of a running character with the upper body of a waving character to create animation of a character running and waving at the same time.
The Track Content list displays the name of the asset that you drag onto an Animation, Character, or Camera Animation track. A track’s clips affect the asset selected in the Track Content list. These selected assets are often referred to as the track content.
Clicking the Track Content list displays the entire list of assets you have dragged into the track. The Remove button lets you remove objects from the list.
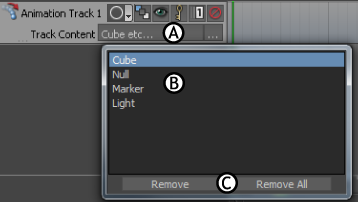
Animation track A. Track Content list B. Click on the list to see what you dragged into the track. C. Remove button
The Track Content button displays the Asset list. This Asset list lets you select assets and create local blends.
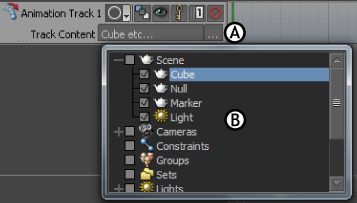
Animation track A. Track Content button B. Asset list
You can also find the Track Content list in the Asset Settings window when you double-click an Animation, Character, or Camera Animation track.
The Weight field appears in Animation, Character, Camera Animation, and Constraint tracks. It also displays in the Asset Settings window when you double-click on one of these tracks.

Weight field A. Animation track B. Constraint track
The Weight field lets you determine and animate to what percentage a track’s clips are in effect, with 100% meaning fully animated and 0% meaning disabled.
For example, a Constraint track’s Weight field lets you define how much a track’s constraints are in effect. If you set the Weight value for a Constraint track containing a Position constraint at 50%, the position of the constrained object is halfway between its original position and the position of its source object.
The Destination menu in Audio tracks lets you select the audio card on which the audio track plays. When <none> is selected in the Destination menu, the track’s audio does not play.

Audio track A. Audio Destination menu
The Volume settings in Audio tracks let you modify and animate the volume of the audio clips on Audio tracks.

Audio track A. Volume settings
 Except where otherwise noted, this work is licensed under a Creative Commons Attribution-NonCommercial-ShareAlike 3.0 Unported License


