This section describes the menu items and options for the Reference Editor.
Imports the selected reference’s objects directly into the current scene. See Import file references.
Saves edits that were made within the parent scene for a selected file reference to the corresponding referenced file on disk. The edits get transferred so they no longer reside within the parent scene. See Reference edits.
Exports changes made to objects in a scene (i.e. connected nodes) to a file you specify. You can then apply these edits to other scenes with the Assign Offline File option. See Export to an offline file.
References the edits from the file you select and applies them to the reference node selected in the Reference Editor. Maya applies edits by matching each nodename.attribute in the edit file to the file its being applied to.
For example, you can export a reference edit for pSphere1.translateX in the scene sphere.ma. This edit is saved in the reference file as <main>:sphere_pSphere1.translateX. You can then apply this edit to the scene ball.ma so that ball:pSphere1.translateX is edited. See Assign an offline file
When you reference or import a scene with Use namespaces on, Maya creates a new namespace that contains the referenced data. Turning on Use namespaces ensures that all nodes are uniquely named. See What are namespaces? and Create namespaces when referencing or importing.
The currently set namespace is indicated in the Namespace Options section by the  icon. Namespaces that are parents of the currently set namespace are indicated by an
  icon. You can set the current namespace in the Namespace Editor by clicking Set Current. See Namespace Editor Overview and Edit namespaces.
Namespaces do not effect selection, the DAG, the Dependency Graph, or any other aspect of Maya.
Merges the object's namespace wih an existing, selected namespace.
If duplicate namespaces occur, the namespaces are merged and duplicate object names are incrementally suffixed with a number. Use this option to avoid an accumulation of new namespaces each time your referenced or imported objects have the same namespace.
Lets you perform text substitutions on the offline edits file as it is applied to the scene. One or more sets of replacement text can be specified and are applied to the file in the order that they appear in the list.
For example, if you wanted to replace all the edits applied to an object named sphere1 and apply them instead to an object named sphere2 , you would type sphere1 in the Search for field and sphere2 in the Replace with field, and click Add.
Displays a current list of edits on the selected reference. You can refresh this window manually by clicking the Refresh Edits List button or remove specific edits by selecting them and clicking Remove Selected Edits. See List copy or remove reference edits.
When you reference a file from Maya 6.5 or earlier, some edits may not be recognized by the conversion process. These unknown edits are listed here. You can refresh this window manually by clicking the Refresh Edits List button or remove specific edits by selecting them and clicking Remove Selected Edits.
Removes all edits from the target reference node.
Using Clean Up Reference should be done only if you are certain that you will no longer require the edits it will remove. Using Clean Up Reference on a loaded reference removes all edits which could not be applied. Using Clean Up Reference on an unloaded reference will remove all edits, whether they could be applied or not, and so should be used with care to avoid unwanted data loss.
Loads or unloads the selected reference. If the current reference is already loaded, reload updates the loaded reference. This is useful when the reference file is being edited simultaneously. See Unload and reload file references.
Loads or unloads references related to selected objects.
For example, if you want to unload an object and the reference to which it belongs without having to open the Reference Editor and figure out which reference should be unloaded, you can simply  -click the object and choose Unload Related Reference. As well, you can select a locator or annotation, and then load its related references (you must select both the locator/annotation
and the foster parent node for this to work).
-click the object and choose Unload Related Reference. As well, you can select a locator or annotation, and then load its related references (you must select both the locator/annotation
and the foster parent node for this to work).
Duplicates the file associated with the selected reference. See Duplicate file references.
Locks or unlocks all of the nodes and attributes for a selected file reference. A lock icon appears beside the listed file reference within the Reference Editor to indicate the locked status. See Locking a file reference.

Adds a proxy reference to the currently selected file reference. When you select Proxy > Add Proxy > you can specify the file type to add and set the Proxy Tag Options within the Proxy Options window that appears.
If a proxy reference does not exist for the file reference, a proxy set is created for the proxy references for that file reference. If a proxy reference exists, the new proxy becomes a member of the existing proxy set for that reference.
When a proxy reference is created, the listed file reference updates to display a icon to indicate that one or more proxy references exist for that reference.
Select the file format you want to use as a default for the next time you add a proxy reference. If you have a project set up, when you open a scene, the browser points to the directory containing files of that type. On Windows and Mac OS X, it also sets the filter to display only files of the selected type.
Type the text string for the proxy tag you want applied to the proxy reference or select an existing tag from the list in the drop-down menu. When a proxy tag appears in gray in this list, it indicates that the tag is already in use for this specific file reference. The proxy tag appears in the Reference Editor.
After you create a proxy tag, it will become available for selection within the Proxy Tag Options drop-down menu in both the Proxy Options and Reference Options windows.
Proxy tags must be unique within a given proxy set. That is, a proxy tag will be available for a proxy set provided it is not already in use within the same proxy set. You can create your own tags and reuse them in different proxy sets.
Depending on the File Type you select, various File Type Specific Options are displayed here. See File > Open Scene in the Basics guide for more information.
Removes the proxy reference that is selected from the list of proxy tags that appears within the Remove Proxy submenu.
The list of available proxy references is displayed in the menu based on their proxy tags. The list of proxy tags is generated from all of the proxy tags currently in use within the proxy sets selected. When a proxy tag appears in gray, it indicates that it is currently loaded.
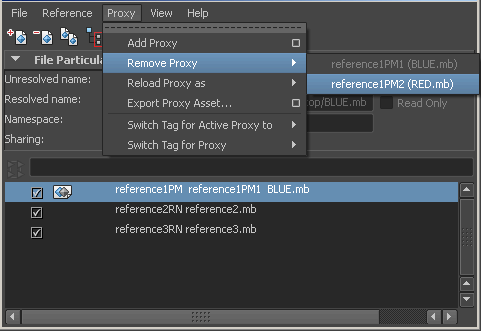
When a proxy reference is removed from a proxy set, and only a single file reference remains, the proxy set is removed and the reference returns to a normal reference state. In the Reference Editor, the icon is removed from the listed file reference, and the listed name of the file reference is updated.
Loads the proxy reference that is selected from the list of proxy tags that appears within the Reload Proxy As submenu. The list of proxy tags is generated from all of the proxy tags currently in use for the proxy sets selected. When a proxy tag appears in gray, it indicates that it is currently loaded.
Reload Proxy As is used to switch between proxy references for a given file reference. The list of available proxy references is displayed in the menu based on their proxy tags. When a proxy tag appears in gray, it indicates that it is currently loaded.
A proxy for a specific proxy set is only reloaded when the selected proxy tag matches one of the available tags for that set. For example, if multiple proxy sets are selected and the high proxy tag is chosen for reload, only those proxy references that have the high tag will be reloaded. Any proxy set that does not include the high tag will remain unchanged.
Exports a proxy asset for the selected asset (referenced or non-referenced). For more information about proxy assets, see Proxy assets.
For proxy asset options, see Assets > Export Proxy Asset.
Displays only the selected references.
Selecting this option also creates a new Reference View Set, which can be found in the View menu. This Reference View Set acts as a bookmark; selecting the created Reference View Set in the future filters the references in the Reference Editor and only displays the references that were selected when the Reference View Set was created.
See Reference View Sets.
The following file information displays when a referenced file is selected in the Reference Editor. You can select to show or hide this information by clicking on the disclosure triangle.
Displays the current namespace for the selected file reference. The namespace for a file reference can be edited within the text field. (This field appears when Use Namespaces is turned on.)
 Except where otherwise noted, this work is licensed under a Creative Commons Attribution-NonCommercial-ShareAlike 3.0 Unported License


