 |
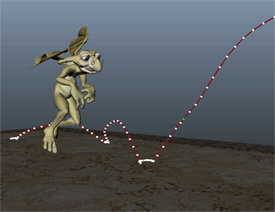
New editable motion trails let you preview your animation and interactively adjust keyframes within the 3D scene. Motion trails provide a visual representation of keys right around your animated models, letting you adjust the timing, keys, tangents, and position of animation directly. |
 |
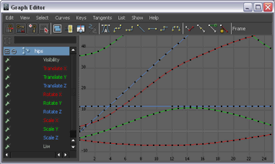
Several new options and preferences have been added to the Graph Editor to enhance curve editing workflows. In particular, animators who work with multiple Autodesk applications can expect increased consistency across curve editing tools. Graph Editor improvements include: A new preference lets you set neighboring keys to automatically align as you edit. Depending on your keyframe editing style, keep Snap Values to Adjacent Keys enabled to make similar, adjacent keys snap to identical values. See Snap Value to Adjacent Keys and Snap keys. As you move keyframes in the graph view, Auto tangents can automatically self-adjust to ensure smooth transitions, without overshooting maximum and minimum values. Auto tangents can save animators valuable time when roughing out animation, as tangents are naturally adjusted to avoid creating spikes. See Auto. This tangent type is common to several other Autodesk applications, and is the new default tangent type for new keys (set as the Default in tangent and Default out tangent in your Animation preferences). Quickly narrow your focus in the graph view by showing only the curves you want to work with. The new Curves > Isolate Curve option lets you easily view curves for selected channels only. See Isolate Curve and Filter curve display in the Graph Editor. The new Region tool provides a simple, more visual mechanism for scaling multiple keys in time and value. Select the Region Tool from the Graph Editor toolbar, select the region of curves you want, then drag the region handles to scale. See Region Tool and Scale keys or Scale curves. The View menu now includes a Classic Toolbar option which toggles the Graph Editor between the classic, full toolbar, and a more simplified toolbar that displays a smaller set of options. Switching off Classic Toolbar gives animators who primarily use Maya as part of a suite a more streamlined display of curve editing tools. See Classic Toolbar. In addition, several Graph Editor icons have been refreshed for this release. See Graph Editor toolbar for an overview of all icons. A new Left Mouse Button Alters Selections preference, on by default, lets you adjust selected keyframes with a single click. With this preference enabled, you can simply click and drag to move a selected keyframe in the graph view area. This keyframe manipulation mode will be familiar to animators who already use curve editing tools in other Autodesk products such as MotionBuilder. See Left Mouse Button Alters Selections and Use single-click curve editing. |
 |
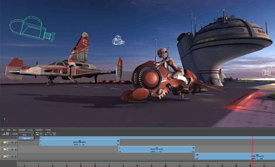
Create an ubercam to playback all camera shots in a sequence using a single camera. See Create a single camera for all shots in a sequence. When you create an ubercam, the Camera Sequencer bakes camera parameters from each shot to this single camera, letting you conserve camera switches. If you modify the source cameras in your shots, simply recreate the ubercam to update. The new Shot Playlist window lets you quickly edit camera shot parameters, such as shot length or the camera used. See Playlist and Change the length of a shot, and Change the camera used in a camera shot. |
Synchronized Channel Box, Graph Editor, and Time Slider
Two new items in the Channels menu of the Channel Box let you set whether to synchronize your selections in the Channel Box to the Graph Editor and Time Slider. When Sync Timeline Display is on, selecting channels in the Channel Box also filters the Time Slider to display only keys for those channels, and only those selected channels are keyed if you set a keyframe. When Sync Graph Editor Display is on, only curves for those selected channels display in the Graph Editor.
See Channel Box menus.
Maya now includes pre-rigged models of two cars and two planes from Craft Animations, as well as the Craft SoftMotionCam, ObserverCam, MultiStateCam, and HumanizerCam camera rigs.
You can use the vehicle rigs to quickly set up your existing vehicle models for animation, control the vehicles using custom input devices, and record keyframe animation of the vehicle actions and your camera rigs.
For information on installing and loading the plug-in, see Craft Animations plug-in.
For complete documentation on the Craft Animation rigs and cameras, use the Help menu in the Craft Animation Director Studio plug-in window. For more information on Craft Animation, see http://www.craftanimations.com.