Use the Timewarp command on the Desktop to speed up or slow down the action in a clip by decreasing or increasing the number of frames. You can also use the timing curve in the Timewarp Editor to produce more complex timing effects. For example, reverse the action in a clip or vary the rate at which the action occurs.
From the Desktop, you can create a timewarp by mixing frames together or by blending frames using an motion estimation option. For information on using motion estimation, see Creating Motion Estimation Timewarps.
To create a timewarp by mixing frames:
The Timewarp menu appears to the right of the Main menu.


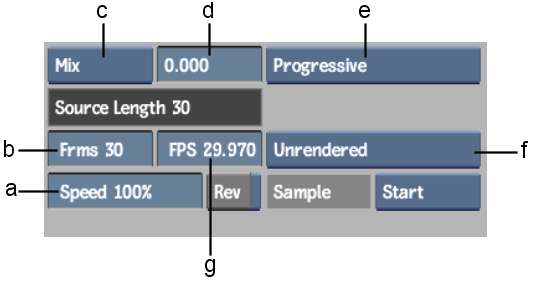
(a) Speed field (b) Frames field (c) Timewarp Processing option box (d) Mix Range field (e) Progressive/Interlaced option box (f) Render Mode box (g) FPS field
In the timewarped clip, each frame is mixed with its preceding and succeeding frames and produces a trail effect. The Mix Range field specifies the range of frames to be used in the mix. Use a higher value to produce more of a trail effect.
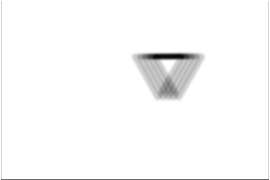
The following examples illustrate the difference between mix values of 5 and 25.

Triangle moves across the screen from left to right.
Same frame of animation with a mix value of 5.

Same frame of animation with a mix value of 25.
| To: | Enter: |
|---|---|
| Adjust the source clip to the specified number of frames | A number of frames in the Frames field. |
| Play the source clip at the specified frame rate | A frame rate in the FPS field. |
| Measure the timewarp as a percentage of the source clip | A percentage in the Speed field. A speed of 100% has no effect on the source, while a speed of 50% results in a timewarped clip that is twice as long as the source (and plays back half as fast). |
| Select: | To: |
|---|---|
| Rendered | Always render timewarps. |
| Unrendered | Never render timewarps. Timewarps will remain hidden until the clip is rendered using the Force Render command in the Editing menu. Select Unrendered if you want to edit the timewarp later in the Player or Batch timeline. |


