Assemblies are useful for creating combinations of geometry and light objects that act as lighting fixtures; you use them to represent the housing of a lamp and its light source or sources. You can use assemblies to represent lighting fixtures such as simple desk lamps, lighting strips, track systems, wall sconces with fluorescent or incandescent lights, chandelier systems, line voltage cable systems, and so on.

Object on the right is an assembly and is treated as a single entity.
When you create light assemblies, first you create your objects and build a hierarchy, then set joint parameters and assign inverse kinematics (IK). As a final step, you assemble the object hierarchy. The lights you use in the assembly have light-multiplier and filter color controls. You wire the Dimmer and Filter Color parameters of the Luminaire helper object to the parameters of the light sources that are members of the light assembly.
Assembly functionality is a superset of grouping. Like grouping, creating an assembly lets you combine two or more objects and treat them as a single object. The assembled object is given a name, and then treated much like any other object.
The main difference with assemblies is that, when you assemble the member objects, you specify a head object: a Luminaire helper object. The head object acts as a front end for the assembly, and its parameters appear in the Modify panel when the assembly is
selected. You can use these parameters to control the light sources in the assembly via parameter wiring. You can create other types of head objects with MAXScript; for further information, open the MAXScript Help, available from the Help menu, and look in Creating MAXScript Tools  Scripted Plug-ins Scripted Helper Plug-ins.
Assembly names are similar to object names, except that they’re carried by the assembly. In lists like the one in the Selection Floater, assembly names appear in square brackets; for example: [Assembly01]. In Scene Explorer and related dialogs, the square brackets enclose the assembly object icon instead.
General Features of Assemblies
Once you assemble objects, you can treat them as a single object in your scene. You can click any object in the assembly to select the entire assembly.
When you create an assembly, all of its member objects are rigidly linked to an invisible Luminaire helper object. The assembly uses the pivot point and the local transform coordinate system of this helper object.
You can nest assemblies. That is, assemblies can contain other assemblies (or groups), up to any level.
The head object parameters appear in the Modify panel when the assembly is selected. You can use the 3ds MaxWire Parameters functionality to connect these parameters to those of light objects in the assembly. For a step-by-step procedure, see To wire a head object to a light source.
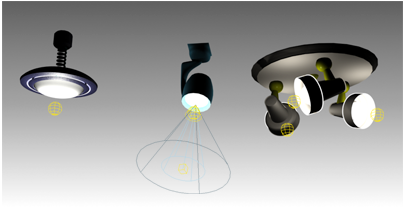
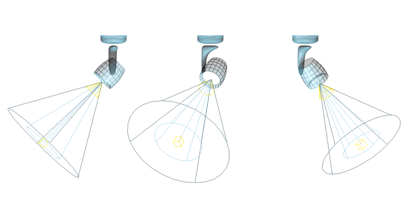
Luminaire types
Left: Fixed
Middle: Orientable
Right: Multiple lights
Transforming and Modifying an Assembly
You can transform or modify an assembly as if it were a single object, and you can animate the transforms.
Unlike a group, when you apply a modifier to the assembly, only the luminaire receives the modifier. Thus, deforming modifiers such as Bend don't have any effect on assemblies.
When you apply a transform to the assembly, it applies to the assembly as a whole. More precisely, 3ds Max applies transforms to the dummy object that represents the assembly. To modify member objects, you must first open the assembly, select the objects, and then apply modifiers. Such modifiers do not appear in the modifier stack when the assembly is closed.
You can transform and animate individual objects within an assembly independently from the assembly itself. However, when you transform the assembly itself, the transform affects all assembled objects equally. The assembly transform is uniformly added to objects that have independent motions. An analogy is a cage of birds, each flying around on its own, while the cage itself is being moved. In the case of assemblies, the "cage" (the dummy object) expands to surround all objects in the assembly, wherever the objects’ independent transforms take them.
Accessing Objects in an Assembly
You can open and close assemblies to access the individual objects contained in them without dissolving the assembly. These commands maintain the integrity of the assembly.
Using Make Unique with Assemblies
When you clone assemblies using instancing, and then make the clones unique, it's important to consider how this affects parameter wiring. Consider the following typical usage case:
When you clone-instance an assembly, all objects in the assembly, along with all the parameter wires, are instanced. So if you change a wired luminaire parameter, all instanced assemblies are affected.
When the modifier stack displays an assembly head that is an instance or reference, the Make Unique button is active. By clicking it, the assembly head object is made unique with respect to its instances and all the assembly members are also made unique.
The parameter wiring between the unique assembly head and its members is de-coupled from the other instances of the assembly. Changing the parameters of the unique assembly head object affects only the parameters of its own members, not the members of the other instances of the assembly.
When multiple assembly instances are selected, the Make Unique command works the same as when multiple instances of an object are selected. You're asked whether you want to make the selected assemblies unique one with respect to each other.
Make Unique command does not make the controllers unique. You can make them unique by doing the following: Open Track View,
select the Transform track for object whose controller you want to make unique, and click the Make Unique button in the Track
View toolbar.
You can permanently dissolve assemblies by either disassembling or exploding them. Both commands dissolve assemblies, but to different levels.
When you disassemble or explode an assembly, any transform animation applied to the assembly is lost, and objects remain as they were in the frame at which the dissolution is performed. However, objects retain any individual animation.
To transform or modify the objects within an assembly, you must first remove them from the assembly, either temporarily or permanently. The Open command lets you do this.
Comparing Assemblies with Other Selection Methods
Compared to the other methods you can use to combine objects in 3ds Max, assembling is more permanent than making a transient selection, but less permanent than attaching objects.
Each object in an assembly retains its modifier stack, including its base parameters. At any time, you can open the assembly to edit an object, and then close the assembly to restore the assembly identity.
To insert and place an existing assembly:
 (Use Pivot Point Center).
Assemble.
(Use Pivot Point Center).
Assemble.
A dialog appears requesting a name for the assembly and that you specify a head object. The only head object type available by default is Luminaire.
If more than one light source is present inside the assembly, create a chain of wired parameters. Then enter the desired relationship expression in the expression text box.
To adjust the pivot location of an assembly:
To use an assembly with radiosity: