Command entry:
Select the objects to assemble.

Group menu
Assembly
Assemble
The Assemble command combines a selection set of objects, assemblies, and/or groups into a single assembly, and adds a Luminaire helper object as a head object.
Once you assemble objects, you can treat them as a single object in your scene. You can click any object in the group to select
the entire assembly. You can transform the assembly as a single object, and you can apply modifiers as if it were a single
object.
Assemblies can contain other assemblies and/or groups, up to any level.
Assembly names are similar to object names, except that they’re carried by the assembly. In lists like the one in the Selection Floater, assembly names appear in square brackets; for example: [Assembly01]. In Scene Explorer and related dialogs, the square brackets enclose the assembly object icon instead.
Each member of an assembly inherits the visibility of the parent when a visibility controller is assigned to the parent, providing
its Object Properties Rendering Control group Inherit Visibility check box is turned on, or if its Rendering Control is set to By Layer and Inherit Visibility is turned
on for its layer.
Assemblies are considered whole objects in the Light Exclude/Include dialog, so you can exclude (or include) all objects in
an assembly by selecting the assembly in the list. If an assembly is nested within another assembly, only the "outer" assembly
is available in the list. To exclude only certain objects in an assembly, open the assembly before displaying the Exclude/Include
dialog.
Procedures
To define an assembly:
- Select two or more objects.
- Choose Group menu Assembly Assemble.
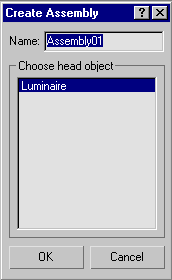
The Create Assembly dialog appears. It requests you to specify a name for the assembly and a head object. The default head object type is Luminaire.
- Enter a name for the assembly, choose Luminaire from the list, and click OK.
The selected objects are assembled. The assembly head object position and orientation is determined as follows:
- If there are multiple immediate children of the assembly head (for example, you're assembling several non-hierarchical objects),
the head object is aligned with center of bottom face of the assembly bounding box.
- If there's only one immediate child of the assembly head, the assembly head pivot point is aligned with that object's pivot
point. For example, if you're assembling a single hierarchy, the topmost object in the hierarchy would be the single immediate
child of the assembly head.
To define a nested assembly:
- Select two or more assemblies or any combination of assemblies and objects.
- Choose Group menu Assembly Assemble.
The Create Assembly dialog appears. It requests a name for the assembly, and a head object.
- Enter a name for the new assembly object and click OK.
To wire a head object to a light source:
- Create a hierarchy of lights and geometrical objects that models a lighting fixture. Sets up all the necessary IK chains and
other constraints that make the model behave properly when the user interacts with it (orients, positions, aims, etc.).
ImportantFor any photometric lights that you want to control with the head object, be sure to turn on the Multiplier check box on the
Intensity/Color/Distribution rollout.
- Select all objects in the fixture and define them as an assembly.
When the assembly is selected, the luminaire parameters Dimmer and Filter Color appear in the Modify panel.
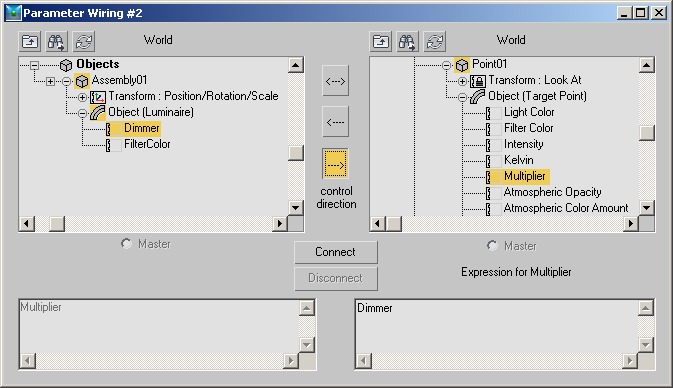
- From the Animation menu, choose Wire Parameters Parameter Wire Dialog.
- The Parameter Wiring dialog appears.
- On one side of the dialog, find the assembly and expand the branch titled Object (LuminaireHelper). Click the Dimmer item
to highlight it.
- On the other side, find the assembly and expand its hierarchy branch (click the + symbol in the square box). Find and expand
the branch for the light source, and then expand its Object branch. Click the Multiplier item to highlight it.
- Between the two hierarchy lists, click the Control Direction arrow button that points from the selected Dimmer item to the
selected Multiplier item.
- If you're wiring a photometric light, skip this step. If you're wiring a standard light, or any light whose default Multiplier
setting is 1.0, do this:
- The Expression box below the selected Multiplier item contains the word "Dimmer." Edit this to read "Dimmer/100". This divides
the Dimmer value by 100, giving a 1:1 value ratio between it and the Multiplier setting.
- Click the Connect button.
Now, when you change the luminaire's Dimmer setting, the light source intensity changes as well.
- If you like, use the same method to wire the luminaire to any additional light sources in the light fixture.
You can also use this method to wire the luminaire's Filter Color parameter to any light sources' color settings.
Interface
- Name
-
Specifies the name of the new assembly. The default name is "Assembly" followed by a two-place number starting with 01 and
incremented by one for each new assembly.
- Choose Head Object
-
Lets you choose the type of object to serve as the assembly head object.