The controls on this rollout affect how the mental ray renderer performs sampling for antialiasing rendered images.
To use low sampling for previews:
To use high sampling for final renderings:
Instead of rendering the image, mental ray draws a diagram that shows the range of applied sampling values. White lines indicate edges in the scene, where the mental ray renderer took the maximum number of samples. If fractional sample limits are used (sampling down), lighter dots indicate the higher value while darker dots indicate the lower value.
To assist with analysis, View Samples also draws red lines around each bucket, or separately rendered block.
When the Minimum and Maximum number of samples are equal, the diagram shows all buckets as white.
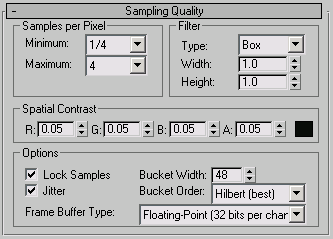
Set the minimum and maximum sample rates for antialiasing the rendered output.
Sets the minimum sample rate. The value represents the number of samples per pixel. A value greater than or equal to 1 indicates that one or more samples are computed per pixel. A fractional value indicates that one sample is computed for every N pixels (for example, 1/4 computes a minimum of one sample for every four pixels). Default=1/4.
Sets the maximum sample rate. If neighboring samples find a difference in contrast that exceeds the contrast limit, the area containing the contrast is subdivided to the depth specified by Maximum. Default=4.
The values of the Minimum and Maximum lists are "locked" together so that the value of Minimum can't exceed the value of Maximum.
Determines how multiple samples are combined into a single pixel value. Can be set to Box, Gauss, Triangle, Mitchell, or Lanczos. Default=Box.
Specify the size of the filtered area. Increasing the value of Width and Height can soften the image, however it will increase rendering time.
Default=Depends on the Filter type you choose:
This control sets the contrast value used as thresholds to control sampling. Spatial contrast applies to each still image.
If neighboring samples in a frame differ by more than this color, the mental ray renderer does recursive supersampling (that is, more than one sample per pixel), up to the depth specified by the Maximum samples per pixel value. Increasing the Spatial Contrast values decreases the amount of sampling done, and can speed the rendering of a scene at the cost of image quality.
When on, the mental ray renderer uses the same sampling pattern for every frame of an animation. When off, the mental ray renderer introduces a quasi-random (Monte Carlo) variation in the sample pattern from frame to frame. Default=on.
Varying the sample pattern reduces rendering artifacts in animations.
Introduces a variation into sample locations; see Sampling. Turning on Jitter can help reduce aliasing. Default=on.
Determines the size of each bucket in pixels. Range=4 to 512 pixels. Default=48 pixels.
To render the scene, the mental ray renderer subdivides the image into rectangular sections, or “buckets.” Using a smaller bucket size causes more image updates to be generated during rendering. Updating the image consumes a small number of CPU cycles. In most cases, adjusting this value has little or no effect on rendering time, but when rendering very large images, you can achieve faster results by setting Bucket Width to about 1/10th of the largest dimension in pixels. For example, when rendering a 4000 x 3000 image, set Bucket Width to 400.
Lets you specify the method by which mental ray chooses the next bucket. If you are using placeholders or distributed rendering, use the default Hilbert order. Otherwise, choose a method based on how you prefer to see the image appear as it renders in the Rendered Frame Window.
Lets you choose the bit depth of the output frame buffer:

Above: In a 16-bit rendering, bright highlights are muted.
Below: In a 32-bit rendering, bright highlights (on the lamp chains and the mirror), are strong and jagged.
For example, suppose a pixel is sampled four times, and an object occludes the pixel one of those times. In a 16-bit rendering, this results in a 25 percent grayscale value for the pixel. The same thing happens in a 32-bit rendering, unless the object is bright. In that case, the pixel might be 20 times brighter than its surroundings, so the result does not blend into its surroundings, and the rendered highlight appears to be jagged or “aliased.” While this effect is apparent in the 3ds Max Rendered Frame Window, it is only apparent: if you use the image in a compositing program that handles HDRI images, for example, or open it and adjust its levels in an image-processing program such as Photoshop, the image appearance will be correct.


