The controls in this rollout let you choose whether to render using ray-tracing, scanline rendering, or both. You can also choose the method used to accelerate ray-tracing.
The Trace Depth controls the number of times each ray can be reflected, refracted, or both.
To set trace depth for reflections and refractions:
The greater the number of reflections and refractions, the more slowly your scene will render. On the other hand, too low a value for Max. Reflections or Max. Refractions (or Max. Trace Depth, controlling both) can make your rendering look unrealistic.
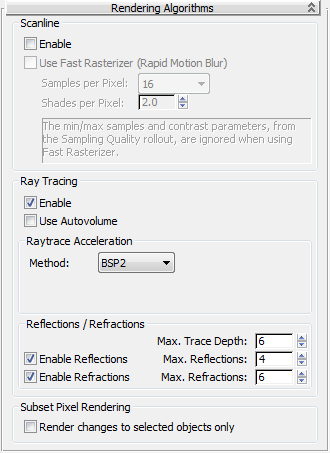
By default, Scanline is off and Ray Tracing is enabled for accurate rendering. Scanline rendering is used for direct illumination (“primary rays”) only; ray tracing is used for indirect illumination (caustics and global illumination) as well as reflections, refractions, and lens effects.
You can use both options together or disable either option, but not both. For example, if only Ray Tracing is enabled and you turn it off, 3ds Max enables Scanline rendering.
When on, uses a fast rasterizer method to generate the first generation of rays to trace. This can improve rendering speed. Default=off.
This option works well with object motion blur, and also with scenes that have no motion blur.
The following settings are available for the fast rasterizer:
 Time Samples label changes to Time Samples (Fast Rasterizer) to indicate that this version of Time Samples is now in effect.
When on, mental ray uses ray tracing to render reflections, refractions, lens effects (motion blur and depth of field), and indirect lighting (caustics and global illumination). When off, the renderer uses the scanline method only. Ray tracing is slower but more accurate and more realistic. Default=on.
To render reflections, refractions, depth of field, and indirect lighting (caustics and global illumination), Ray Tracing must be enabled.
When on, uses the mental ray autovolume mode. This lets you render nested or overlapping volumes such as the intersection of two spotlight beams. Autovolume also allows a camera to move through the nested or overlapping volumes. Default=off.
To use Autovolume, Ray Trace must be on, Scanline must be off, and the shadow mode must be set to Segments. (You set the shadow mode on the Shadows And Displacement rollout.) If these conditions aren't met when you click to turn on Autovolume, an alert warns you about this, and gives you the option of making the appropriate setting changes.
The drop-down list sets which algorithm to use for ray-trace acceleration. The other controls in this group box change, depending on which acceleration method you choose. These are the alternatives:
The BSP method has Size and Depth controls. See Ray-Trace Acceleration: Parameters for the BSP Method.
This method is the fastest on a single-processor system. Use it for small-to-medium size scenes on a single processor. BSP is also the best method to use when ray tracing is turned off.
(The default.) The BSP2 method is configured automatically by mental ray and has no controls. This method is optimized for large, static scenes; for example, a fully-furnished cafeteria.
BSP2 requires less memory than BSP and is able to flush memory when necessary. However, there could be a small performance loss when using it with smaller scenes.
Trace depth controls the number of times a light ray can be reflected or refracted. At 0, no reflection or refraction occurs. Increasing these values can increase the complexity and realism of a scene, at a cost of greater rendering time.
Limits the combination of reflection and refraction. Tracing of a ray stops when the total number of reflections and refractions reaches the Max. Trace Depth. For example, if Max. Trace Depth is set to 3 and the two trace depths are both set to 2, a ray can be reflected twice and refracted once, or vice-versa, but it can’t be reflected and refracted four times. Default=6.
When on, mental ray traces reflections. Turn off to improve performance when you don’t require reflections.
This control is also available on the Rendered Frame Window lower panel, as the leftmost position of the Glossy Reflections Precision slider.
This control is also available on the Rendered Frame Window lower panel, as the Max. Reflections parameter.
When on, mental ray traces refraction. Turn off to improve performance when you don’t require refraction.
This control is also available on the Rendered Frame Window lower panel, as the leftmost position of the Glossy Refractions Precision slider.
This control is also available on the Rendered Frame Window lower panel, as the Max. Refractions parameter.
When on, rendering the scene applies only to selected objects. Unlike using the Selected option for rendering, however, using this option takes into account all scene elements that affect its appearance. This includes shadows, reflection, direct and indirect lighting, and so on. Also, unlike Selected, which replaces the entire contents of the Rendered Frame Window (except for selected objects) with the background color, this option replaces only pixels used by the re-rendered selected objects.
Subset pixel rendering is particularly useful when performing iterative rendering and refinement of lighting, shadows, and other scene elements for a particular object or set of objects in the scene. It lets you re-render repeatedly to view the results of isolated changes without disturbing the rest of the rendered output.
This setting is also available on the Rendered Frame Window, as Subset Pixels (of selected objects).
When you choose BSP as the Raytrace Acceleration method on the Rendering Algorithms rollout, the parameters described here are displayed. BSP stands for Binary Space Partitioning.


