


Controls in this rollout affect the operation of the mental ray renderer with respect to translation of the scene to the format the renderer requires. They also let you save the translated scene to an MI file, which you can then use with a standalone renderer. The translated output uses the mental ray version 3 (mi3) format. The translator does not support mental ray version 1 (mi1).
To save the mental ray renderer settings:
To create a rendering from multiple passes:
 Selected option to render only those objects.
The partial rendering is saved in the PASS file you specified.
At this point, you might also want to turn off Save, unless you want the final result to be saved as a PASS file as well as a rendering.
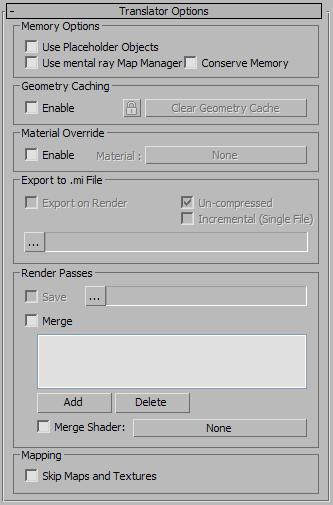
When on, 3ds Max sends geometry to the mental ray renderer only on demand. Initially, the mental ray scene database is populated only with the sizes (bounding box) and positions of objects in the 3ds Max scene. An object's geometry is sent to the rendering engine only when mental ray renders a bucket that contains the object. Default=off.
This option can improve rendering speed when a large amount of the scene's geometry is outside of the view you are rendering.
When the mental ray renderer is low on memory, Use Placeholder Objects enables it to increase available memory by deleting object geometry from the scene database. This can dramatically reduce memory usage, but at a possible cost in rendering speed.
When on, maps (typically file-based bitmap images) used in materials and shaders are read from disk and if necessary, translated to a format that the mental ray renderer can read. When off, maps are accessed directly from memory, and translation is unnecessary. Default=off.
Following is a complete list of differences between turning this option on and off:
Turning this option on is useful for large scenes that take a lot of memory to render. Turning it off is quicker, because textures already loaded in memory don’t have to be reloaded by mental ray.
You must turn on “Use mental ray Map Manager” when performing these actions:
See Distributed Bucket Rendering Rollout (mental ray Renderer).
When rendered with distributed bucket rendering and the mental ray map manager, images with textures can look different than when rendered with 3ds Max alone, because the filtering technique is different.
Tells the translator to be as memory efficient as it can. This can slow down the translation process, but reduces the amount of data being sent to the mental ray renderer. Default=off.
This option is useful when you are trying to render a huge scene and time is not necessarily an issue. When you render to an MI file, this option can also help reduce the size of the output file.
When on, this toggle also tells the mental ray renderer to save frames as temporary .map files. This allows you to render extremely large frames without running out of random-access memory.
The location of the temporary map files is chosen in the following order:
The entry should have the form
registry "{_MI_REG_FBDIR}" value "<path>" end registryGeometry caching lets you save the translated scene contents to a temporary file for reuse in subsequent renders. This can save time by omitting the translation step, especially with geometry-heavy scenes. Two levels of caching are available: standard and locked.
When on, rendering uses geometry caching. During the first render, the translated geometry is saved to the cache file. Then, in subsequent renderings of the same scene, the renderer uses the cached geometry for any unchanged objects instead of retranslating it. Any changed geometry is retranslated. Default=off.
This control is available on the Rendered Frame Window lower panel as Reuse Geometry.
 Lock Geometry Translation
When on, sub-object-level changes such as vertex editing or adjusting a modifier such as Bend are ignored and don’t cause retranslation. However, object-level changes such as moving or rotating an object are retranslated.
This control is available on the Rendered Frame Window lower panel as Reuse Lock Geometry Translation ( button).
This control is available on the Rendered Frame Window lower panel as Reuse Clear Geometry Cache.
Material Override allows you to render a scene with all its materials replaced by a single master material. For example, if you need to do a wireframe pass, you can create a Wire material and then specify it here. When you render, all surfaces will use the Wire material.
Click to display the Material/Map Browser and choose a material to use as the override. Once you have chosen an override material, this button displays the material name.
These controls let you save the translated scene in a mental ray MI file. Before exporting, you must specify an export file by clicking the ellipsis [...] button.
When on, exports an animation as a single MI file that contains a definition of the first frame and descriptors of the incremental changes from frame to frame. When off, exports each frame as a separate MI file. Default=off.
When you export an animation, turning on Incremental can save a considerable amount of disk space.
Controls in this group let you create a rendering out of multiple passes that render portions a scene. This can be a useful way to render large scenes or scenes that have complex effects. It can also be a way to divide the labor on a composited (“merged”) rendering. See the “Procedures” section, above, for more information.
When on, saves the image currently being rendered (prior to merging) inside the specified PASS file.
If you are rendering a time segment (that is, an animation), the PASS files are created with sequence numbers appended to the main file name (for example, test0000.pass, test0001.pass, and so on).
When on, the PASS files specified in the list will be merged into the final rendering.
If you choose a PASS file with a sequence number appended to its name, 3ds Max asks if you want to use the individual file or the entire sequence.
