


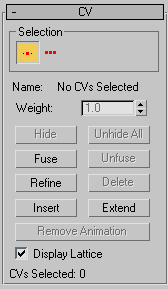
This topic describes the controls for CV sub-objects that lie on curves. A rollout labeled CV contains the CV sub-object controls for NURBS models. In addition to the CV rollout described here, the Curve CV sub-object level displays the Soft Selection rollout.
In you can edit the CVs in CV curves on surfaces as you edit other kinds of curve CVs. You can transform CVs in CV curves on surfaces, but you can't move the CVs off the surface. Using the Curve CV sub-object level is an alternative to editing these CVs by using the Edit Curve on Surface dialog.
To transform curve CV sub-objects:
 select one or more CVs.
The sub-object selection tools are the same as for other kinds of sub-objects. You can also use the H key while the Keyboard Shortcut Override toggle is on. See Sub-Object Selection.
The Selection group box, described under "Interface" later in this topic, provides some additional options for selecting CV sub-objects.
 (Select And Move) or another transform and then drag in a viewport to transform the selection.
The shape of the model changes as you interactively transform the CVs.
Rotate and Scale are useful only when you've selected multiple CVs.
 When you transform NURBS CV sub-objects, the Lock Selection Set button can be useful. You can make a selection in one viewport,
click Lock Selection Set (or press the Spacebar), and then transform the selection in a different viewport.
When you transform NURBS CV sub-objects, the Lock Selection Set button can be useful. You can make a selection in one viewport,
click Lock Selection Set (or press the Spacebar), and then transform the selection in a different viewport.
To use the keyboard to select curve CV sub-objects:
You can select curve CV sub-objects using the Ctrl key and the arrow keys. The arrows traverse the sub-objects in the order they were created. To do so, follow these steps:
 (Keyboard Shortcut Override Toggle).
Click or drag to select CVs.
(Keyboard Shortcut Override Toggle).
Click or drag to select CVs.
For CVs on curves, the arrow keys traverse the CV selection along the length of the curve. The arrow keys don’t move between curve sub-objects.
You can also use the H keyboard shortcut (while the Keyboard Shortcut Override Toggle button is on) to display a dialog and select CVs by name. Ctrl+H displays only the names of CVs directly beneath the mouse cursor.
Select a CV.
The CV is deleted and the shape of the curve is updated.
A CV is added at the location you clicked. Neighboring CVs move away from the new CV in order to preserve the original curvature.
To add CVs and extend the length of a curve:
The first CV you choose acquires the position of the second CV, and becomes dependent to it. If the first CV has an animation controller, the controller is discarded. If the second CV has an animation controller, the first CV acquires it too.
Move is the most common transform to use. Rotate and Scale can be used with a non-local transform center.
In addition to the CV rollout described here, the Curve CV sub-object level also displays the Soft Selection rollout.
Curve sub-object selection controls
 Single CV
 All CVs
Shows either "No CVs selected", "Multiple CVs selected", or "CurveName(index)", where "CurveName" is the name of the CV's parent curve, and "index" is the CV's U location along the length of the curve. You can't edit the Name field to customize the names of CVs.
If CVs are fused, the Name field shows the name of the first CV.
Adjusts the weight of the selected CVs. You can use a CV's weight to adjust the CV's effect on the curve. Increasing the weight pulls the curve toward the CV. Decreasing the weight relaxes the curve away from the CV.
Increasing weight is a way to harden a curve; that is, to sharpen its curvature at a particular location.
By default, the weight is 1.0 for the CVs of NURBS objects that you create on the Create panel or the NURBS sub-object creation rollouts. The weight of CVs in geometry that you convert to NURBS can vary, depending on the object's original shape.
You can change the weight when multiple CVs are selected. Using the Weight field or spinner while multiple CVs are selected assigns all of them the value you choose. Because weights are relative to each other (rational), using the Weight control when all CVs are selected has no visible effect.
Fuses a CV to another CV. (You can't fuse a CV to a point, or vice versa.) This is one way to connect two curves. It is also a way to change the shape of curves.
Fusing CVs does not combine the two CV sub-objects. They are connected but remain distinct sub-objects that you can unfuse later.
Fused CVs behave as a single CV until you unfuse them. Fused CVs behave similar to a single point, but the property of multiplicity for coincident CVs also applies. (See NURBS Concepts and CV Curve.) The fused CVs have proportionally more influence on the curve. The curve can become sharper in the fused CVs' vicinity, or even angular if more than two CVs are fused together.
Fused CVs are displayed in a distinct color. The default is purple. (You can change this color using the Colors panel of the Customize User Interface dialog.)
Refines the curve by adding CVs.
As you move the mouse over the CV curve, a preview of the CVs that will be added, and their locations, is displayed in blue.
Inserts CVs into the curve. Click Insert and then click the curve where you want to insert the new CV. Inserting CVs is similar to refining with CVs, except that other CVs in the curve do not move. This means that the shape of the curve changes when you insert.
Inserting CVs does not remove animation from the curve, as refining does.
When on, displays the control lattice that surrounds CV curves. When off, the control lattice isn't shown in viewports. Default=on.

 Modify panel